


In This Article Show
Keeping kids busy on rainy afternoons or during long weekends can be a real challenge. You want something simple, low-cost, and not too messy—ideally with stuff you already have at home.

This list gives you fun, useful recycled crafts for both kids and adults, so you can make storage, toys, gifts, and decor without buying much.
Each project reuses common items and turns them into something you’ll actually use. Let’s jump into the ideas!
1. Cereal Box Magazine Holder

This sturdy holder looks like a slim, upright file you’d see on a desk, cut on a diagonal so magazines and papers peek out. It’s satisfying because you turn trash into neat storage, and kids love painting bold patterns on the sides.
Materials Needed:
- Empty family-size cereal box, flap opened and cleaned
- Scissors or craft knife (adult use)
- Paint or colored paper
- Glue stick or tape
- Stickers or markers
How to make it:
- Mark a diagonal line from one top corner to the opposite side’s midpoint; cut along the lines to create the holder shape.
- Reinforce edges with tape if needed.
- Paint or cover with colored paper and add designs.
- Let dry and place magazines, notebooks, or mail inside.
2. Tin Can Pencil Caddy

This organizer looks like a shiny metal cup wrapped in bright paper bands with labeled sections for pens, markers, and brushes. Kids enjoy the quick transformation and the clinking sound as supplies drop in; adults love how tidy it keeps a desk.
Materials Needed:
- Clean, label-free tin can (edges checked for safety)
- Washi tape or scrap fabric
- Craft glue or double-sided tape
- Ribbon or string
- Labels or sticker dots
How to make it:
- Wash and dry the can; check the rim and cover sharp edges with tape if needed.
- Wrap the can with washi tape or glue on a fabric strip.
- Add labels or sticker dots to mark sections.
- Tie ribbon around the middle and fill with pencils.
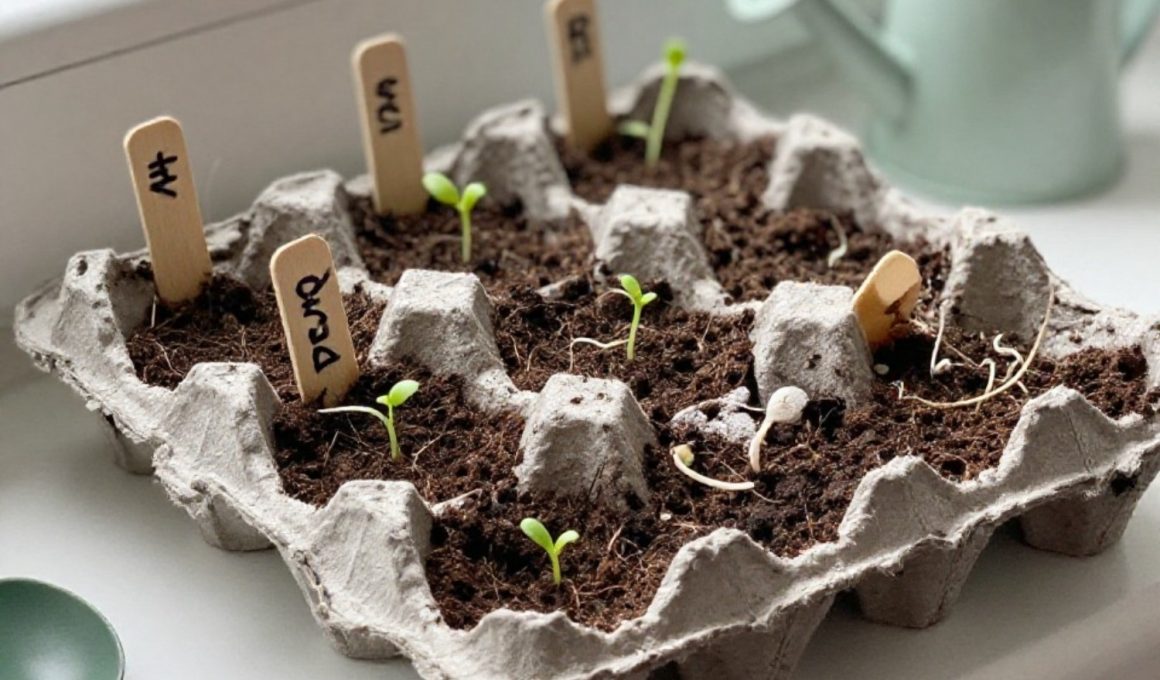
3. Egg Carton Seed Starters

These mini planters look like a grid of small cups filled with soil, each labeled with a seed name, perfect for a sunny windowsill. Kids love checking daily for sprouts and feel proud when tiny leaves appear.
Materials Needed:
- Cardboard egg carton (not plastic)
- Potting soil
- Seeds (herbs or flowers)
- Spoon for scooping
- Marker and craft stick labels
How to make it:
- Cut the lid off the egg carton and place the cup section on a tray.
- Fill each cup with soil and press in seeds according to packet instructions.
- Label each row with craft sticks and water lightly.
- Place in a sunny spot and mist daily.
4. T-Shirt Tote Bag (No-Sew)

This soft tote looks like a casual fabric bag with fringe knots along the bottom and the shirt’s neckline as the handle opening. Kids enjoy choosing old shirts with fun graphics, and the no-sew knots make it easy and quick.
Materials Needed:
- Old cotton T-shirt (adult or kid size)
- Scissors
- Ruler or chalk
- Safety pin (optional for stretching fringe)
How to make it:
- Cut off the sleeves and widen the neck opening to your preferred handle size.
- Turn the shirt inside out, cut 3-inch slits along the bottom to create fringe, front and back.
- Tie matching fringe pairs into tight knots across the bottom.
- Turn right side out and test with light items.
5. Cardboard Roll Desk Organizer

This organizer looks like a cluster of paper tubes of different heights glued to a sturdy base, perfect for pens, brushes, and rulers. Kids enjoy choosing colors and arranging the tubes like a city skyline.
Materials Needed:
- Toilet paper or paper towel rolls
- Cardboard base (from a box)
- Paint or colored paper
- White glue or hot glue (adult use)
- Stickers or washi tape
How to make it:
- Cut rolls to varied heights and paint or wrap them.
- Glue rolls upright onto the cardboard base in a tight cluster.
- Add washi tape borders or stickers for fun accents.
- Let dry fully before filling with supplies.
6. Jar Lantern with Tissue Glow

This lantern looks like a frosted, colorful jar that glows softly when a tea light is inside. Kids love layering tissue shapes and watching the colors blend when lit.
Materials Needed:
- Clean glass jar with lid removed
- Tissue paper scraps
- Mod Podge or watered-down white glue
- Foam brush
- LED tea light
How to make it:
- Brush a thin glue layer on the outside of the jar.
- Stick tissue pieces around the jar, overlapping for a stained-glass look.
- Seal with another thin glue coat and let dry.
- Place an LED tea light inside and enjoy the glow.
7. Plastic Bottle Planter Friends

These planters look like cute animal faces or friendly monsters made from cut plastic bottles, with plants growing like “hair.” Kids love drawing faces and giving each planter a name.
Materials Needed:
- Clean plastic bottles (soda or water)
- Scissors (adult help for cutting)
- Acrylic paint and markers
- Googly eyes (optional)
- Potting soil and small plants or herbs
How to make it:
- Cut the bottle about one-third from the bottom; flip the top upside down into the base if you want self-watering, or just use the bottom as a pot.
- Paint or draw faces and add googly eyes.
- Fill with soil and plant herbs or succulents.
- Water lightly and place by a window.
8. Cereal Box Drawer Dividers

These dividers look like neat little open-top boxes that fit snugly in a drawer to sort socks, art supplies, or utensils. Kids enjoy measuring and decorating, and the result makes any messy drawer look calm.
Materials Needed:
- Empty cereal boxes
- Ruler and pencil
- Scissors or craft knife (adult use)
- Wrapping paper or contact paper
- Tape or glue
How to make it:
- Measure drawer height and cut boxes to that height.
- Cover each box with wrapping paper or contact paper.
- Tape or glue edges neatly inside for strength.
- Arrange in the drawer and fill with items.
9. Sock Rice Heat Pack

This cozy pack looks like a soft, chunky tube or cute animal-shaped bundle you can warm in the microwave. Kids enjoy filling and decorating simple faces, and adults love using it for sore shoulders or cold hands.
Materials Needed:
- Clean thick sock (no holes)
- Uncooked rice
- Funnel or paper cone
- Ribbon or string
- Fabric markers or felt scraps
How to make it:
- Use a funnel to fill the sock with rice, leaving a couple inches at the top.
- Tie the opening tightly with ribbon or string.
- Draw a face or glue felt features if you like.
- Warm in the microwave for 30–60 seconds (adult supervision) and enjoy.
10. Bottle Cap Magnets

These tiny magnets look like colorful circles with mini art inside—painted patterns, photos, or pressed glitter. Kids love designing quick, bite-size art and seeing it hold notes on the fridge.
Materials Needed:
- Metal bottle caps
- Small magnet discs
- Strong craft glue
- Paint, tiny photos, or stickers
- Clear sealant or Mod Podge (optional)
How to make it:
- Clean and dry the caps.
- Decorate the inside with paint, stickers, or tiny photos and seal if desired.
- Glue a magnet to the back and let dry completely.
- Stick on the fridge to hold lists or drawings.
11. Newspaper Gift Bags

These bags look like chic, folded paper sacks made from printed pages with sturdy handles. Kids enjoy choosing funny headlines, and the bags make any gift feel smart and eco-friendly.
Materials Needed:
- Full newspaper sheets
- Glue stick or double-sided tape
- Cardboard strip for base support
- Hole punch
- Twine or ribbon handles
How to make it:
- Fold a newspaper sheet around a book to size it, then glue the side seam.
- Fold and glue the bottom like a standard paper bag; add a cardboard strip inside for strength.
- Punch two holes at the top and knot twine handles.
- Decorate with a tag or doodles.
12. Milk Jug Watering Can

This looks like a simple, sturdy watering jug with a lid full of tiny holes that create a gentle shower. Kids enjoy helping water plants and counting the holes they poke.
Materials Needed:
- Clean plastic milk jug with cap
- Pushpin or small nail
- Permanent marker
- Stickers or paint pens
How to make it:
- Rinse the jug and remove labels.
- Use a pushpin to poke several small holes in the cap.
- Decorate the jug with stickers or paint pens.
- Fill with water, screw on the cap, and water plants.
13. Fabric Scrap Bookmarks

These bookmarks look like slim fabric strips with neat edges and a cute ribbon tab at the top. Kids enjoy mixing patterns, and readers love using something soft and handmade.
Materials Needed:
- Fabric scraps from old clothes
- Cardstock strip (recycled packaging)
- Glue stick or fabric glue
- Ribbon piece
- Scissors
How to make it:
- Cut cardstock to bookmark size and glue fabric on both sides.
- Trim edges cleanly; tuck and glue a ribbon loop at the top.
- Press under a book to flatten while drying.
- Use in your current read or gift to a friend.
14. Bottle Bracelet Loom

This tool looks like a cut plastic bottle ring with evenly spaced notches that hold yarn to weave simple friendship bracelets. Kids love how fast the bracelets come together using yarn scraps.
Materials Needed:
- Clean plastic bottle
- Scissors (adult help)
- Permanent marker
- Yarn or embroidery floss scraps
- Tape
How to make it:
- Cut a 1–1.5 inch ring from the bottle and smooth edges with tape if needed.
- Mark and cut small notches evenly around the ring.
- Wrap yarn in the notches as warp threads; weave another color over-under.
- Tie off ends and slide off your bracelet.
15. CD Sun Catcher

This sun catcher looks like a rainbow disc with beaded dangles that sparkle in the window. Kids enjoy seeing the light dance across the room.
Materials Needed:
- Old CDs or DVDs
- Fishing line or thread
- Beads or buttons
- Hole punch for CDs (or use existing center hole)
- Tape or clear adhesive hooks
How to make it:
- Clean the CD; use the center hole or carefully punch small holes near the edge (adult help).
- Thread beads onto fishing line and tie through holes to make dangles.
- Add a top loop for hanging.
- Hang in a sunny window and watch the colors.
16. Shoe Box Lid Wall Shelf

This looks like a shallow, framed shelf mounted on the wall, perfect for mini figures, spices, or art supplies. Kids enjoy painting bold borders, and adults love the light, renter-friendly storage.
Materials Needed:
- Sturdy shoe box lid
- Paint or contact paper
- Strong double-sided mounting tape or removable strips
- Ruler
- Optional washi tape trim
How to make it:
- Paint or cover the lid inside and along the rim.
- Reinforce corners with tape if needed.
- Add washi tape trim for a clean edge.
- Mount level on the wall using strong strips and place lightweight items inside.
17. Paper Scrap Notepad

This pad looks like a chunky stack of small pages bound at the top with a colorful tape spine. Kids enjoy stamping the cover and tearing off sheets for doodles or lists.
Materials Needed:
- Paper scraps (one side clean)
- Binder clips
- White glue
- Strip of washi tape
- Stamp or marker for cover
How to make it:
- Cut scraps to the same small size and stack neatly.
- Clamp the top edge with binder clips and brush white glue along the edge.
- Press a strip of washi tape over the glued spine.
- Decorate the cover page and let dry before use.
18. Gift-Card Holder from Toilet Roll

This holder looks like a small pillow box with folded ends that neatly hides a gift card. Kids enjoy decorating the outside with patterns and tags.
Materials Needed:
- Empty toilet paper roll
- Wrapping paper or painted design
- Glue stick
- Ribbon or twine
- Tag or sticker
How to make it:
- Flatten the roll gently and fold curved flaps inward on each end to make a pillow box.
- Wrap or paint the outside and let dry.
- Slide in a gift card and tie with ribbon or twine.
- Add a tag and gift it.
19. Denim Pocket Wall Organizer

This organizer looks like a row of jean pockets mounted on a hanger, ready to hold mail, brushes, or small toys. Kids like cutting old jeans and choosing pocket layouts, and the result is stylish and tough.
Materials Needed:
- Old jeans with intact back pockets
- Scissors
- Strong glue or needle and thread (optional adult help)
- Cardboard backing or fabric scrap
- Hanger or dowel with string
How to make it:
- Cut pockets from jeans, leaving a small fabric border around each.
- Arrange and glue or stitch pockets onto a cardboard or fabric backing.
- Attach the backing to a hanger or dowel with string.
- Hang and fill with mail, art tools, or notes.


