

In This Article Show
Summer days can feel long when you’re trying to keep little hands busy and happy. If you need easy projects for daycare, a classroom, or a rainy afternoon, this list is for you.
These summer-themed crafts are simple, colorful, and use common supplies you likely already have. You’ll find quick wins and playful keepsakes that spark creativity and calm. Let’s jump into bright, beachy, and sunshine-filled ideas kids can make right now.
1. Paper Plate Sun Faces
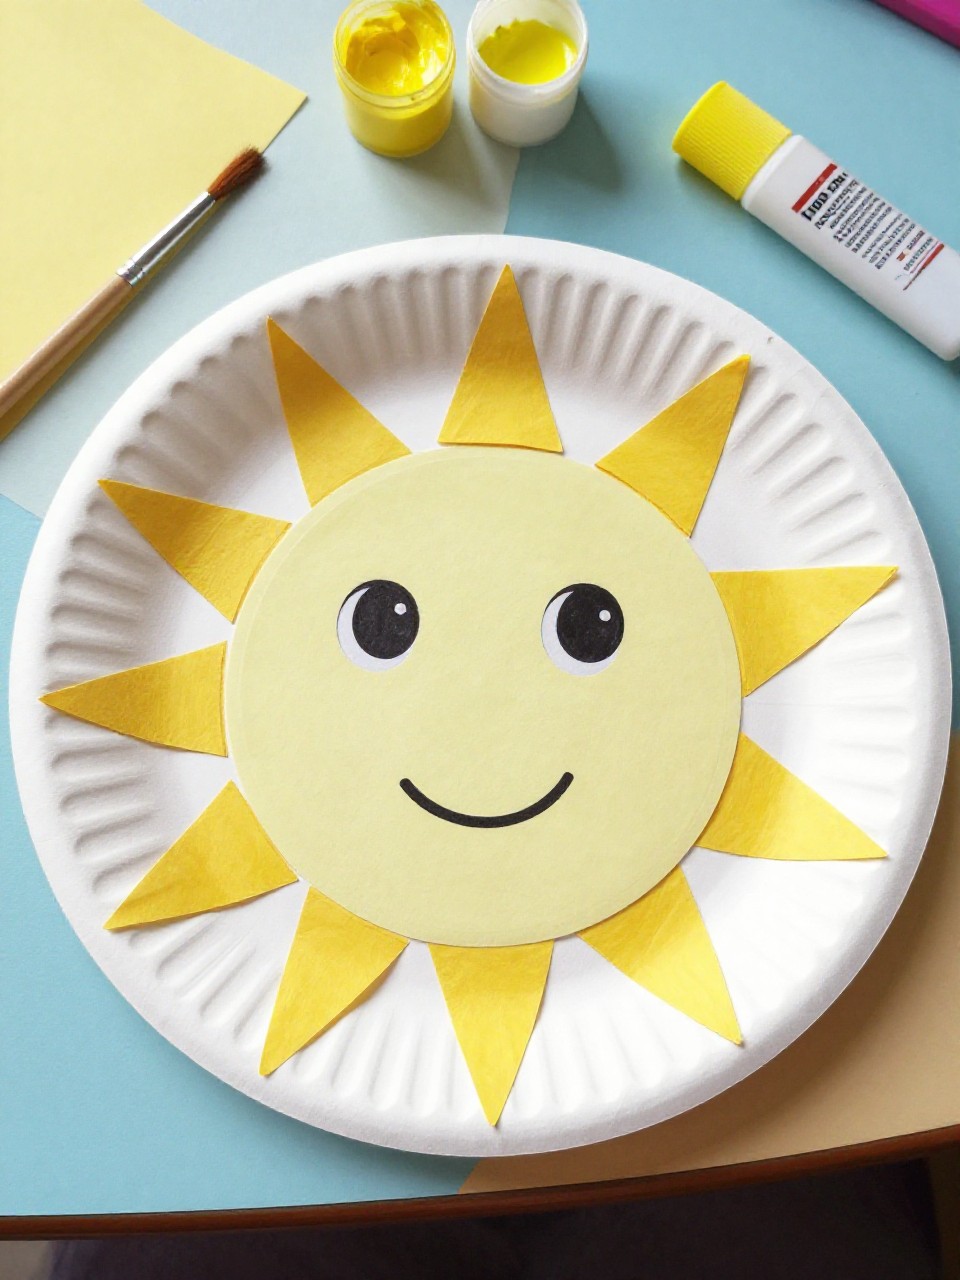
Big, smiling suns with paper plate centers and bright paper rays make a cheerful wall display. Kids love choosing silly face expressions and ray colors, and the simple steps are great for mixed ages.
Materials Needed:
- Paper plates (plain white)
- Yellow paint or markers
- Construction paper (yellow/orange for rays)
- Glue stick
- Googly eyes [optional]
How to make it:
- Paint the paper plate yellow and let it dry.
- Cut triangles from paper for sun rays and glue around the edge.
- Add a face with googly eyes and markers for a smile and cheeks.
- Let dry, then hang in a sunny window.
2. Ocean Paper Tube Fish

Cardboard tubes turn into bright fish with paper fins and big eyes. Kids enjoy choosing patterns and scales, and the tube shape makes the fish feel real and fun to “swim” around.
Materials Needed:
- Empty toilet paper tubes
- Colored paper or tissue paper
- Markers or crayons
- Googly eyes [optional]
- Glue and safety scissors
How to make it:
- Flatten one end of the tube and glue or tape it closed for the tail.
- Cut and glue paper fins and a tail triangle onto the tube.
- Draw scales and patterns; add eyes.
- Let glue dry and then play with your fish or hang it with string.
3. Beach-in-a-Bag Sensory Art
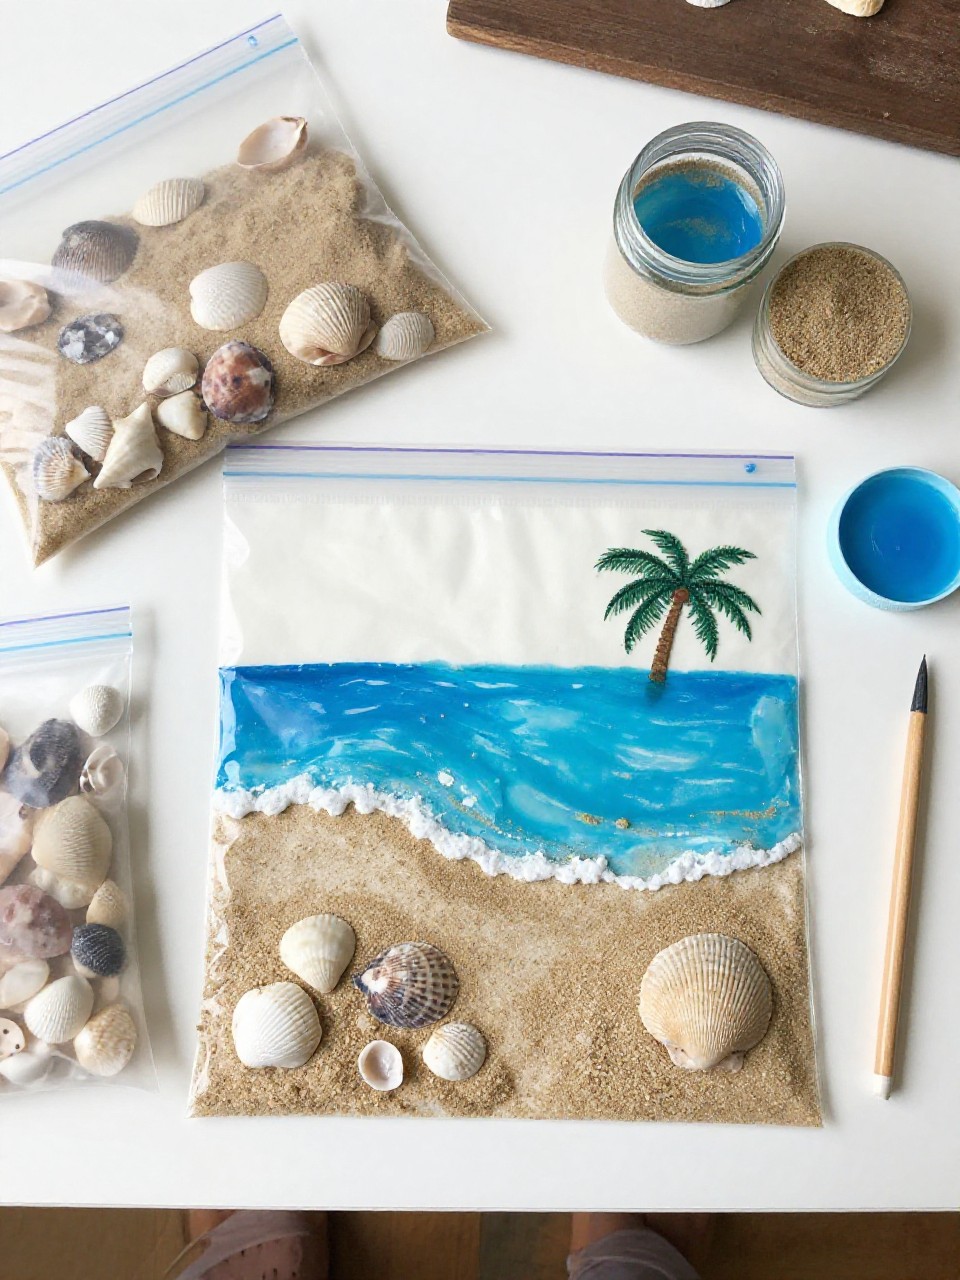
A clear zip bag becomes a mini beach scene with sand, shells, and blue gel “water.” Squishing and moving the pieces is calming and perfect for little hands.
Materials Needed:
- Quart-size zip-top bags (clear)
- Play sand or table salt dyed tan
- Blue hair gel or clear gel with blue food coloring
- Small shells or smooth pebbles
- Tape for sealing
How to make it:
- Pour a thin layer of sand into the bottom of the bag.
- Add a spoonful of blue gel on top for “water.”
- Drop in shells or pebbles; seal tightly and tape the top closed.
- Press and move items to design your beach, then display flat.
4. Watermelon Paper Fan
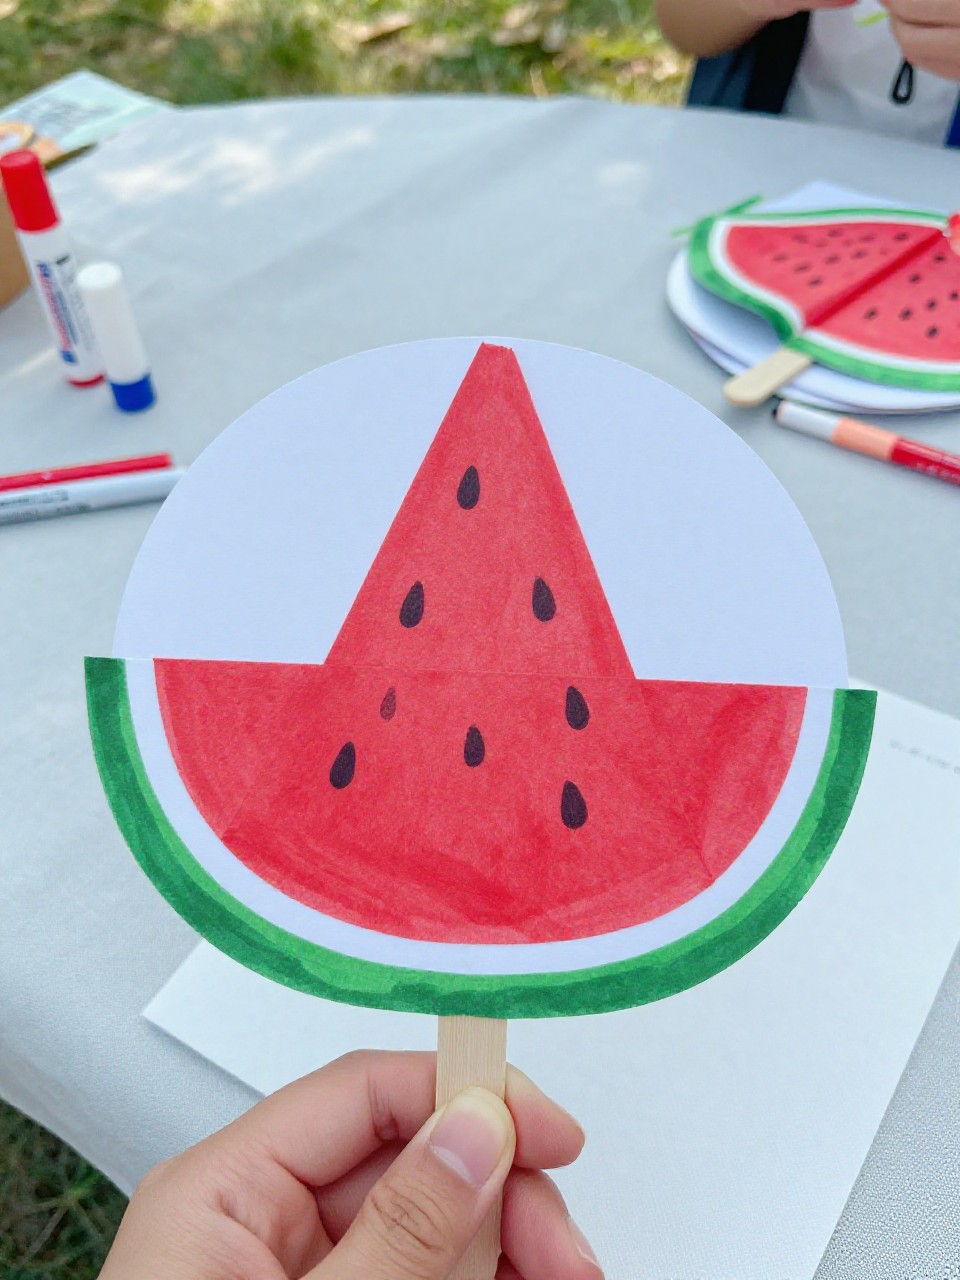
A folded paper fan painted like a watermelon slice keeps kids cool on hot days. The quick folding and bold colors make it satisfying and useful after craft time.
Materials Needed:
- Green and pink construction paper (or white paper with paint)
- Black marker or paint for seeds
- Craft sticks or popsicle sticks
- Glue or tape
- Stapler [optional]
How to make it:
- Accordion-fold a sheet of paper lengthwise.
- Color one edge green (rind) and the rest pink; add black seed dots.
- Fold the strip in half to form a fan and secure ends with glue or a staple.
- Glue a craft stick handle at the base and let dry before fanning.
5. Bubble Print Jellyfish

Bubbly painted circles become soft jellyfish with curly ribbon tentacles. Kids love the magic of printing bubbles and seeing the watery textures appear.
Materials Needed:
- White cardstock
- Tempera paint mixed with dish soap and water
- Straw or bubble wand
- Ribbon, yarn, or paper strips for tentacles
- Glue
How to make it:
- Mix paint with a little soap and water in a shallow dish.
- Blow bubbles into the paint and press paper onto the bubbles to print.
- Cut a half-circle jellyfish body from the bubbled paper and glue to a background.
- Add ribbon or yarn tentacles and let dry flat.
6. Sandcastle Paper Collage

Layered papers, real sand, and flags create a textured sandcastle picture. Kids enjoy sprinkling sand for a beachy feel and choosing where to place tiny shells.
Materials Needed:
- Construction paper (tan, blue, and bright colors)
- Glue
- Play sand or glitter sand
- Small shells or sequins [optional]
- Crayons or markers
How to make it:
- Glue a blue background onto a base and add a tan strip for the beach.
- Cut castle shapes (towers, arches) from tan paper and glue in layers.
- Brush glue on sections and sprinkle sand; add shells or sequins.
- Draw windows and add a tiny paper flag on top; let everything dry.
7. Pool Noodle Flower Stamps

Cut pool noodles make chunky stamps for printing big, sunny flowers. The stamps are easy to hold, and kids love pressing and lifting to see bright flower shapes bloom.
Materials Needed:
- Pool noodle slices (1-inch thick)
- Washable paint (various colors)
- Paper plates for paint trays
- Large paper or butcher paper
- Markers for stems and leaves
How to make it:
- Slice a pool noodle into round pieces for stampers.
- Dip a noodle end into paint and stamp circles for flower petals.
- Add centers in a different color; draw stems and leaves with markers.
- Let the garden mural dry, then hang it as a summer backdrop.
8. Seashell Wind Chime
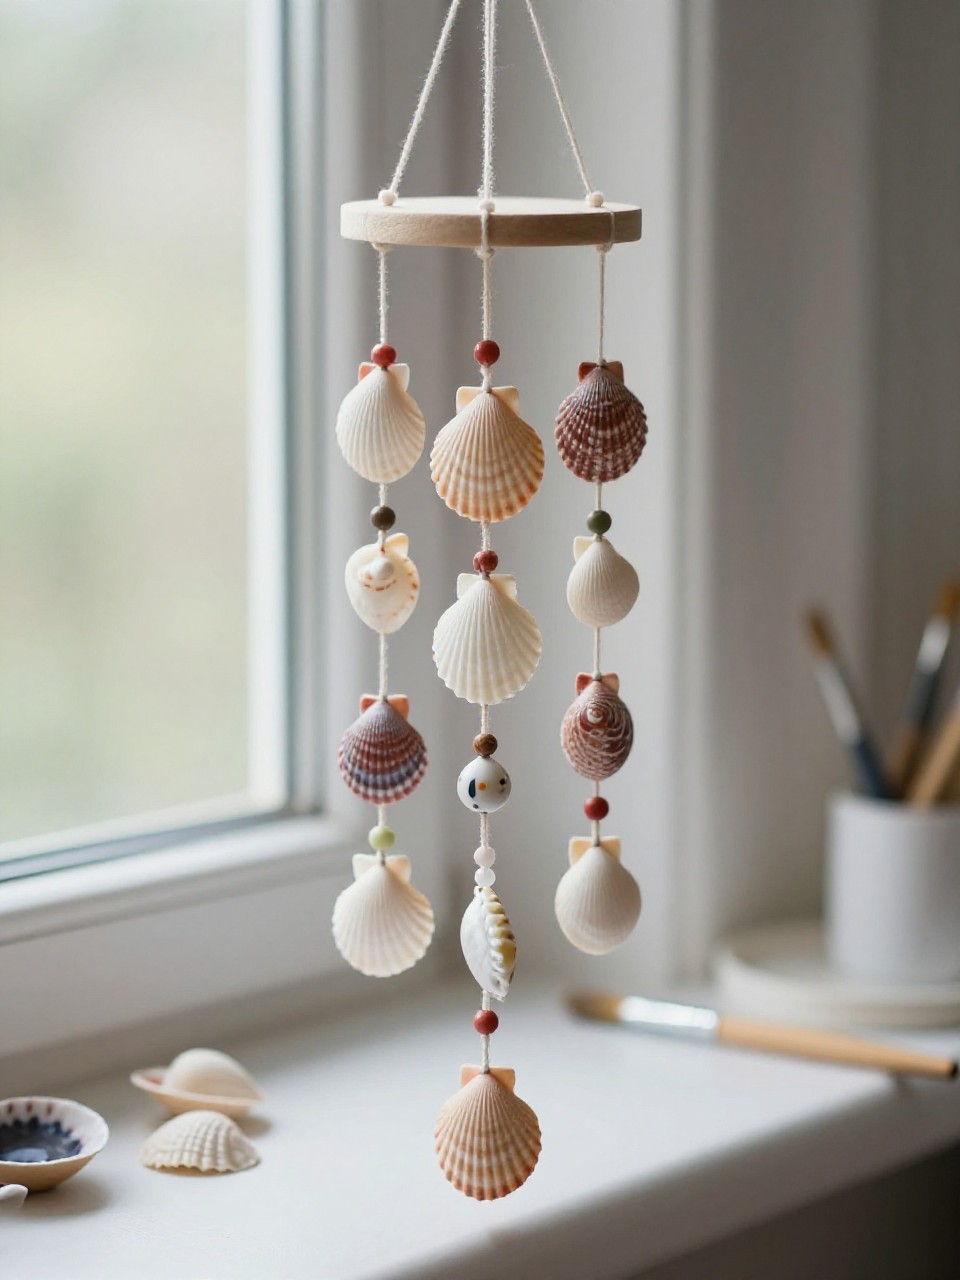
Painted shells and beads dangle from a stick to make a gentle summer chime. Kids enjoy choosing colors and hearing the soft clinks in the breeze.
Materials Needed:
- Clean seashells (with small holes) or wooden shapes
- String or fishing line
- Beads [optional]
- Small stick or craft dowel
- Acrylic paint and brush
How to make it:
- Paint shells in bright colors and let dry.
- Tie strings to the stick and thread shells and beads onto each string.
- Knot the ends so pieces stay in place.
- Add a hanging loop to the top and display near a window.
9. Popsicle Stick Popsicle Art

Colorful “popsicles” made from cardstock and real sticks look sweet and summery. Kids love decorating each pop with sprinkles, glitter, or smiling faces.
Materials Needed:
- Colored cardstock
- Jumbo popsicle sticks
- Markers, crayons, or paint
- Glue
- Sequins or paper “sprinkles” [optional]
How to make it:
- Cut simple popsicle shapes from cardstock.
- Glue a jumbo stick to the back of each shape.
- Decorate with stripes, faces, or sprinkles using markers and sequins.
- Let dry and string them as a summer banner.
10. Handprint Crab Beach Scene

Red handprints become funny crabs on a sandy beach background. Kids enjoy seeing their hands turn into creatures and adding googly eyes on stalks.
Materials Needed:
- Blue and tan construction paper
- Red paint or stamp pad
- Googly eyes
- Glue and markers
- Small sand or glitter [optional]
How to make it:
- Glue a tan strip (sand) onto a blue sheet (ocean/sky).
- Paint a hand red and press two handprints with palms together for the crab body.
- Add eyes, legs, and a smile with markers; sprinkle a little sand if you like.
- Let dry and sign the artwork.
11. Sunshine Name Suncatchers

Transparent suns with a child’s name in the center glow in a window. Kids love seeing their names light up and choosing bright tissue colors.
Materials Needed:
- Clear contact paper
- Yellow/orange tissue paper squares
- Black construction paper for name letters or marker
- Paper plate ring or cardstock circle frame
- String for hanging
How to make it:
- Cut a circle frame from a paper plate or cardstock.
- Stick contact paper behind the frame, sticky side up.
- Place tissue squares inside and add name letters; seal with another contact sheet.
- Punch a hole, add string, and hang in sunlight.
12. Nature Paintbrush Leaf Prints
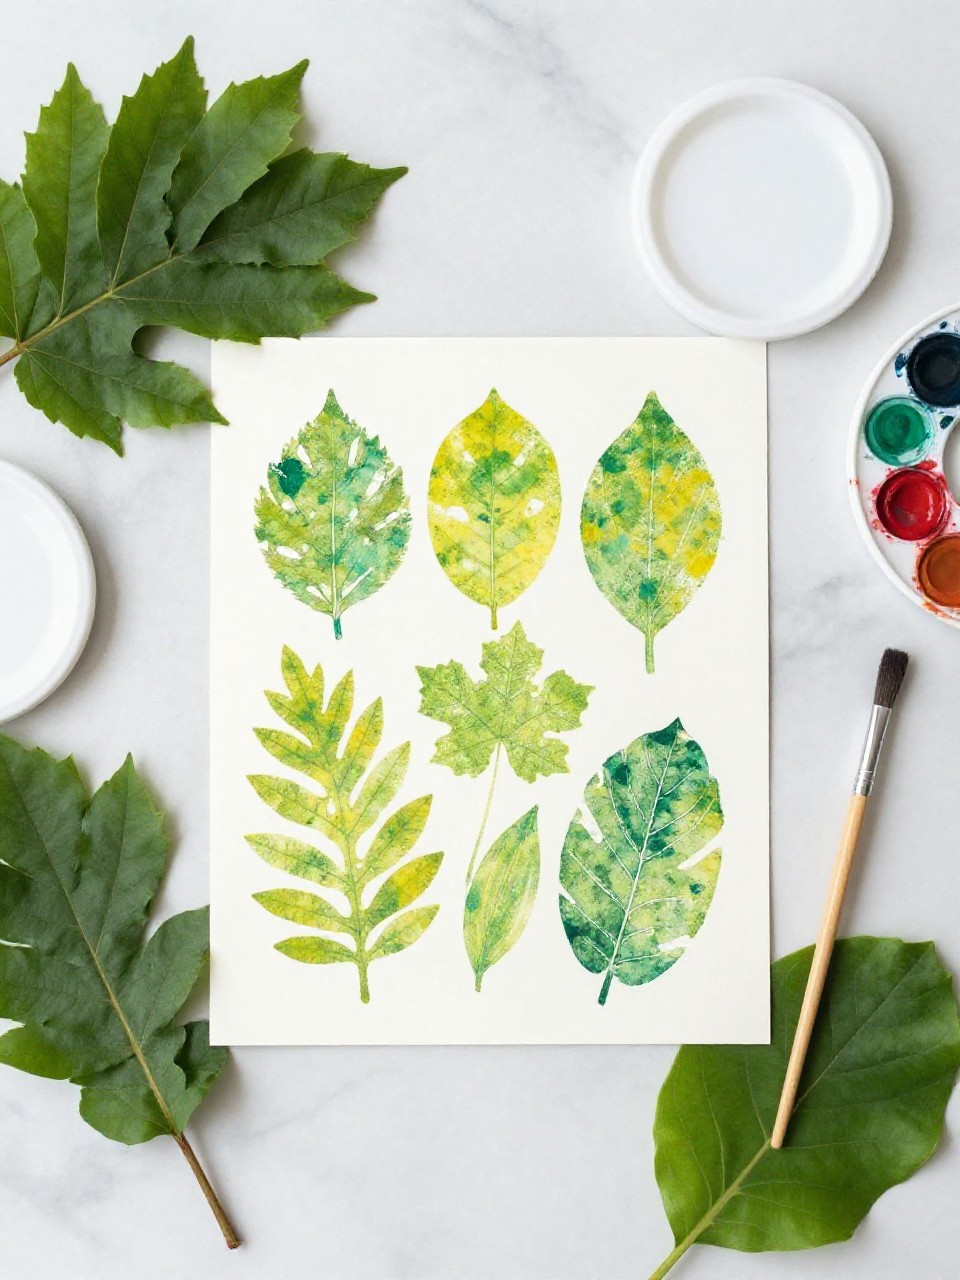
Leaves tied to sticks become nature paintbrushes for stamping summer patterns. Kids enjoy experimenting with textures and seeing different leaf shapes appear.
Materials Needed:
- Collected leaves and small twigs
- Rubber bands or string
- Washable paint
- Paper plates for paint
- Large paper
How to make it:
- Bundle leaves onto twig ends with rubber bands to make brushes.
- Dip leaves in paint and press or swipe onto paper.
- Layer colors and shapes to build a summer garden print.
- Let dry flat and trim into posters or cards.
13. Paper Plate Tropical Turtle

A half paper plate becomes a bright turtle shell with tropical patterns. Kids enjoy choosing island colors and giving their turtle a friendly face.
Materials Needed:
- Paper plate (cut in half)
- Green construction paper
- Paint, crayons, or markers
- Googly eyes [optional]
- Glue and scissors
How to make it:
- Color the half-plate with bold patterns for the shell.
- Cut head, legs, and tail from green paper and glue under the plate edges.
- Add eyes and a smile; outline spots or shapes for extra pop.
- Let dry and display a little turtle parade.