

In This Article Show
Keeping kids busy on a rainy day can be tough, and sometimes you just want a simple activity that uses what you already have. If you snack on pistachios, you’ve got a crafty goldmine right in your bowl.
This list gives you fun, easy projects that turn shells into cute decor, classroom art, and tiny gifts. You’ll find ideas that are simple to set up, relaxing to make, and satisfying to display. Let’s dive into 15 useful pistachio shell crafts you’ll love.
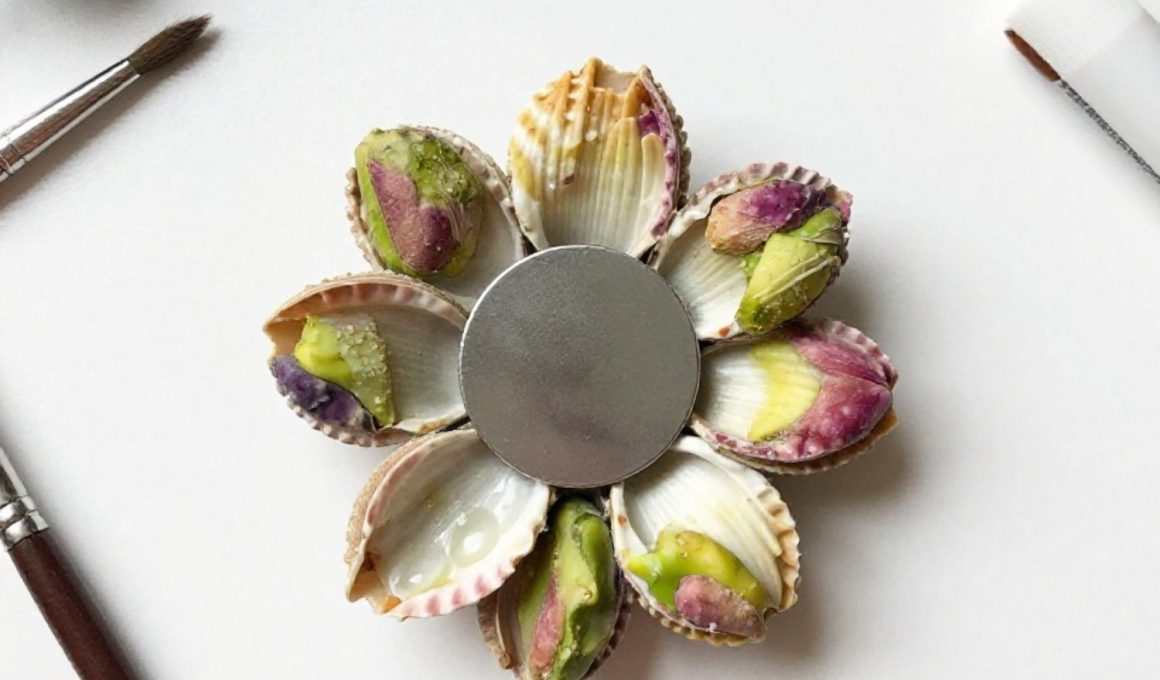
1. Pistachio Shell Flower Magnet
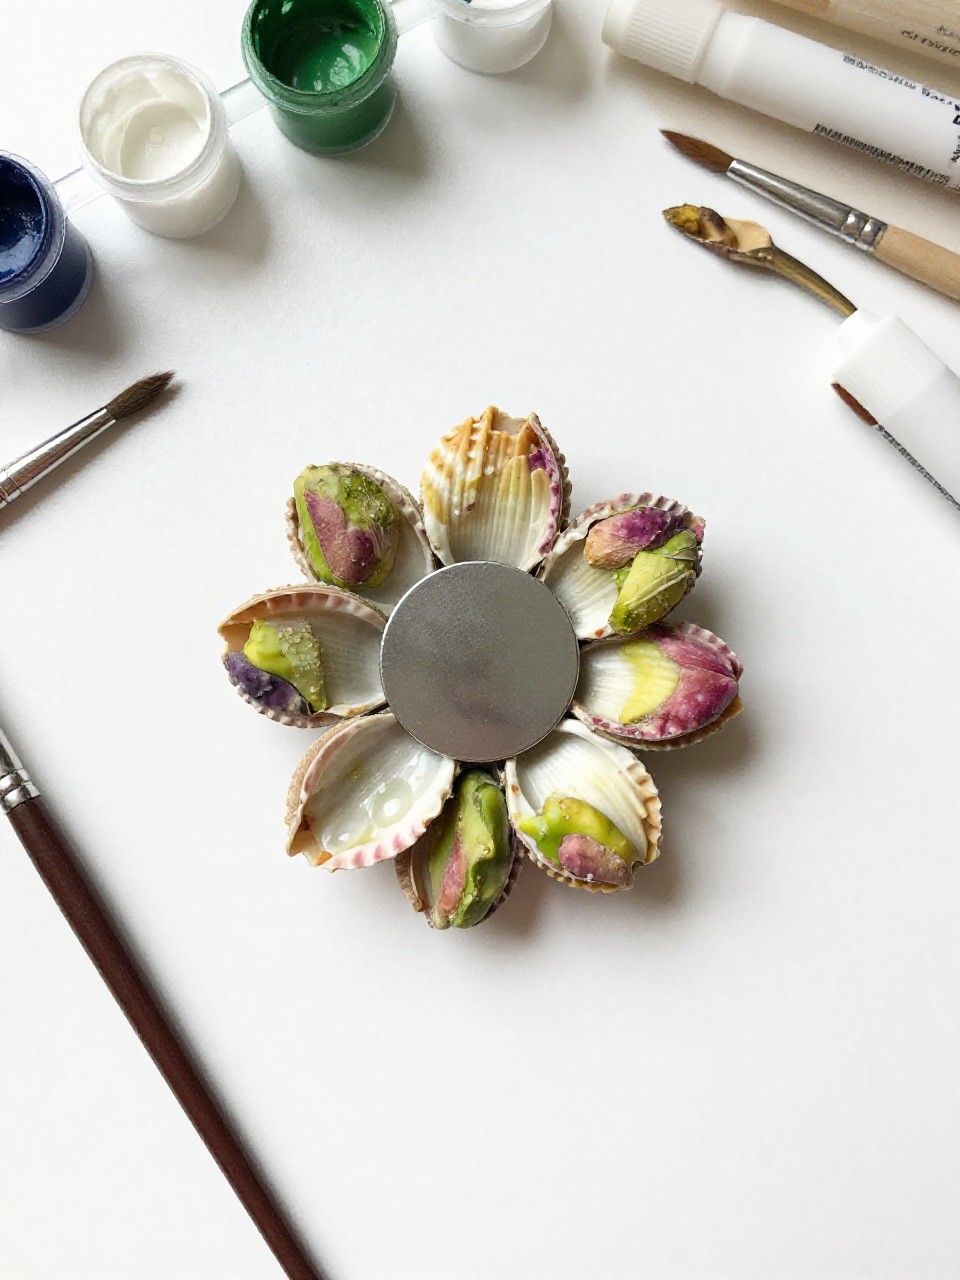
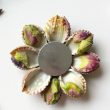
This small magnet looks like a daisy made from layered pistachio shell “petals” around a bright painted center. It’s quick, colorful, and great for gifting or decorating the fridge; kids love choosing petal colors and seeing it come together fast.
Materials Needed:
- Clean pistachio shells (rinsed and dried)
- Small circle of cardstock or felt (about 1 inch)
- Acrylic paint and brush
- Strong craft glue or hot glue (adult help)
- Small round magnet
How to make it:
- Paint shells in petal colors and let them dry.
- Glue shells around the cardstock circle to form a flower.
- Add a painted dot or small bead to the center.
- Glue the magnet on the back and let it dry before placing on the fridge.
2. Pistachio Shell Photo Frame Trim
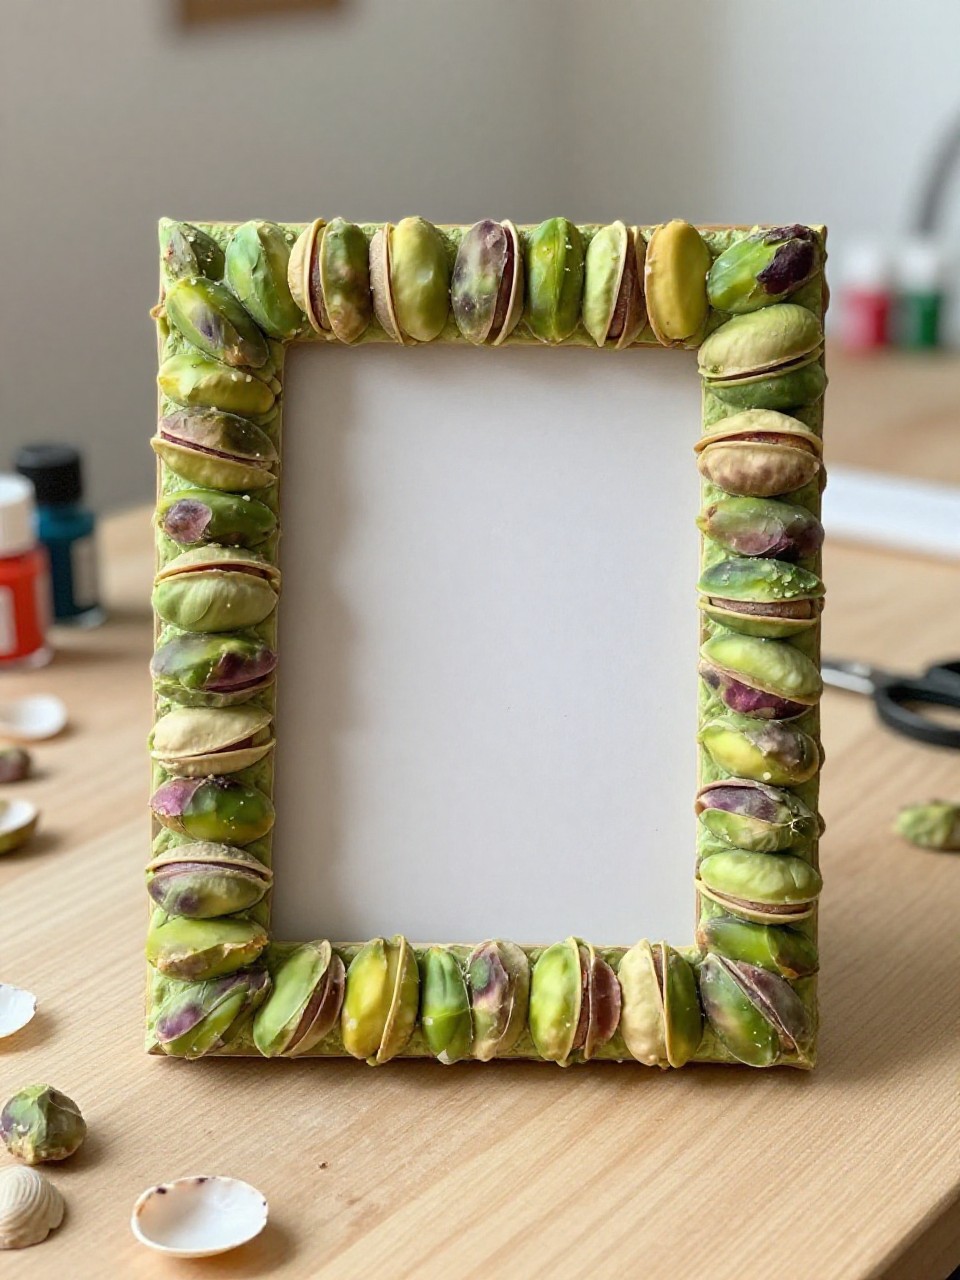
A plain frame gets a natural, textured border with rows of pistachio shells, like tiny leaves wrapping the edges. Kids enjoy arranging patterns and choosing paint or keeping it natural for a rustic look.
Materials Needed:
- Simple wooden or cardboard photo frame
- Clean pistachio shells
- Acrylic paint (optional)
- Craft glue or hot glue (adult help)
- Clear sealer or Mod Podge (optional)
How to make it:
- Paint shells if desired and let dry.
- Glue shells around the frame edge in rows or a leaf pattern.
- Brush a thin sealer coat for shine if you like.
- Let it dry fully, then add your photo.
3. Pistachio Shell Mini Succulent in a Cork
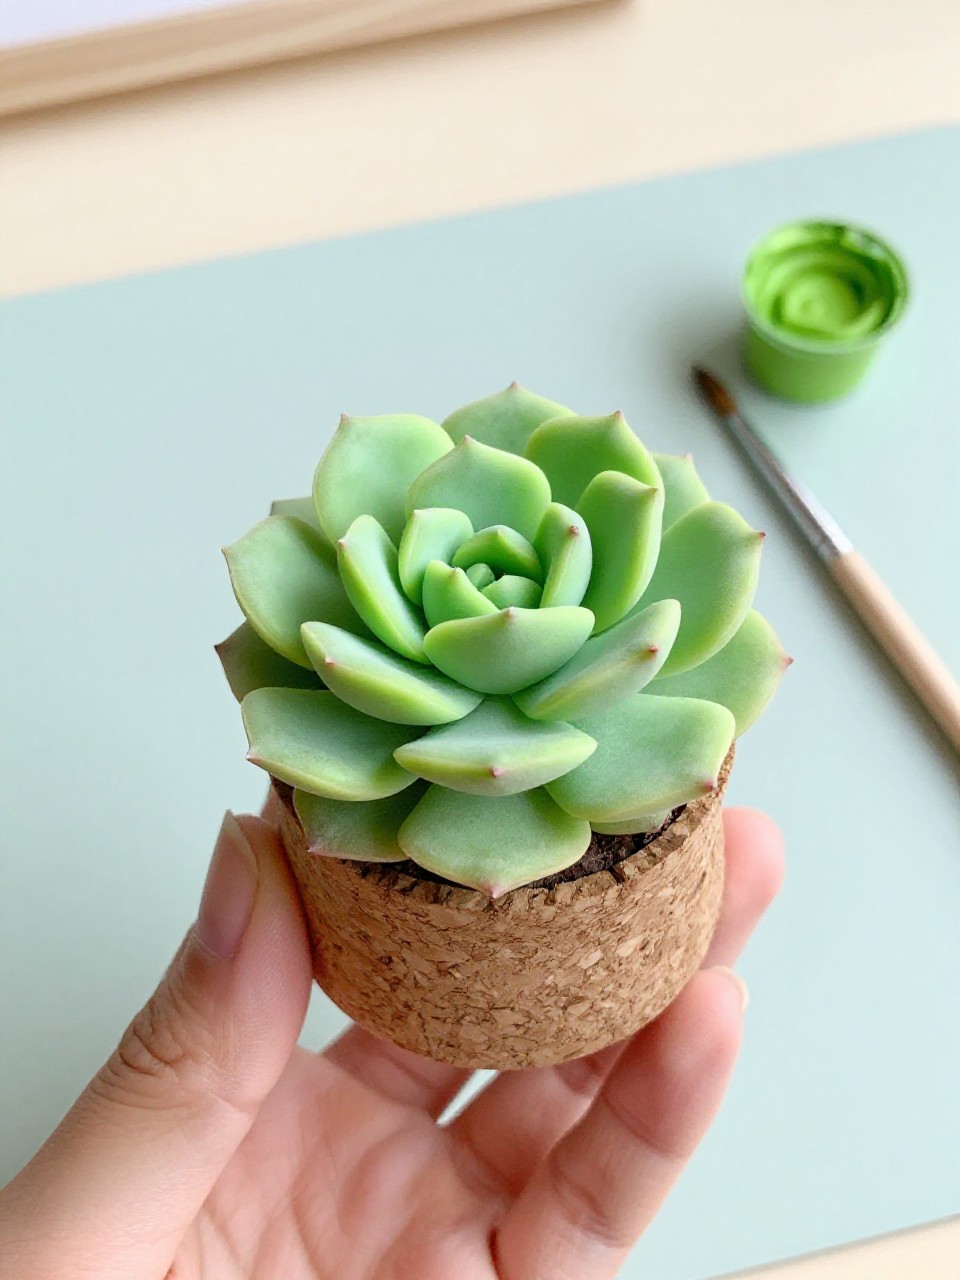
This tiny “plant” looks like a baby succulent made from green shells set into a wine cork. It’s cute, fast, and perfect for desk decor; kids love the tiny size and instant results.
Materials Needed:
- Clean pistachio shells
- Wine cork or bottle cork
- Green acrylic paint (two shades if possible)
- Craft glue
- Toothpick for placing shells
How to make it:
- Paint shells in light and dark green and let them dry.
- Add a glue dot on top of the cork.
- Arrange shells upright like layered leaves forming a rosette.
- Let dry standing up, then display on a shelf.
4. Pistachio Shell Owl Ornament
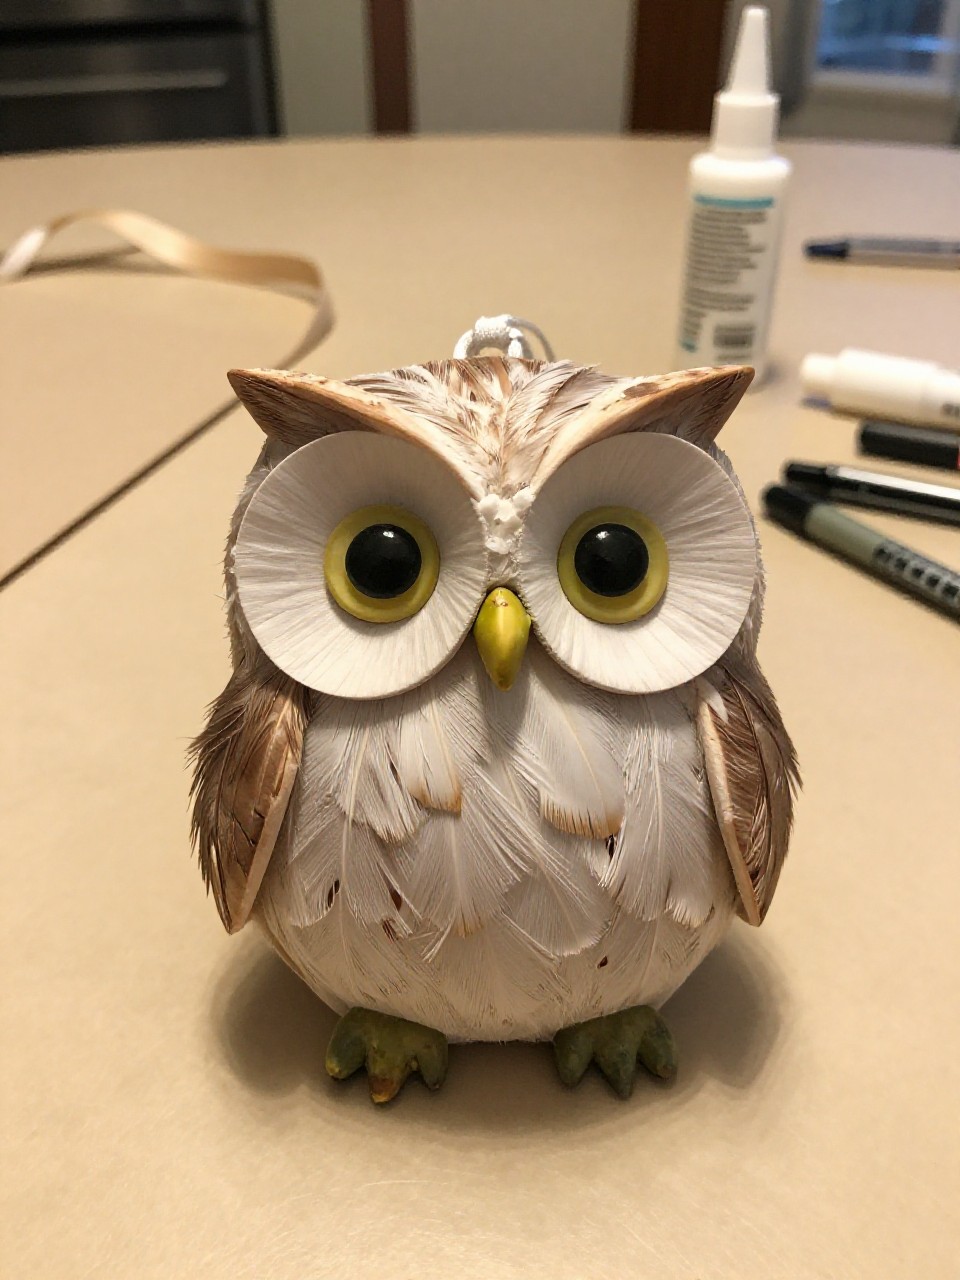
This ornament looks like a round owl with shell “feathers,” big button eyes, and a tiny beak, ready to hang. Kids enjoy building the feather texture and choosing colors; it’s a cozy fall or holiday craft.
Materials Needed:
- Cardboard circle (2-3 inches)
- Clean pistachio shells
- Acrylic paint and brush
- Googly eyes or buttons
- Ribbon or string for hanging
How to make it:
- Paint shells in browns, creams, or fun colors; let dry.
- Glue shells in rows on the circle, leaving room for eyes and beak.
- Add eyes and a small triangle beak from cardstock.
- Glue ribbon loop on top and hang after drying.
5. Pistachio Shell Flower Tealight Holder
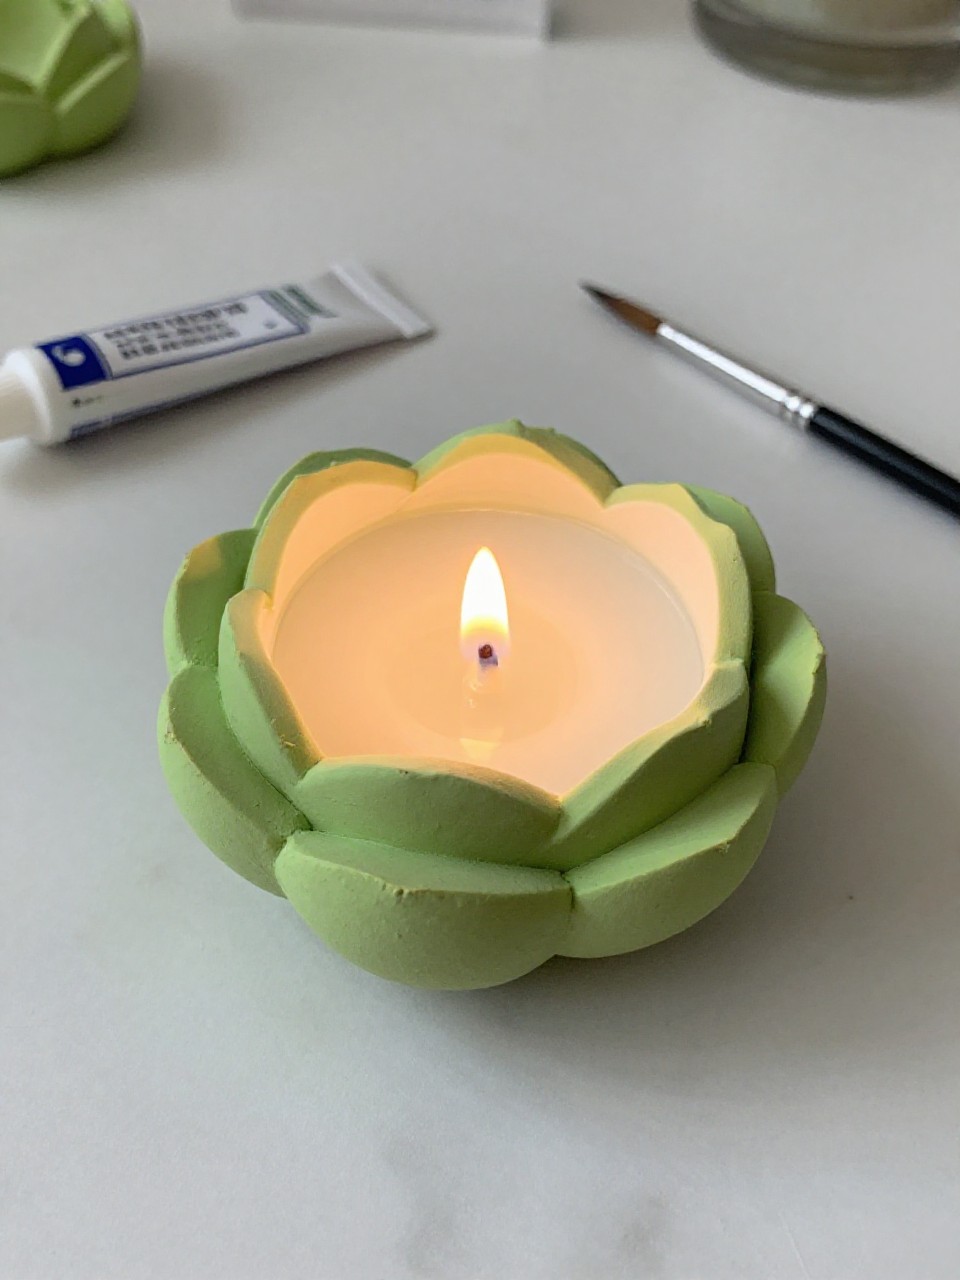
A small jar turns into a floral tealight holder with shell petals circling the rim like a blooming lotus. It’s calming to make and looks lovely on a table; use an LED tealight for kid-safe glow.
Materials Needed:
- Small glass jar or votive holder
- Clean pistachio shells
- Acrylic paint (optional)
- Strong craft glue
- LED tealight
How to make it:
- Paint shells if desired and let dry.
- Glue shells around the rim in overlapping petal layers.
- Add a second row for a fuller flower.
- Place LED tealight inside once everything is dry.
6. Pistachio Shell Mosaic Coaster
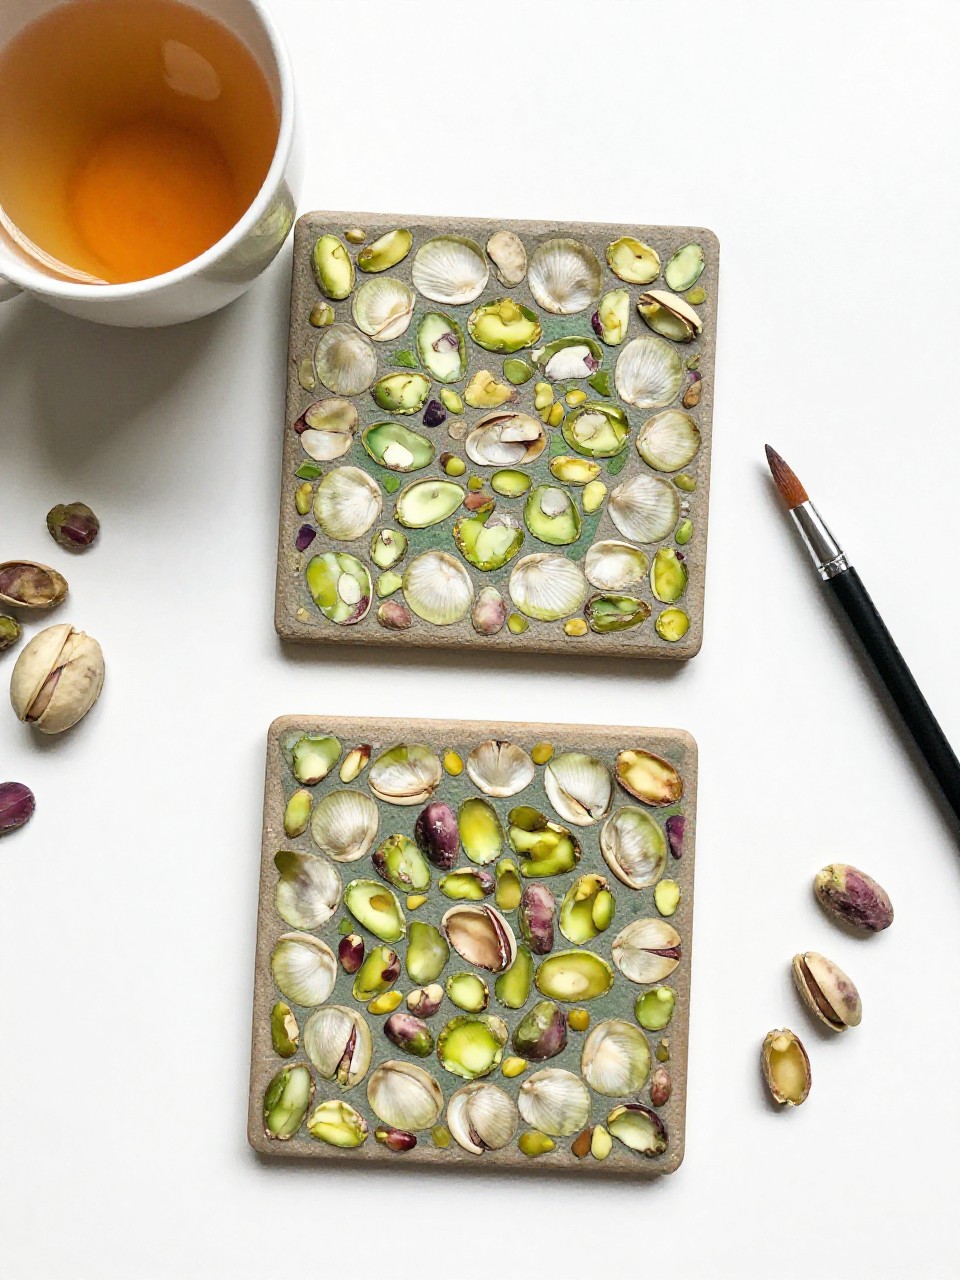
This coaster shows a simple mosaic pattern of shells set in a circle, then sealed for everyday use. Kids enjoy arranging shapes into suns, hearts, or spirals and seeing a useful item appear.
Materials Needed:
- Round cork or wooden coaster base
- Clean pistachio shells
- Acrylic paint (optional)
- Strong craft glue
- Clear sealant or Mod Podge
How to make it:
- Paint shells in chosen colors and let them dry.
- Glue shells on the base in a pattern, leaving small gaps.
- Brush on clear sealant to protect the surface.
- Let dry completely before using under cups.
7. Pistachio Shell Cactus Rock Garden
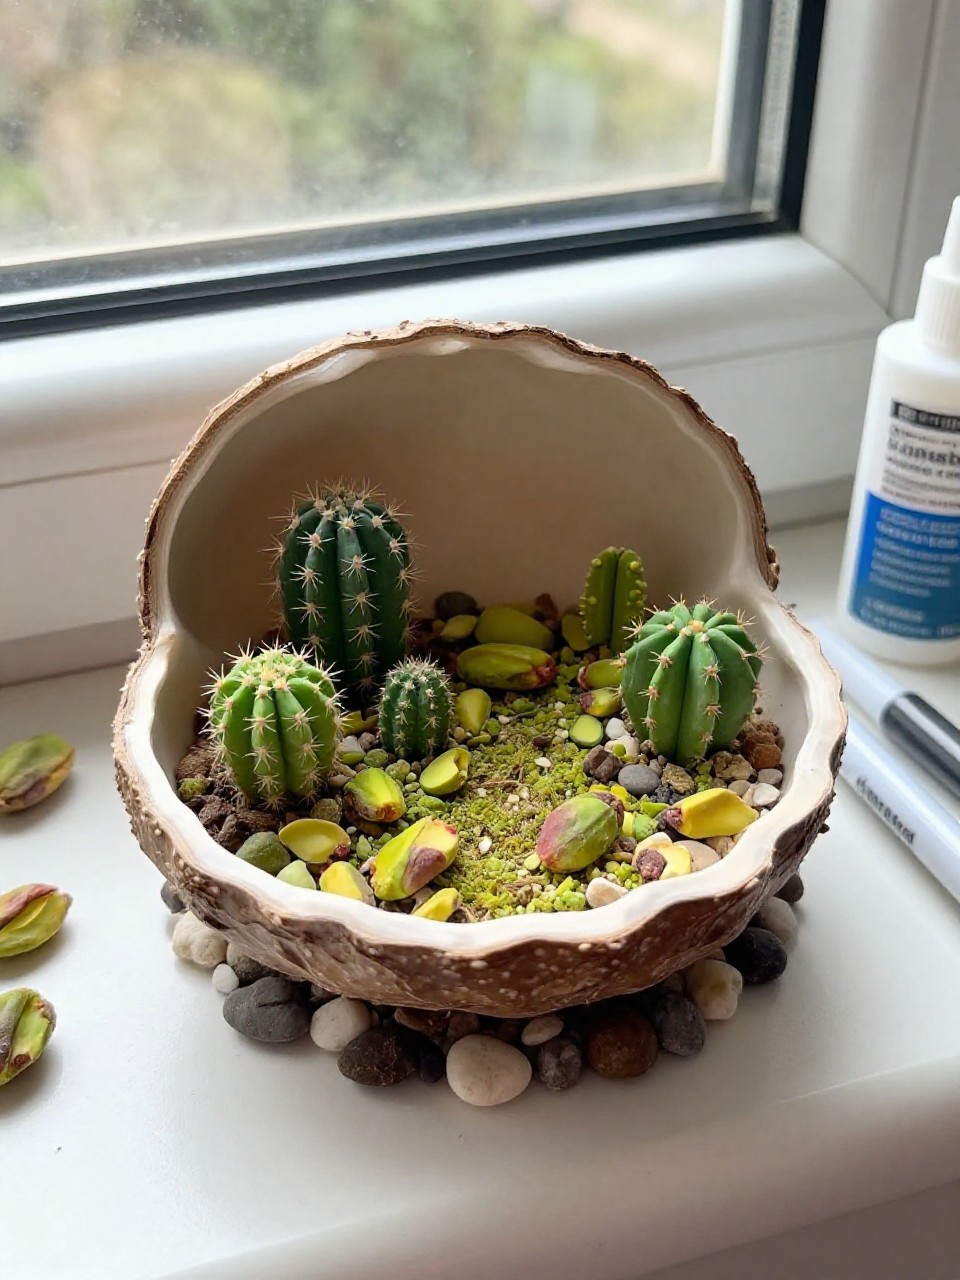
Painted shells stand upright on a pebble-filled lid to look like tiny cacti with white dot spines and flower tops. Kids love the playful desert look and adding mini flowers.
Materials Needed:
- Clean pistachio shells
- Small jar lid or shallow cap
- Tiny pebbles or gravel
- Green acrylic paint and white marker/paint pen
- Craft glue and small faux flower or paper flower
How to make it:
- Paint shells green and add white dots or lines for spines.
- Fill the lid with pebbles and glue in place.
- Glue painted shells upright among the pebbles.
- Add a small flower to one cactus and let dry.
8. Pistachio Shell Leaf Bookmark
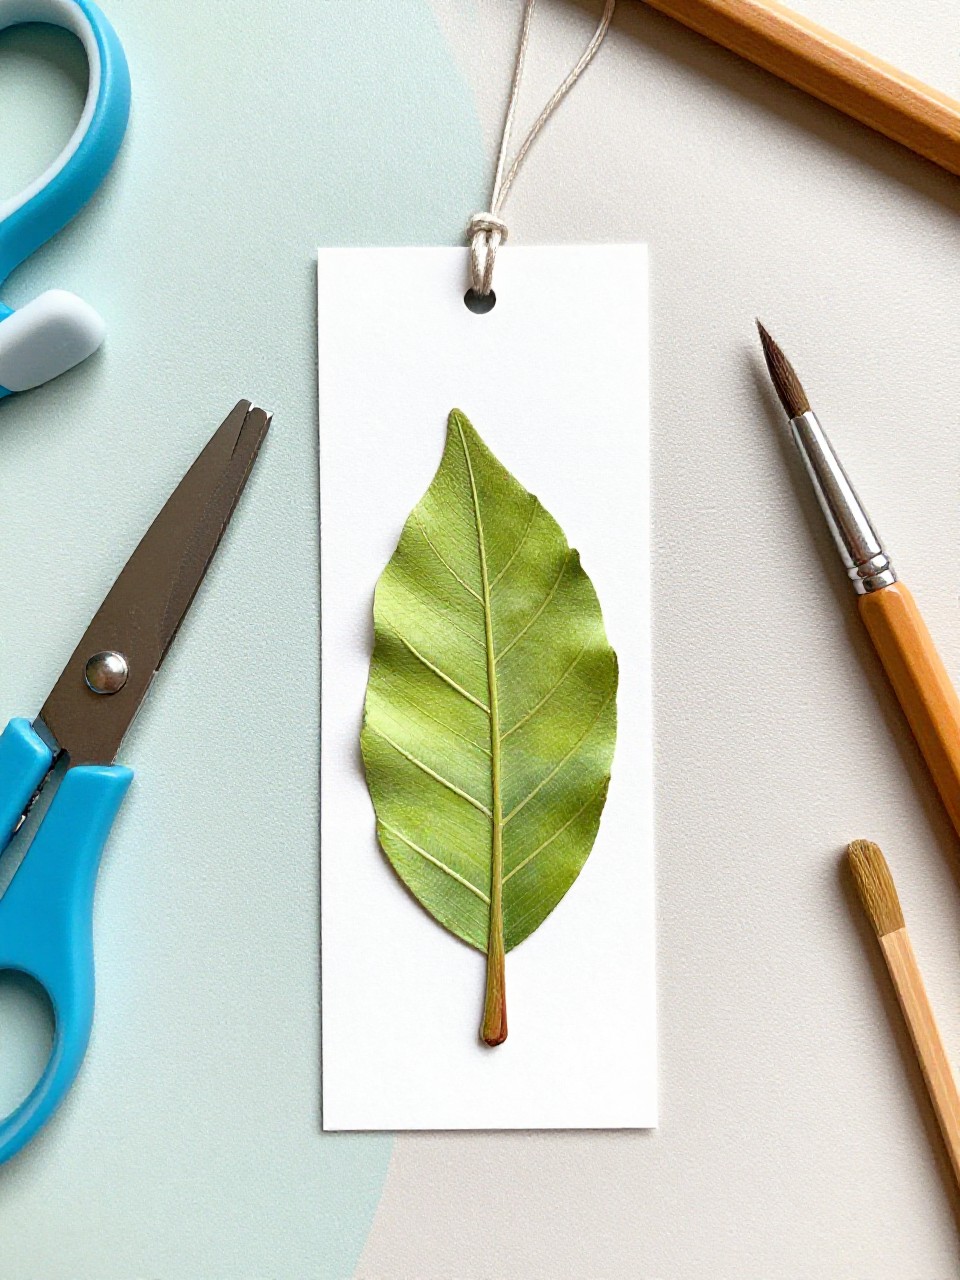
A flat paper leaf gets raised shell “veins,” then painted for a natural, tactile bookmark. It’s satisfying because it looks store-bought but is simple to make and personalize.
Materials Needed:
- Cardstock strip or leaf-shaped cutout
- Clean pistachio shells (halves and slivers)
- Craft glue
- Acrylic paint or watercolor
- Ribbon (optional)
How to make it:
- Cut a leaf shape from cardstock.
- Glue shells along the center and sides to form veins.
- Paint over everything in leaf colors; add ribbon at top if desired.
- Let dry flat under a book for smoothness.
9. Pistachio Shell Butterfly Wall Art

This piece shows a bright butterfly with shell wings on a small canvas, with painted swirls around it. Kids enjoy choosing wing colors and patterns; it’s a nice beginner art project.
Materials Needed:
- Small canvas or thick cardstock
- Clean pistachio shells
- Acrylic paint and brush
- Craft glue
- Black marker for body and antennae
How to make it:
- Paint shells in pairs for matching wings and let dry.
- Draw a butterfly body and antennae on the canvas.
- Glue pairs of shells as wings on each side.
- Add background dots or swirls and let it dry to hang.
10. Pistachio Shell Name Plaque
A wooden sign or cardboard strip shows a child’s name spelled with shell “letters” and paint accents. Kids love seeing their name become art, and it’s easy to tailor colors to their room.
Materials Needed:
- Wooden plaque or thick cardboard strip
- Clean pistachio shells
- Pencil for sketching letters
- Craft glue
- Paint or markers
How to make it:
- Lightly sketch the name on the plaque.
- Glue shells along the lines to shape each letter.
- Paint the background or shells as desired.
- Let dry and display on a shelf or door.
11. Pistachio Shell Pineapple Keychain
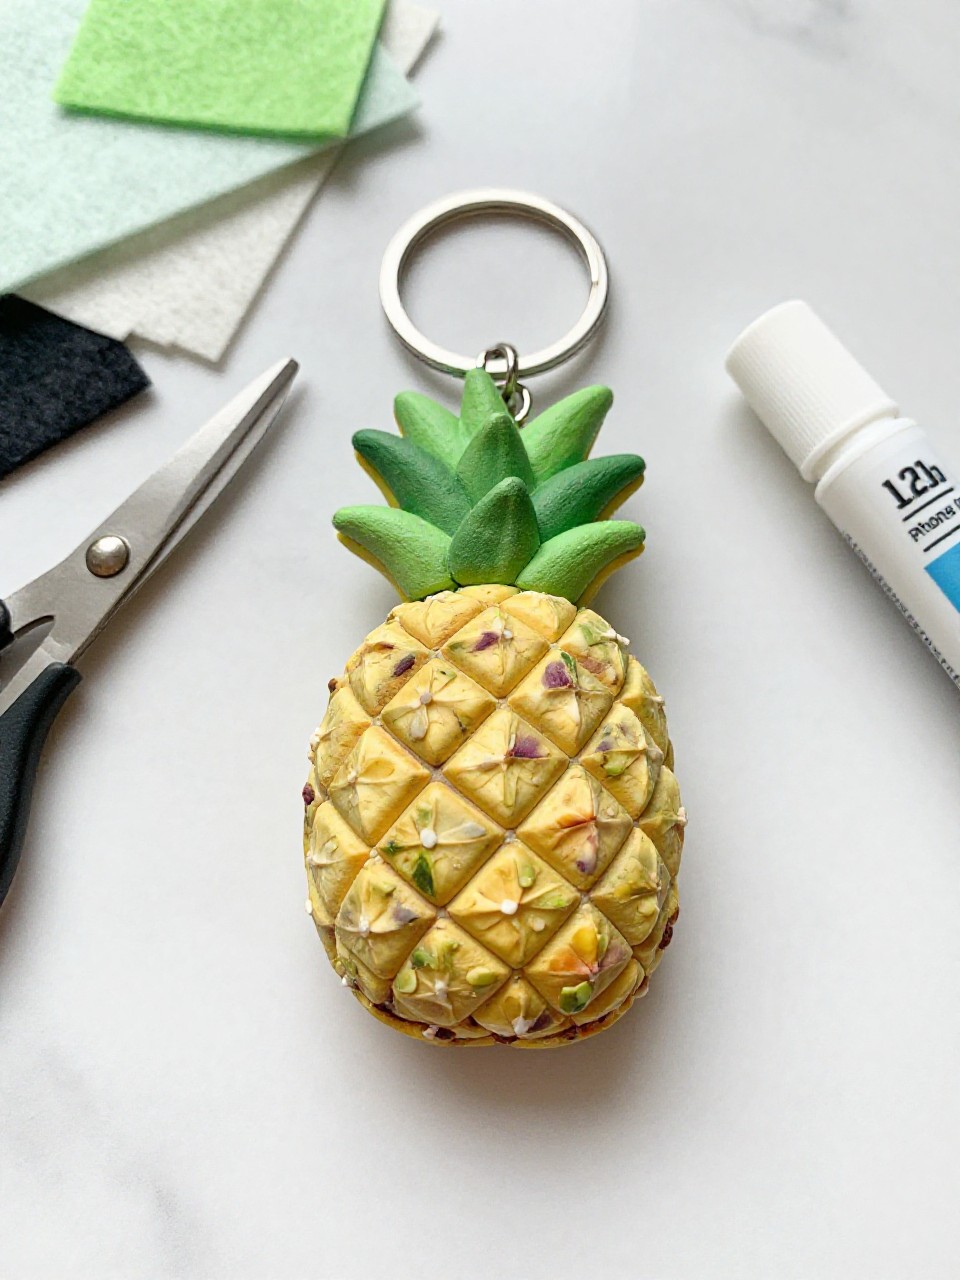
This keychain looks like a mini pineapple: yellow-painted shells form the fruit, with green felt leaves on top. Kids enjoy the cute look and carrying their own handmade charm.
Materials Needed:
- Clean pistachio shells
- Small oval of sturdy felt or foam
- Yellow and green acrylic paint
- Craft glue
- Keychain ring and short ribbon or jump ring
How to make it:
- Paint shells yellow and cut small green felt leaves.
- Glue shells to the felt oval to make the pineapple body.
- Glue leaves at the top and attach ribbon to the back.
- Loop through a keychain ring and let it dry before use.
12. Pistachio Shell Picture Holder Clip
A painted shell cluster sits on a small wood block with a wire loop to hold a photo or note. Kids like bending the wire and choosing cheerful colors for a useful desk piece.
Materials Needed:
- Small wooden block or smooth rock
- Clean pistachio shells
- Acrylic paint
- Craft wire (18–22 gauge)
- Glue and optional clear sealer
How to make it:
- Paint shells and the block; let dry.
- Twist wire into a double loop at one end for clipping.
- Glue the straight end of wire into a hole or wrap and glue onto the block.
- Glue shell cluster around the base, seal, and add a photo.
13. Pistachio Shell Snowflake Ornament
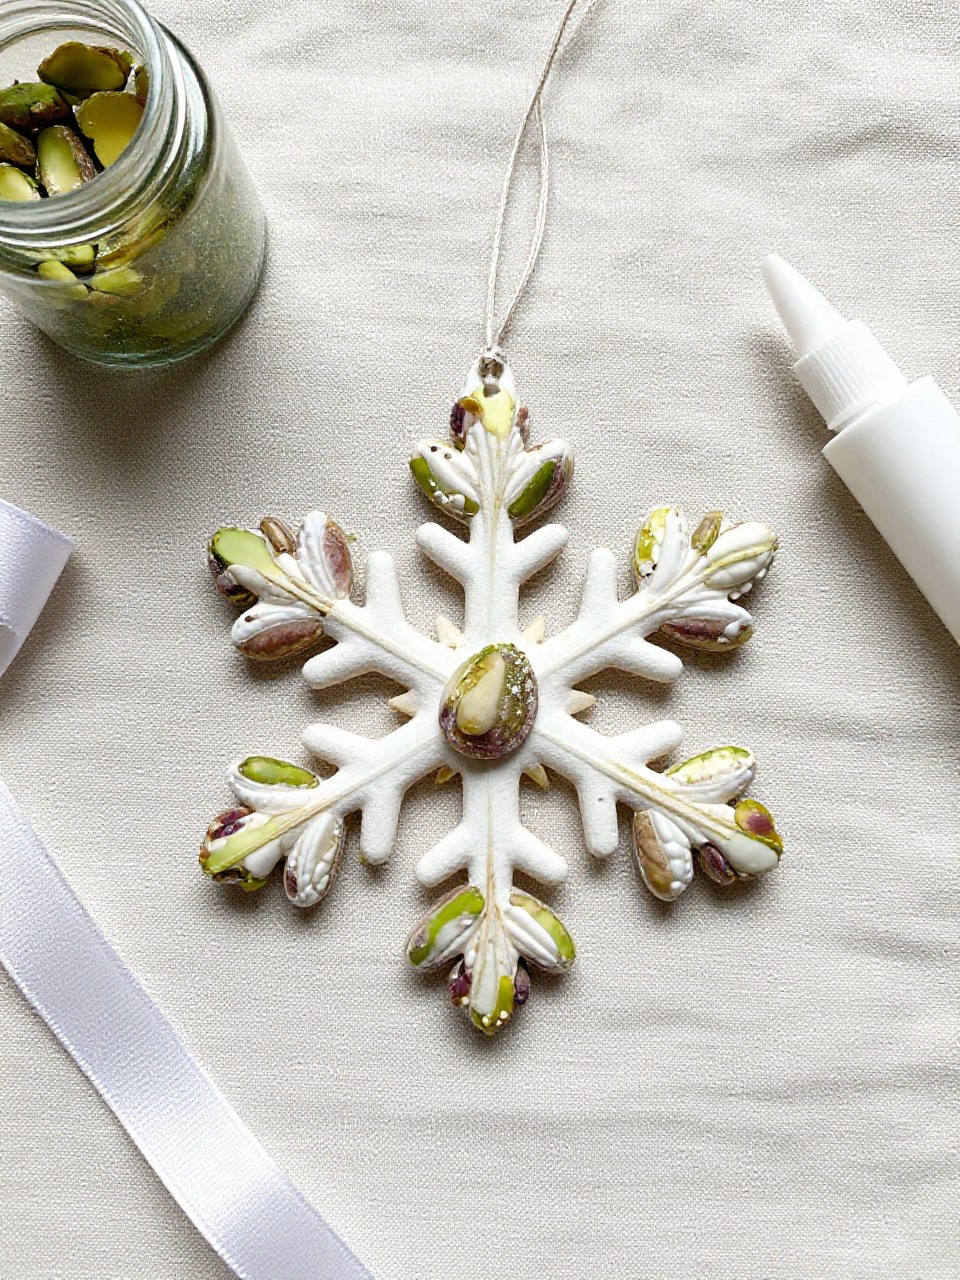
This winter ornament looks like a layered snowflake made from painted white shells with a touch of glitter. Kids love the sparkle and the simple, repeating pattern.
Materials Needed:
- Cardboard circle or snowflake base (2 inches)
- Clean pistachio shells
- White acrylic paint
- Craft glue
- Fine glitter and ribbon
How to make it:
- Paint shells white; sprinkle light glitter while wet.
- Glue shells in six-point snowflake arms around the base.
- Add a second inner layer for fullness.
- Glue ribbon loop on back and hang after drying.
14. Pistachio Shell Jewelry Dish
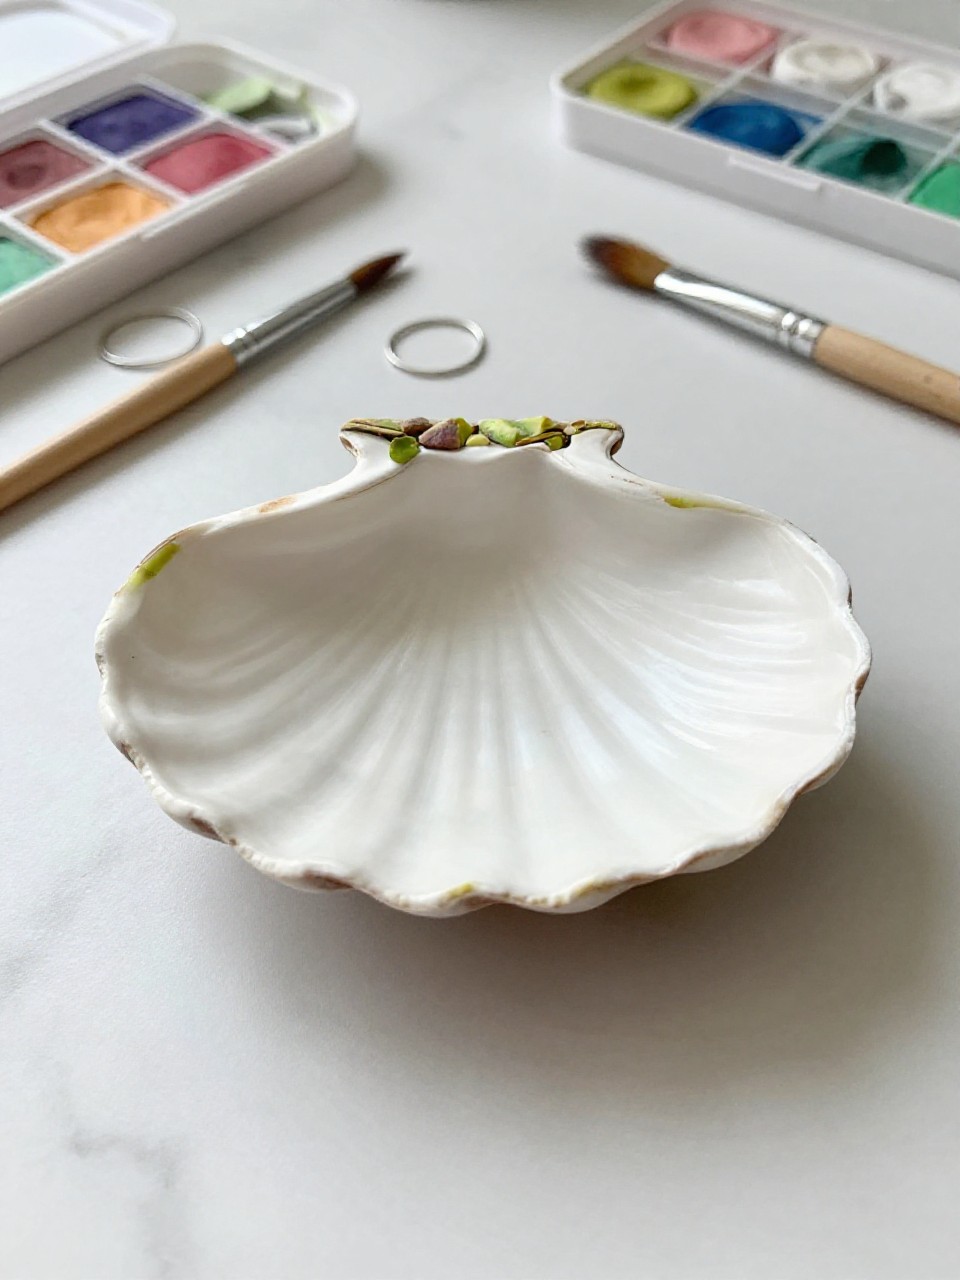
A shallow dish becomes pretty storage when you add a ring of shell “petals” and soft pastel paint. It’s useful on a nightstand, and kids enjoy making something they can use every day.
Materials Needed:
- Small ceramic or plastic dish
- Clean pistachio shells
- Acrylic paint and brush
- Craft glue
- Clear sealer (optional)
How to make it:
- Paint the dish base and shells in matching colors; let dry.
- Glue shells around the rim like petals or scales.
- Add a second row if you want extra texture.
- Seal and let dry before holding rings or clips.
15. Pistachio Shell Ladybug Pebble
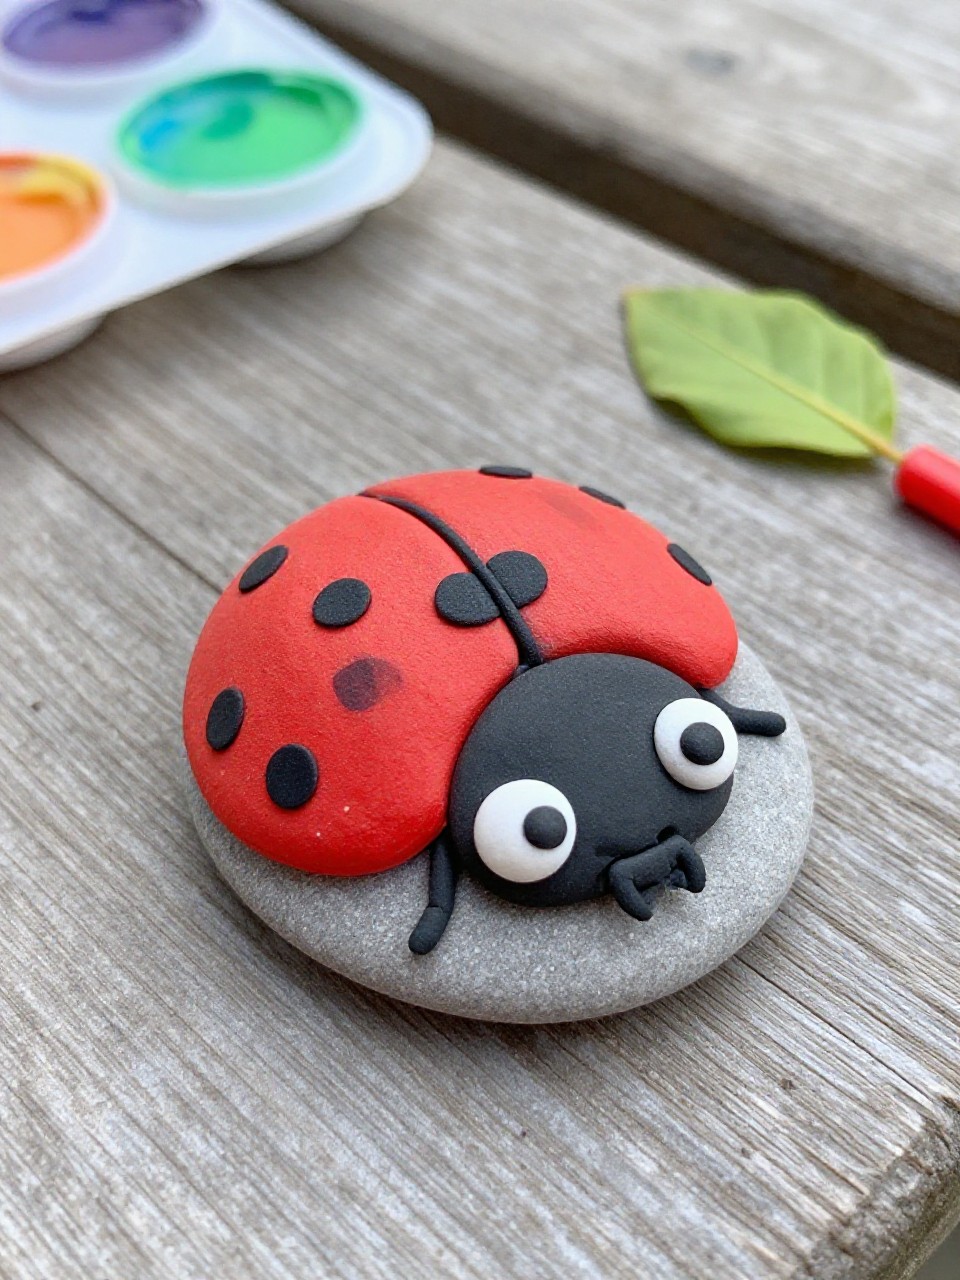
This tiny friend is a shell painted red with black dots, glued to a smooth pebble “leaf.” It’s quick, cute, and perfect for garden-themed play or desk decor.
Materials Needed:
- Clean pistachio shells
- Small smooth pebble
- Red, black, and white acrylic paint
- Craft glue
- Fine paintbrush or paint pen
How to make it:
- Paint shell red; add black head and dots with white eye highlights.
- Paint a simple green leaf vein on the pebble if desired.
- Glue the shell onto the pebble and let dry.
- Display on a windowsill or give as a tiny gift.