


In This Article Show
Keeping kid busy, finding simple projects for class, or planning a rainy afternoon can be hard. Buttons are small, colourful, and easy to turn into cute craft that people love to buy. This list gives you fun, simple button projects you can make and sell for extra income.

Each idea uses basic supplies, looks charming, and is beginner-friendly. Let’s dive into the best button crafts to start your mini shop.
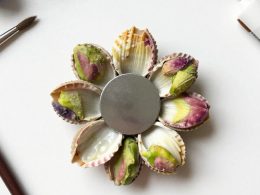
1. Button Flower Bouquet Magnets

These sweet magnets look like tiny flower bouquets, with layered buttons as blossoms and a bit of twine for stems. They’re quick to make, cheerful on any fridge, and perfect for gift sets or spring markets.
Materials Needed:
- Mixed colorful buttons (various sizes)
- Strong magnet discs
- Hot glue gun and glue sticks
- Twine or green embroidery floss
- Small felt circles (for backing)
How to make it:
- Cut small felt circles slightly larger than your magnets.
- Glue layered buttons together to form flowers; add smaller buttons as centers.
- Glue short twine pieces as stems and add a floss leaf if desired.
- Glue the bouquet onto felt, attach magnet on back, and let set before packaging.
2. Minimalist Button Stud Earrings

Simple and chic, these are small button studs that look modern and neat. They’re satisfying to make in batches and sell as affordable, giftable sets.
Materials Needed:
- Flat-back buttons (pair-matched, 8–12 mm)
- Hypoallergenic earring posts with backs
- E6000 or jewelry glue
- Rubbing alcohol and cotton swabs
- Small earring display cards
How to make it:
- Clean button backs and earring posts with alcohol and let dry.
- Add a tiny dot of jewelry glue to the post pad and press onto the button back.
- Wipe any extra glue and let cure fully.
- Mount on display cards for a polished look.
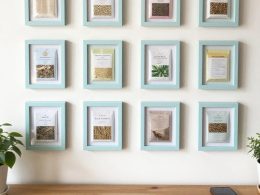
3. Button Monogram Wall Art

This framed initial is filled with layered buttons in one color family for a high-end look. Kids love sorting shades, and shoppers love custom letters for nurseries, dorms, and gifts.
Materials Needed:
- Shadow box frame or deep photo frame
- Cardstock or canvas board
- Assorted buttons in a single color palette
- Pencil and ruler
- Tacky glue or hot glue
How to make it:
- Sketch a large block letter on cardstock that fits your frame.
- Fill the outline with buttons, largest first, then layer smaller ones.
- Add a few contrasting buttons for highlights.
- Let dry, place in the frame, and close it up for a neat finish.
4. Rustic Button Bookmark Clips

These jumbo paper clips wear a little button stack “charm” at the top. They’re quick sellers for book lovers, teachers, and planners.
Materials Needed:
- Jumbo paper clips
- Large flat buttons and small accent buttons
- Felt scraps (tiny)
- Hot glue gun and glue sticks
- Ribbon (optional)
How to make it:
- Cut tiny felt pieces to fit the button back as a cushion.
- Glue felt to button, then glue button stack to the top loop of the paper clip.
- Add a ribbon knot under the button for flair if desired.
- Let cool and package in sets of two or three.
5. Button Heart Gift Tags

These kraft tags feature a small heart made of tiny buttons, sweet for weddings, Valentine’s Day, or handmade gifts. They’re satisfying because each tag feels like a mini artwork.
Materials Needed:
- Pre-cut kraft paper tags
- Small red, pink, or rainbow buttons
- Tacky glue
- Fine-tip marker or stamp (for “To/From”)
- Twine
How to make it:
- Lightly sketch a small heart on each tag.
- Fill the shape with buttons, starting at the edges then the center.
- Add a tiny marker message or stamp below.
- Thread twine and let dry flat before bundling.
6. Spring Button Flower Hair Clips

These hair clips have button blossoms attached to simple snap clips or alligator clips. They’re fun to mix and match and easy to sell in sets.
Materials Needed:
- Metal snap clips or alligator clips
- Medium buttons plus tiny center buttons
- Felt circles
- Hot glue gun and glue sticks
- Ribbon (optional for wrapping clip)
How to make it:
- Wrap clips with ribbon if desired and secure with glue.
- Glue felt circle to the top of clip as a base.
- Stack and glue buttons to form a flower on the felt.
- Let set and display on small cards.
7. Cozy Button Coasters

Round felt coasters are dotted with stitched-on buttons that look like confetti. They’re relaxing to sew and look adorable on coffee tables.
Materials Needed:
- Thick felt sheets (neutral or colorful)
- Assorted flat buttons
- Embroidery thread and needle
- Fabric scissors
- Fabric glue (optional)
How to make it:
- Cut felt circles about 4 inches wide.
- Arrange buttons evenly and stitch them on with X or straight stitches.
- Add a second felt circle as backing and stitch around the edge.
- Trim threads and bundle in sets of four.
8. Button Balloon Birthday Cards

These handmade cards show button “balloons” with drawn strings. Kids love choosing colors, and cards sell well year-round.
Materials Needed:
- Blank folded cards and envelopes
- Small colorful buttons
- Tacky glue
- Black fine-tip pen
- Washi tape (optional)
How to make it:
- Arrange a cluster of buttons on the card front like balloons.
- Glue buttons down and let set a minute.
- Draw strings from each button to a tied knot.
- Add a washi-tape border or hand-lettered message.
9. Farmhouse Button Photo Frame

A plain wooden frame gets a border of neutral buttons for a cozy farmhouse vibe. It’s easy, classy, and makes a fast seller at markets.
Materials Needed:
- Unfinished wooden photo frame
- Neutral buttons (cream, tan, white, wood-tone)
- Hot glue gun and glue sticks
- Clear sealer (matte)
- Sandpaper (fine)
How to make it:
- Lightly sand the frame and wipe dust.
- Glue buttons around the border, mixing sizes and tones.
- Seal with a thin coat of matte sealer.
- Let dry and add a sample photo for display.
10. Button Tree Canvas

This small canvas shows a painted trunk with a round button canopy. It’s relaxing to build, and each tree looks unique.
Materials Needed:
- Mini canvas or canvas board
- Acrylic paint and brush
- Assorted green buttons (plus a few flowers or red “apples”)
- Pencil
- Tacky glue
How to make it:
- Lightly sketch and paint a simple tree trunk and branches; let dry.
- Arrange buttons in a round canopy shape.
- Glue buttons down, layering for depth.
- Add a few accent buttons and let dry before selling.
11. Nautical Button Anchor Keychain

A sturdy felt anchor shape is topped with navy and white buttons and attached to a key ring. It feels coastal and sells well for summer.
Materials Needed:
- Navy felt sheets
- White and navy buttons
- Key ring with short chain
- Embroidery thread and needle
- Hot glue (optional)
How to make it:
- Cut two matching anchor shapes from felt.
- Stitch buttons onto the front piece in a simple pattern.
- Sandwich the chain end between felt layers and blanket-stitch around.
- Trim threads and attach to key ring.
12. Rainbow Button Barrette

A straight line of buttons in rainbow order sits on a sleek metal barrette. It’s bold, happy, and great for school spirit days.
Materials Needed:
- Metal barrette blanks
- Small flat buttons in rainbow colors
- Strong jewelry glue
- Rubbing alcohol
- Toothpick (for glue)
How to make it:
- Clean barrette surface with alcohol and dry.
- Lay out buttons in rainbow order to fit the barrette length.
- Glue buttons on, pressing gently and wiping excess.
- Let cure fully before packaging on display cards.
13. Button Snowman Ornaments

Three stacked white buttons become a tiny snowman with a ribbon scarf. They’re charming, light to ship, and perfect for holiday fairs.
Materials Needed:
- White buttons (small, medium, large)
- Black seed beads or marker for eyes/buttons
- Orange felt or paper for nose
- Ribbon or twine for scarf and hanging loop
- Hot glue
How to make it:
- Glue three white buttons in a vertical stack.
- Add eyes and buttons with tiny beads or a marker.
- Glue on a tiny orange nose and tie a ribbon scarf.
- Add a hanging loop at the top and let set.
14. Botanical Button Tote Patch

A small fabric patch with button “blooms” is stitched onto a plain tote. It’s eco-friendly, useful, and upgrades budget totes into sellable gifts.
Materials Needed:
- Plain canvas tote
- Cotton fabric scrap for patch
- Mixed buttons (floral colors)
- Embroidery thread and needle
- Fabric glue (optional)
How to make it:
- Cut a rectangle patch and hem edges with a running stitch.
- Stitch buttons as flowers; add simple stem stitches.
- Position on tote and hand-stitch around the edges.
- Press lightly and tag with care instructions.
15. Galaxy Button Planet Pins

These small pins show “planets” made from marbled buttons on felt circles with a safety pin back. They feel trendy and make great low-cost add-ons.
Materials Needed:
- Felt sheets (black, navy, or purple)
- Marbled or metallic buttons
- Safety pin backs or brooch pins
- Hot glue gun and glue sticks
- Silver marker for star dots
How to make it:
- Cut felt circles slightly larger than your buttons.
- Glue a marbled button in the center as the planet.
- Add tiny silver star dots around with marker.
- Glue on the pin back and let cool before carding.