


In This Article Show
Keeping kids busy can be tough, especially on rainy days or during quiet classroom time. Walnut shells are tiny, sturdy, and surprisingly perfect for simple crafts that feel like little treasures. This list gives you fun, easy projects that turn everyday shells into boats, bugs, animals, ornaments, and more.

Each idea is beginner-friendly and uses common supplies. Let’s dive into playful walnut shell crafts you can make today.
1. Walnut Shell Sailboat

This tiny boat uses a half walnut shell as the hull with a paper sail, and it looks adorable floating in a bowl of water or sitting on a shelf. Kids love choosing sail colors and testing how their boats glide, making it a simple, satisfying STEM-meets-art project.
- Half walnut shells (cleaned and dried)
- Toothpicks
- Colored paper (for sails)
- Modeling clay or hot glue (adult help)
- Washable markers or acrylic paint
How to make it:
- Clean and dry the walnut shell halves.
- Press a small ball of clay inside the shell and anchor a toothpick mast into it.
- Cut a small triangle sail, poke two holes, and slide it onto the toothpick; decorate the shell if desired.
- Let glue or paint dry, then float in a shallow tray or display on a windowsill.
2. Tiny Walnut Shell Ladybug

A painted red shell with black spots turns into a cheerful ladybug with little paper or felt wings. Kids enjoy dotting the spots and adding cute eyes, and the quick results make it great for short craft times.
Materials Needed:
- Half walnut shells
- Red and black acrylic paint
- Googly eyes (small)
- Black paper or felt (for head and wings)
- Glue
How to make it:
- Paint the shell red and let it dry.
- Add a black head shape at the front and dot black spots across the shell.
- Glue on tiny wings and googly eyes.
- Let dry and display on a leaf or desk.
3. Walnut Shell Turtle

A green felt body peeks out from a domed walnut shell “shell,” creating a cute mini turtle. Kids like arranging the flippers and drawing a tiny smile, and it’s easy enough for beginners.
Materials Needed:
- Half walnut shells
- Green felt or foam
- Googly eyes
- Green paint (optional)
- Glue
How to make it:
- Paint the walnut shell green if desired; let it dry.
- Cut a turtle body with four flippers and a head from felt or foam.
- Glue the shell on top of the body and add googly eyes.
- Let set, then place on a mini “pond” drawn on paper.
4. Walnut Shell Mouse

A soft gray-painted shell becomes the mouse body with a paper ear pair and a string tail. Kids enjoy giving each mouse a personality with whiskers and a tiny nose dot.
Materials Needed:
- Half walnut shells
- Gray or brown paint
- Pink paper or felt (ears)
- String or yarn (tail)
- Black marker and glue
How to make it:
- Paint the shell gray or brown; let dry.
- Cut two small ear shapes and glue them near the top edge.
- Glue on a yarn tail; draw eyes, whiskers, and a nose.
- Dry fully and place in a “cheese” triangle made from yellow paper.
5. Mini Walnut Shell Planter Magnet

A half shell becomes a tiny faux planter filled with moss or felt “succulent,” attached to a magnet for the fridge. Kids love making a garden of tiny plants that never need water.
Materials Needed:
- Half walnut shells
- Craft moss or green felt
- Small self-adhesive magnet
- Glue
- Optional tiny beads (pebbles)
How to make it:
- Clean shell and glue a magnet to the flat back.
- Fill the shell with glue and tuck in moss or rolled felt to mimic a succulent.
- Add a few tiny bead “pebbles.”
- Let dry and stick on a metal surface.
6. Walnut Shell Penguin

A black-and-white paint job and a small felt beak turn the shell into a chubby penguin. Kids enjoy the simple color blocking and adding a tiny scarf from yarn.
Materials Needed:
- Half walnut shells
- Black and white acrylic paint
- Orange felt or paper (beak and feet)
- Yarn (mini scarf, optional)
- Glue
How to make it:
- Paint the shell black, leaving a white oval belly; let dry.
- Cut and glue on orange feet and a small beak.
- Wrap and glue a tiny yarn scarf if desired.
- Dry and stand it on a cotton “snow” base.
7. Floating Walnut Shell Tea Light (LED)

A polished walnut shell holds a mini LED tea light for a safe, cozy glow. Kids like setting them in a bowl of water or on a shelf as calm night lights.
Materials Needed:
- Half walnut shells (sturdy)
- Mini LED tea lights or submersible LEDs
- Modeling clay or hot glue (adult help)
- Optional metallic paint
- Clear bowl with water (for floating display)
How to make it:
- Paint shells metallic if desired; let dry.
- Secure a mini LED inside with clay or glue so it sits snugly.
- Test balance and adjust clay.
- Float in a water bowl or place on a tray; never use real flame.
8. Walnut Shell Bee

A bright yellow-and-black striped shell with tiny wings makes a happy little bee. Kids love the bold stripes and buzzing it around their desk.
Materials Needed:
- Half walnut shells
- Yellow and black paint
- White paper or vellum (wings)
- Googly eyes
- Glue
How to make it:
- Paint the shell yellow; add neat black stripes.
- Cut two small wing shapes and glue to the top.
- Add googly eyes to the front.
- Let dry and perch on a paper flower.
9. Walnut Shell Tiny Treasure Box

Two shell halves hinge together to create a pocket-size box for beads or notes. Kids enjoy hiding little secrets and decorating the outside like a mini jewel.
Materials Needed:
- Two matching walnut shell halves
- Small fabric hinge (ribbon or washi tape)
- Felt scrap (lining)
- Glue
- Gems or stickers (decor)
How to make it:
- Glue a felt oval inside one half as lining.
- Attach a ribbon hinge along the back edges to connect both halves.
- Decorate the outside with gems or stickers.
- Let dry and store tiny treasures.
10. Walnut Shell Cradle with Clothespin Doll

A walnut shell becomes a sweet baby cradle with a tiny clothespin doll tucked in. Kids enjoy making miniature blankets and rocking the cradle softly.
Materials Needed:
- Half walnut shells
- Mini clothespin or bead doll
- Felt or fabric scrap (blanket)
- Paint or markers (decorate cradle)
- Glue
How to make it:
- Paint or decorate the shell outside; let dry.
- Wrap the clothespin doll with felt as a blanket.
- Glue the doll gently into the shell cradle.
- Add a tiny pillow and display on a paper “rug.”
11. Walnut Shell Snowman Ornament

Stack two small shells on a felt circle to make a mini snowman face and body, then hang it as a winter ornament. Kids love adding scarves, buttons, and glittery snow.
Materials Needed:
- Two half walnut shells (one slightly smaller)
- White paint
- Felt (scarf) and tiny buttons
- Ribbon or twine (hanger)
- Glue and glitter (optional)
How to make it:
- Paint two shells white; let dry.
- Glue the smaller “head” above the larger “body” on a felt circle.
- Add a scarf, buttons, and face details.
- Glue on a ribbon loop to hang and let it dry.
12. Walnut Shell Mini Boat Regatta Game

Make several colorful shell boats and race them by blowing through straws across a tray of water. Kids love the friendly competition and testing sail shapes.
Materials Needed:
- Half walnut shells
- Toothpicks
- Foam or paper sails
- Modeling clay
- Shallow tray, water, and straws
How to make it:
- Build simple sailboats with clay anchors and toothpick masts.
- Cut bright sails and attach; label each boat.
- Fill a tray with water and set boats in.
- Use straws to blow and race; crown a winner.
13. Walnut Shell Mushroom Fairy House

A painted red cap with white dots tops a shell “mushroom” sitting on a bottle-cap base, turning into a tiny fairy house. Kids enjoy adding doors, windows, and a path of pebble beads.
Materials Needed:
- Half walnut shells
- Red and white paint
- Bottle cap or wooden disk (base)
- Fine marker or paint pen
- Mini beads or moss (yard decor)
How to make it:
- Paint the shell red and dot with white for the cap; let dry.
- Glue the shell onto the bottle cap base.
- Draw a tiny door and windows on the base or add paper cutouts.
- Decorate with moss and beads, then display.
14. Walnut Shell Fish Magnet

A bright shell body gets a felt tail, fins, and a googly eye, then sticks to the fridge as a happy fish magnet. Kids love choosing ocean colors and patterns.
Materials Needed:
- Half walnut shells
- Acrylic paint in ocean colors
- Felt or craft foam (tail and fins)
- Googly eye
- Small magnet and glue
How to make it:
- Paint the shell in a bold fish color; let dry.
- Cut and glue on tail and fins from felt or foam.
- Add a googly eye and simple scale dots.
- Glue on the magnet to the back, let cure, then display.
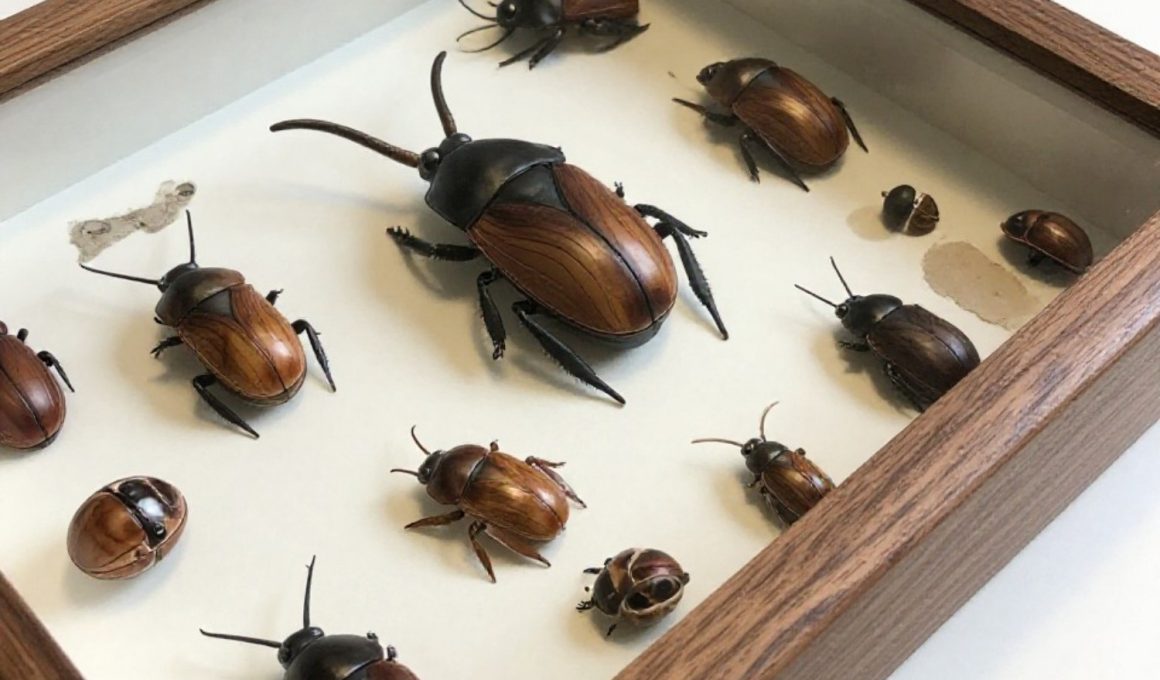
15. Walnut Shell Bug Collection Shadow Box

Create different bugs—beetle, bee, ladybug—each from painted shells, then mount them in a small box frame like a mini museum. Kids enjoy building a “collection” and labeling the species they invent.
Materials Needed:
- Several half walnut shells
- Acrylic paints and fine markers
- Paper or felt (wings, legs)
- Small cardboard box or frame
- Glue and labels
How to make it:
- Paint shells into different bugs with stripes, spots, and shiny colors; let dry.
- Add paper or felt wings and simple legs.
- Arrange and glue bugs inside the small box.
- Write labels and display your tiny entomology set.