


In This Article Show
Here at the end of summer, many of us are looking for easy ways to keep kids busy, use up leftover camp supplies, and bottle up warm memories before school starts. This list brings fun, simple craft ideas that feel sunny, beachy, and outdoorsy without being hard to set up.
Each project helps kids remember summer adventures while practicing basic art skills. Let’s jump into creative, low-stress crafts that parents, teachers, and beginners can enjoy together.
1. Seashell Memory Frame
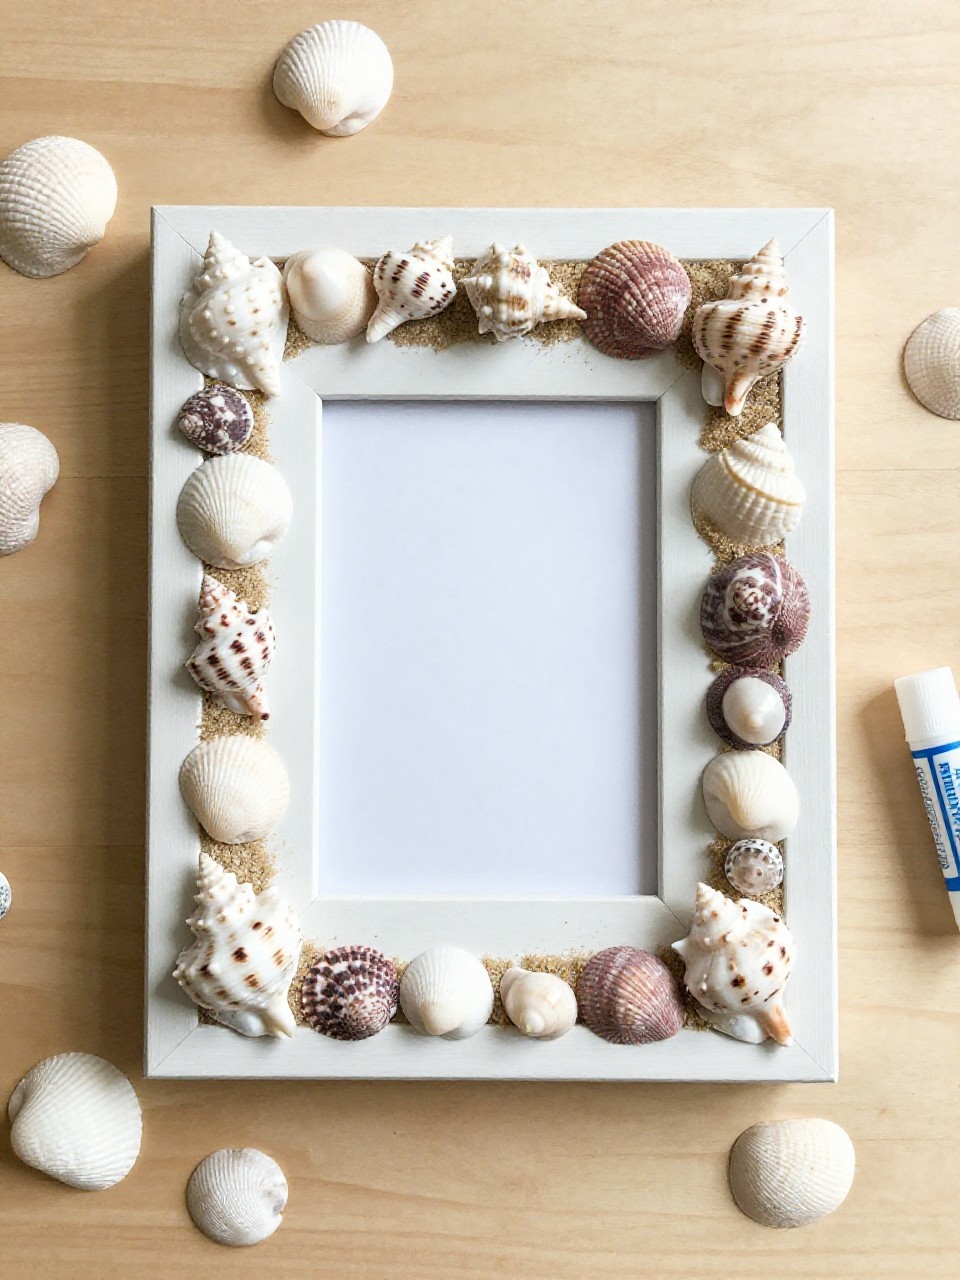
This frame looks like a tiny beach, with real shells and sand glued around the edges of a picture frame. Kids love choosing a favorite summer photo and arranging shells like treasure, and the project is simple enough for beginners.
Materials Needed:
- Plain wooden or cardboard photo frame
- Assorted seashells (clean and dry)
- White school glue or hot glue (adult help)
- Craft sand or brown sugar (optional for a sandy look)
- Ribbon or twine (optional hanger)
How to make it:
- Remove the glass and backing, and protect the work surface.
- Glue shells around the frame, mixing sizes and shapes.
- Sprinkle sand into wet glue gaps and press gently; tie ribbon for a hanger if you like.
- Let dry fully, reassemble with a favorite summer photo, and display.
2. Sunburst Paper Plate Suncatcher
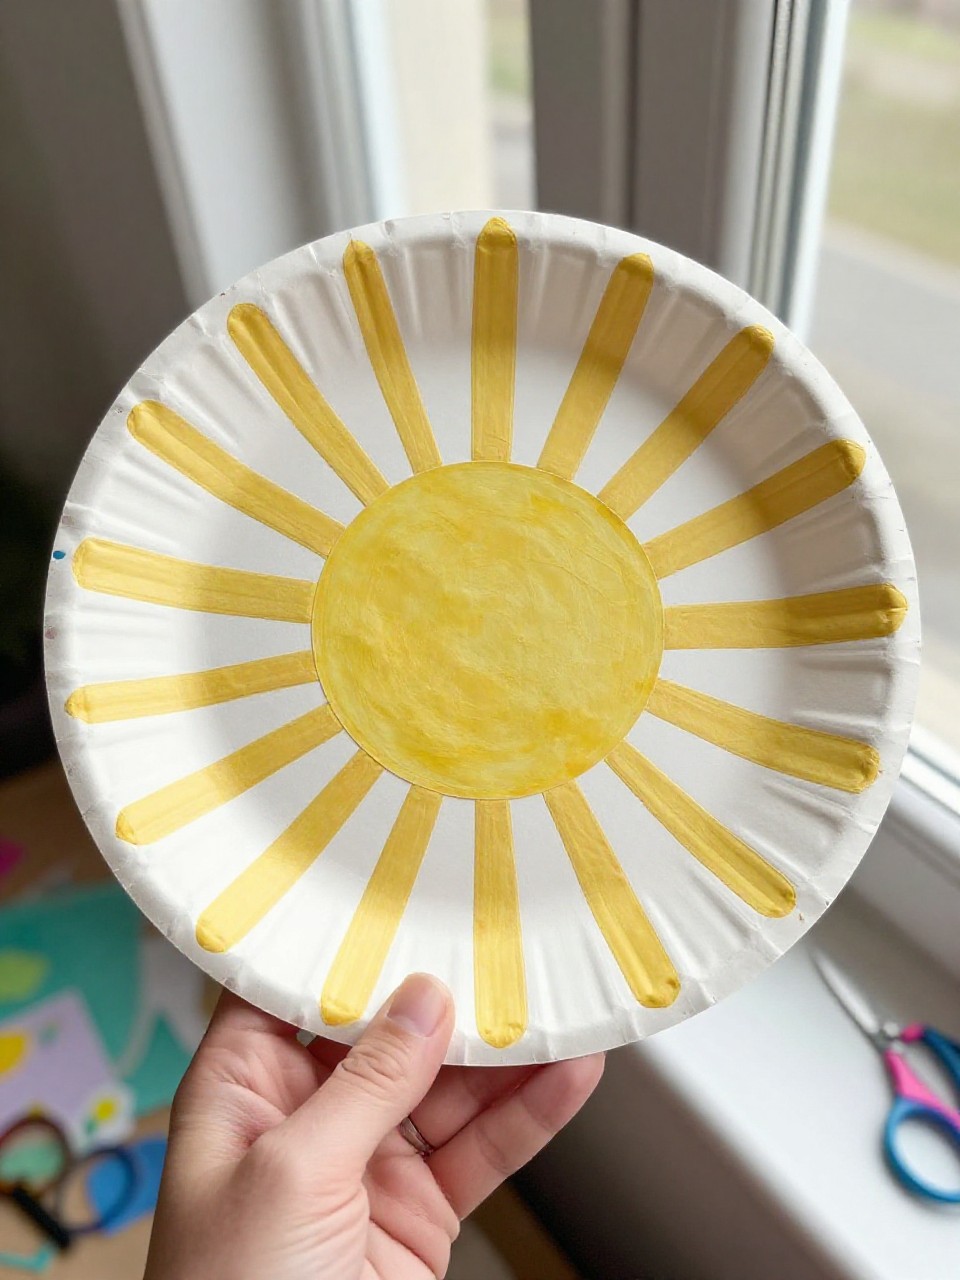
This suncatcher looks like a bright summer sun with colored tissue “rays” glowing in the window. Kids enjoy layering see‑through colors and watching light shine through, and it’s easy enough for all ages.
Materials Needed:
- Paper plate (sturdy)
- Colored tissue paper squares
- Clear contact paper or packing tape
- Scissors
- Marker or crayon (optional face)
How to make it:
- Cut a circle window out of the plate center.
- Stick contact paper behind the opening, sticky side facing through.
- Press tissue squares onto the sticky area and add paper triangles as “rays.”
- Seal with another contact layer, draw a happy sun face, and hang in a sunny window.
3. Beach-in-a-Bottle Discovery Jar
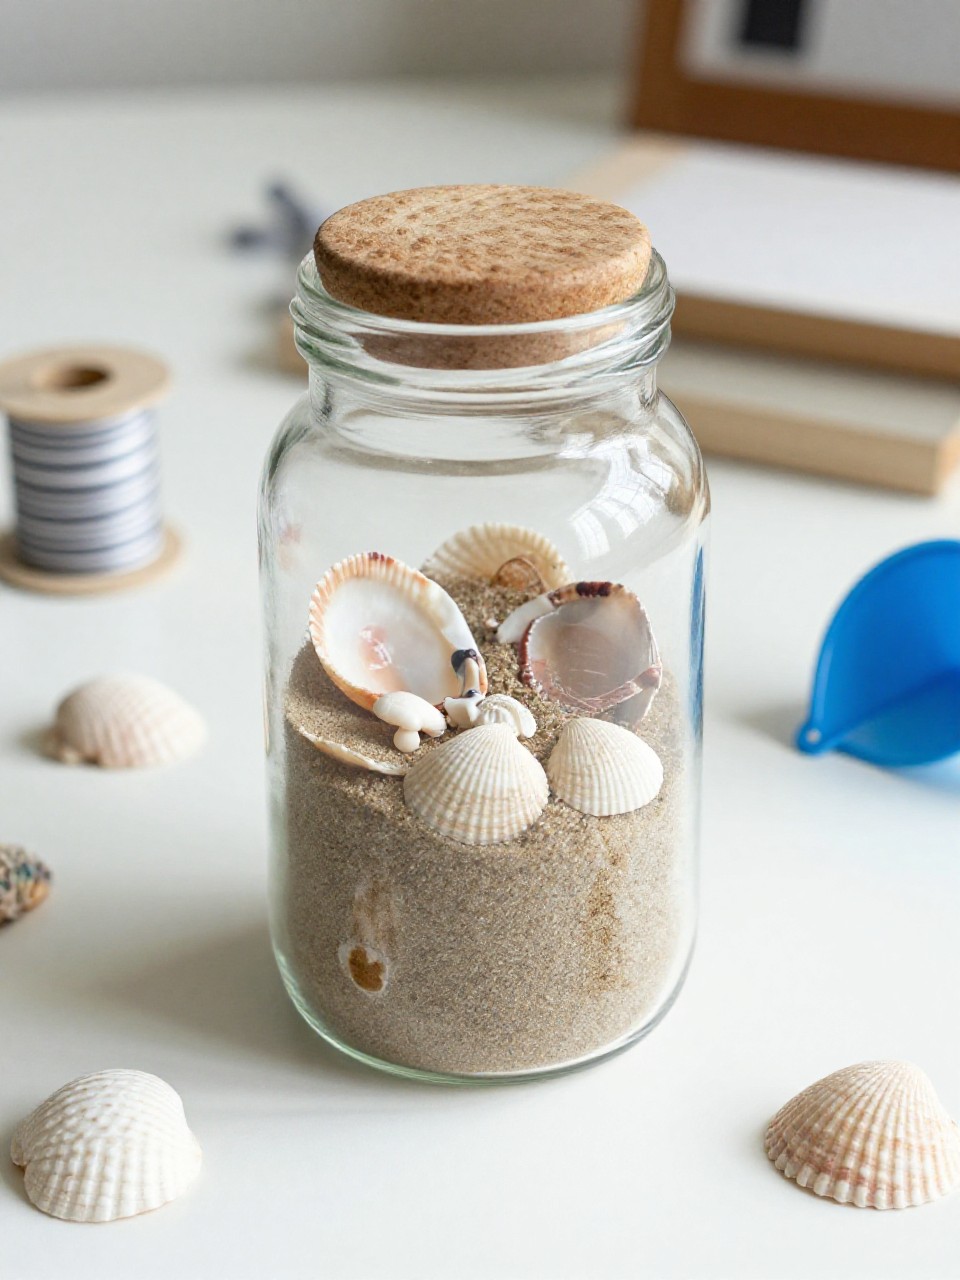
The jar looks like a tiny beach scene with sand, mini shells, and a paper umbrella or little note inside. Kids love shaking, searching, and building a scene they can hold; it’s a satisfying sensory craft.
Materials Needed:
- Clear plastic bottle or jar with lid
- Clean sand (play sand)
- Small shells, smooth pebbles
- Mini paper umbrella or tiny summer-themed charms
- Ribbon and label tag (optional)
How to make it:
- Add a layer of sand to the bottle.
- Drop in shells, pebbles, and a mini umbrella or charm.
- Close the lid tightly and decorate with ribbon and a tag.
- Gently shake and display on a windowsill or shelf.
4. Popsicle Stick Campfire Coaster
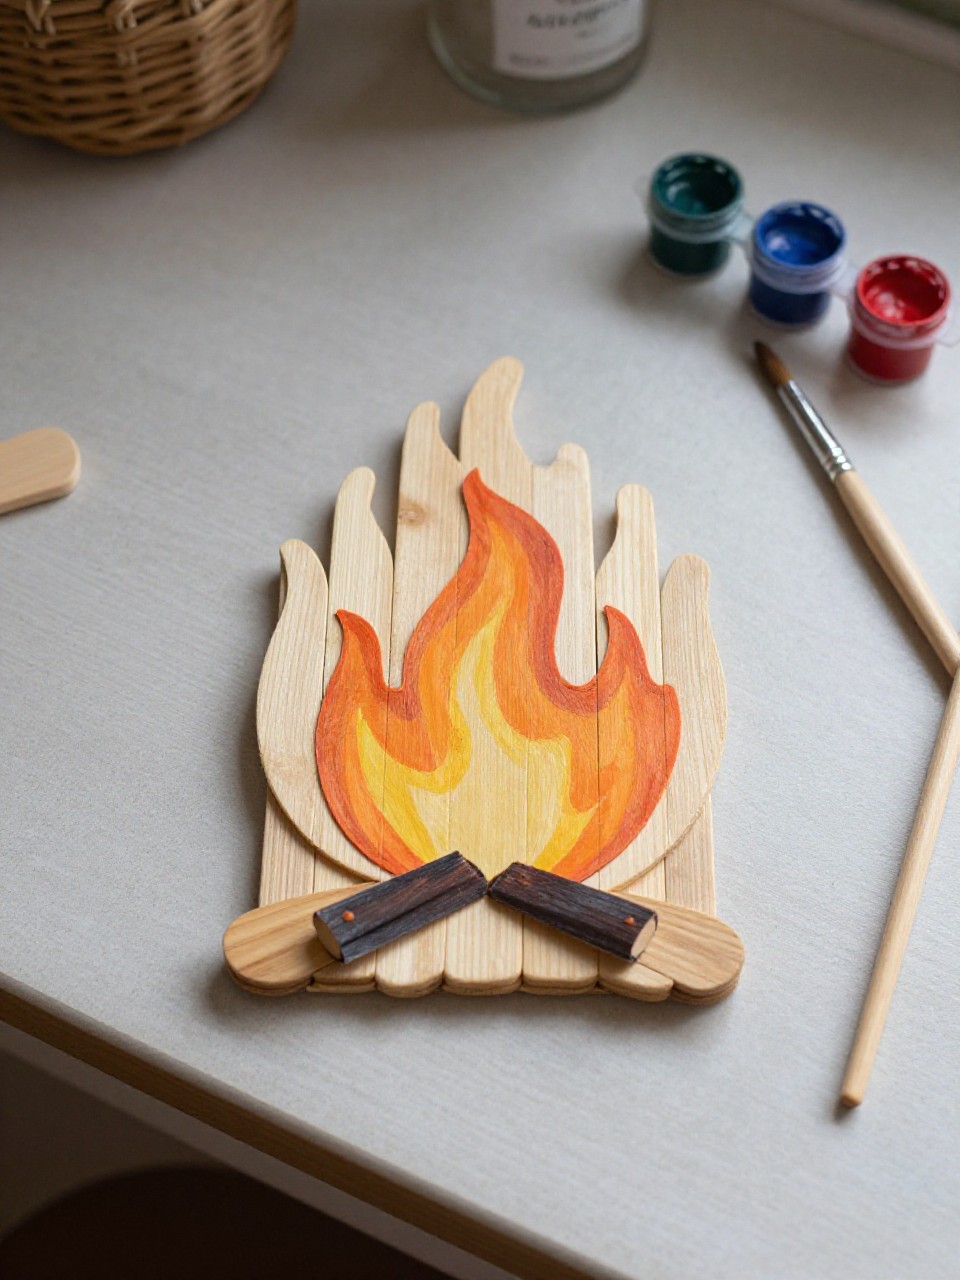
This coaster looks like a tiny campfire with painted “logs” and bright paper flames in the center. Kids enjoy arranging sticks like a real fire and mixing warm paint colors; it’s quick and beginner-friendly.
Materials Needed:
- Popsicle sticks (8–10)
- Brown, orange, red, yellow paints
- Glue
- Small felt or foam circle (optional backing)
- Paintbrush
How to make it:
- Paint several sticks brown for logs; let dry.
- Glue sticks in a crisscross square to form a flat coaster base.
- Cut and glue paper or foam “flames” in the center; add orange and yellow highlights.
- Attach felt backing if desired and let dry before using.
5. Watermelon Slice Fan
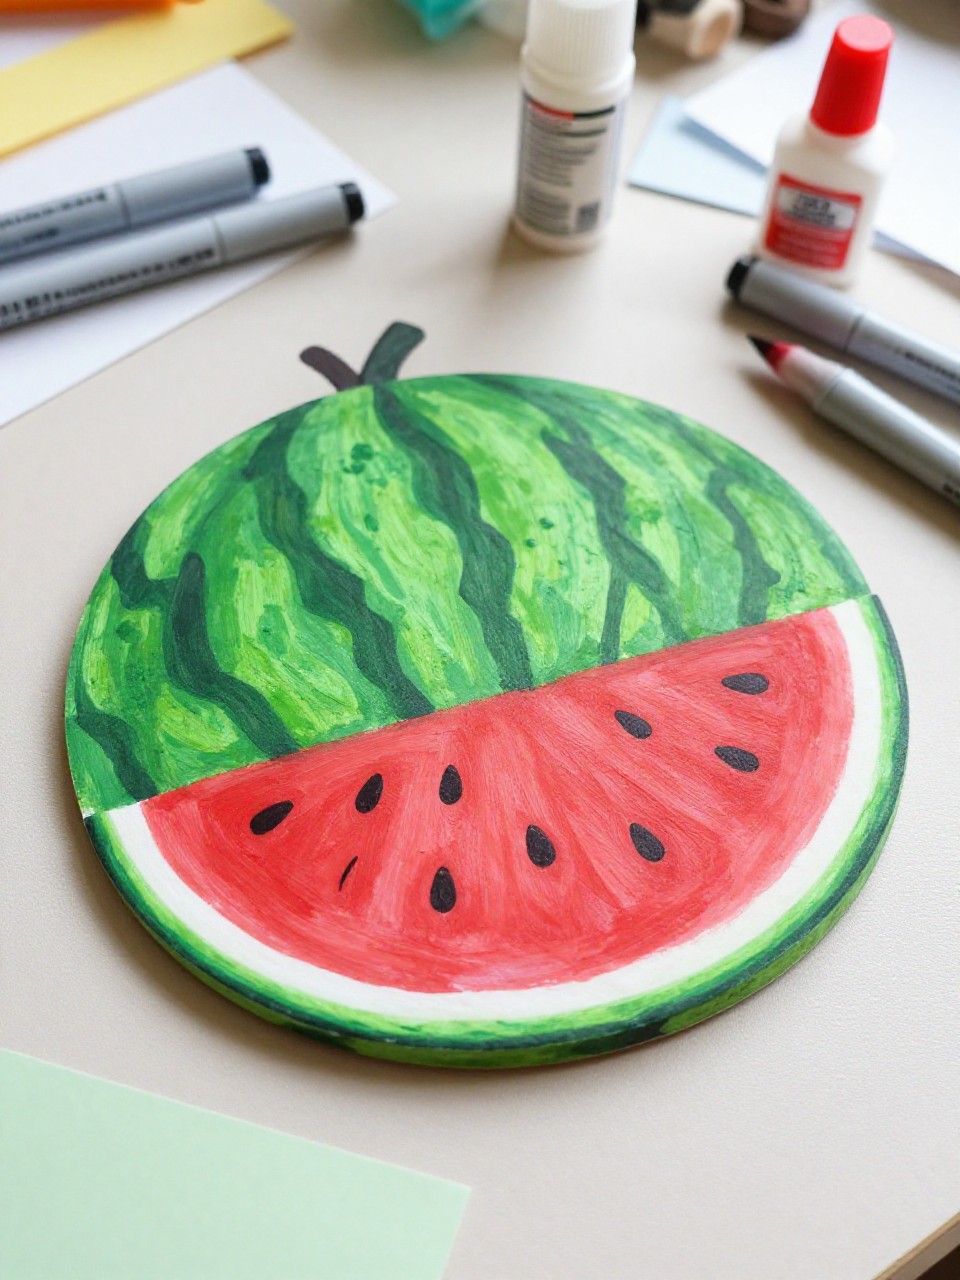
This handheld fan looks like a juicy watermelon wedge with black seed dots and a green rind. Kids love painting bright colors and then cooling themselves on hot afternoons; it’s easy and useful.
Materials Needed:
- Sturdy paper or cardstock
- Craft stick
- Red, pink, green, white paints or markers
- Glue and black marker (for seeds)
How to make it:
- Cut a large half-circle from cardstock.
- Paint red/pink center and green/white rind on the curved edge.
- Draw black seeds and decorate the craft stick handle.
- Glue the stick to the back, let dry, and fan away.
6. Tie-Dye Style Coffee Filter Fireworks
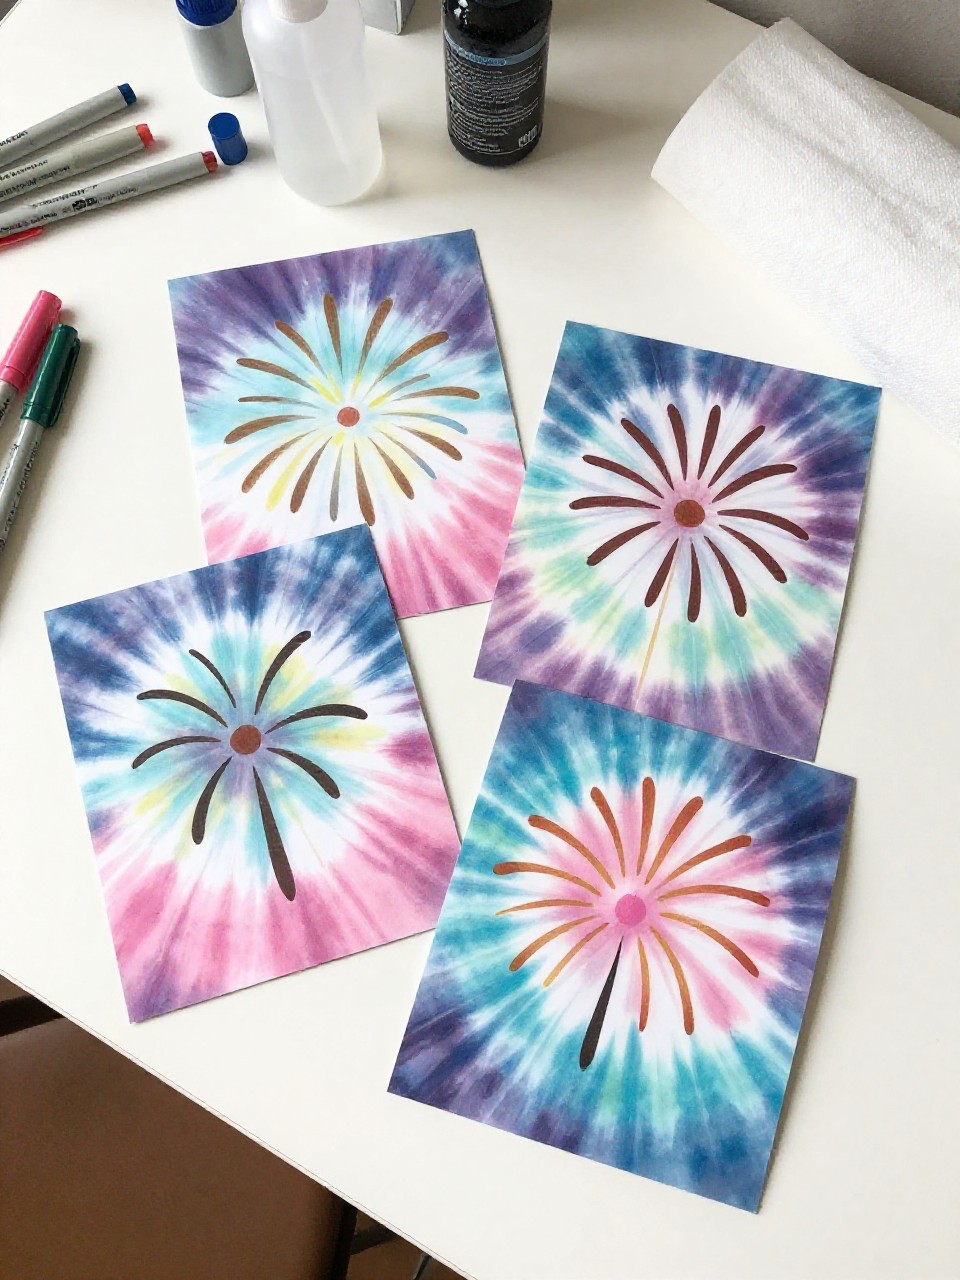
These look like soft, colorful bursts in the sky made from blended marker ink on coffee filters. Kids enjoy spraying water and watching colors spread like summer fireworks after sunset.
Material Needed:
- Round coffee filters
- Washable markers
- Spray bottle with water
- Paper towels
- String and tape (optional for hanging)
How to make it:
- Flatten filters and color patterns with markers.
- Lightly mist with water to blend colors.
- Blot on paper towels and let dry fully.
- Hang from the ceiling or window with string like a mini fireworks show.
7. Ocean Wave Salt-Painting
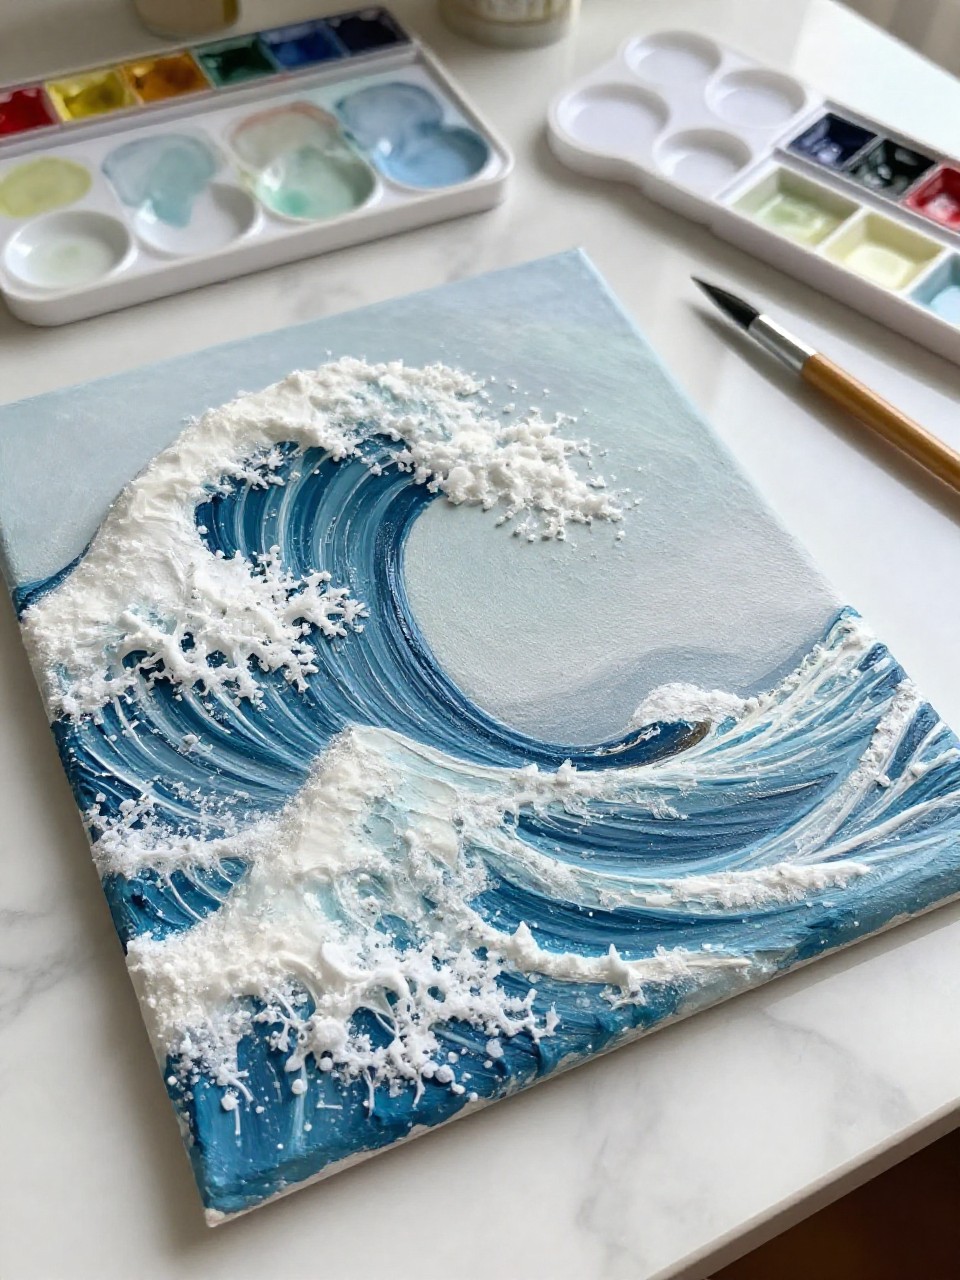
This artwork shows foamy blue-green waves with raised, sparkly salt texture. Kids love the magic of salt pulling paint into patterns that look like real surf; it feels like painting the beach.
Materials Needed:
- Watercolor paper or thick paper
- White glue
- Table salt
- Watercolor paints and brush
- Pencil (light sketch, optional)
How to make it:
- Lightly sketch wave shapes if desired.
- Trace waves with glue and sprinkle salt over the glue lines.
- Tap off extra salt and touch wet watercolor to the salted glue to watch it spread.
- Let dry flat and display your ocean scene.
8. Lemonade Stand Garland
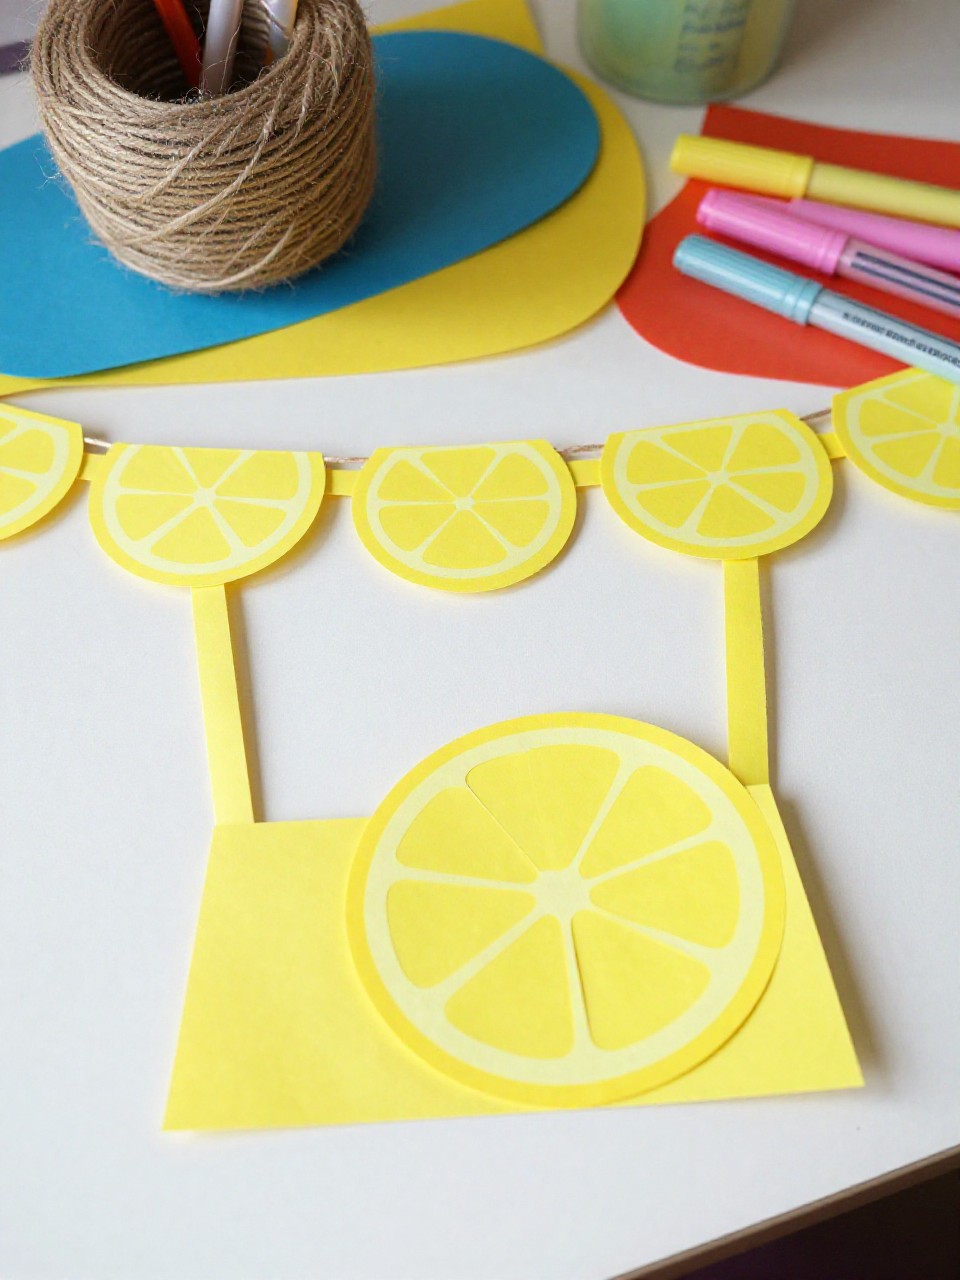
This garland looks like a string of cheerful lemon slices hanging across a window or party table. Kids enjoy tracing, cutting, and decorating slices, then seeing a room brighten instantly.
Materials Needed:
- Yellow cardstock or foam sheets
- White paper for “pith” rings
- Hole punch and twine
- Markers or crayons
- Glue stick
How to make it:
- Cut circles from yellow cardstock and smaller white rings.
- Glue white rings on yellow circles and add wedge lines with a marker.
- Punch small holes and thread twine through the slices.
- Hang across a mantel, window, or pretend lemonade stand.
9. Sandcastle Paper Bag Puppet
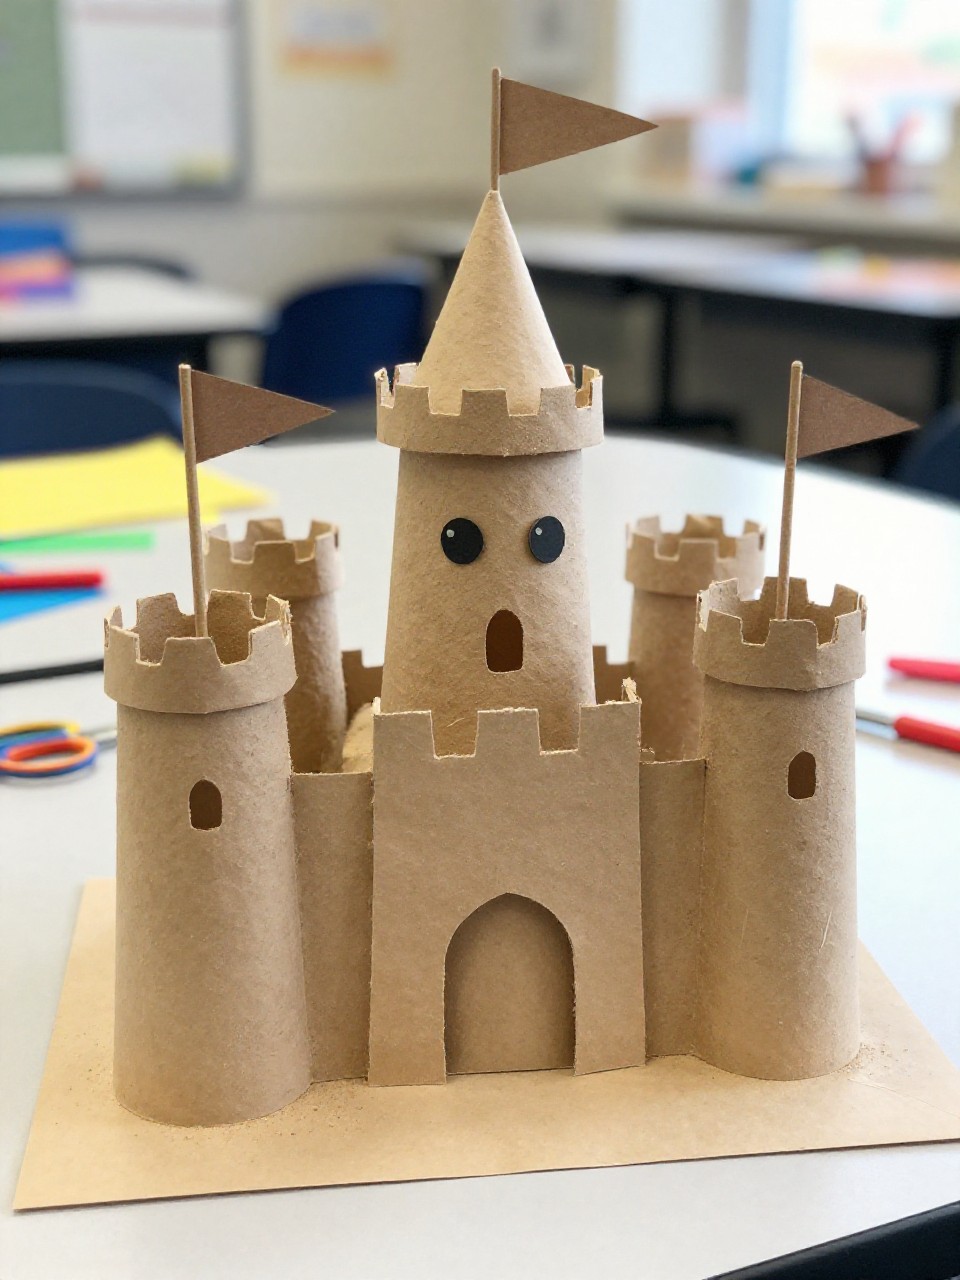
This puppet looks like a friendly sandcastle with tower cutouts, shell doodles, and a smiling face. Kids love mixing pretend play with art and telling beach stories after they build it.
Materials Needed:
- Paper lunch bag (brown or tan)
- Tan paint or crayon
- Construction paper (towers/flags)
- Glue stick and scissors
- Markers, stickers, or shell shapes
How to make it:
- Color the bag tan and flip so the flap is the face.
- Cut and glue paper towers, doors, and tiny flags.
- Draw windows, shells, and a happy face; add stickers if you like.
- Let dry and put on a beach puppet show.
10. Nature Sun Prints with Construction Paper
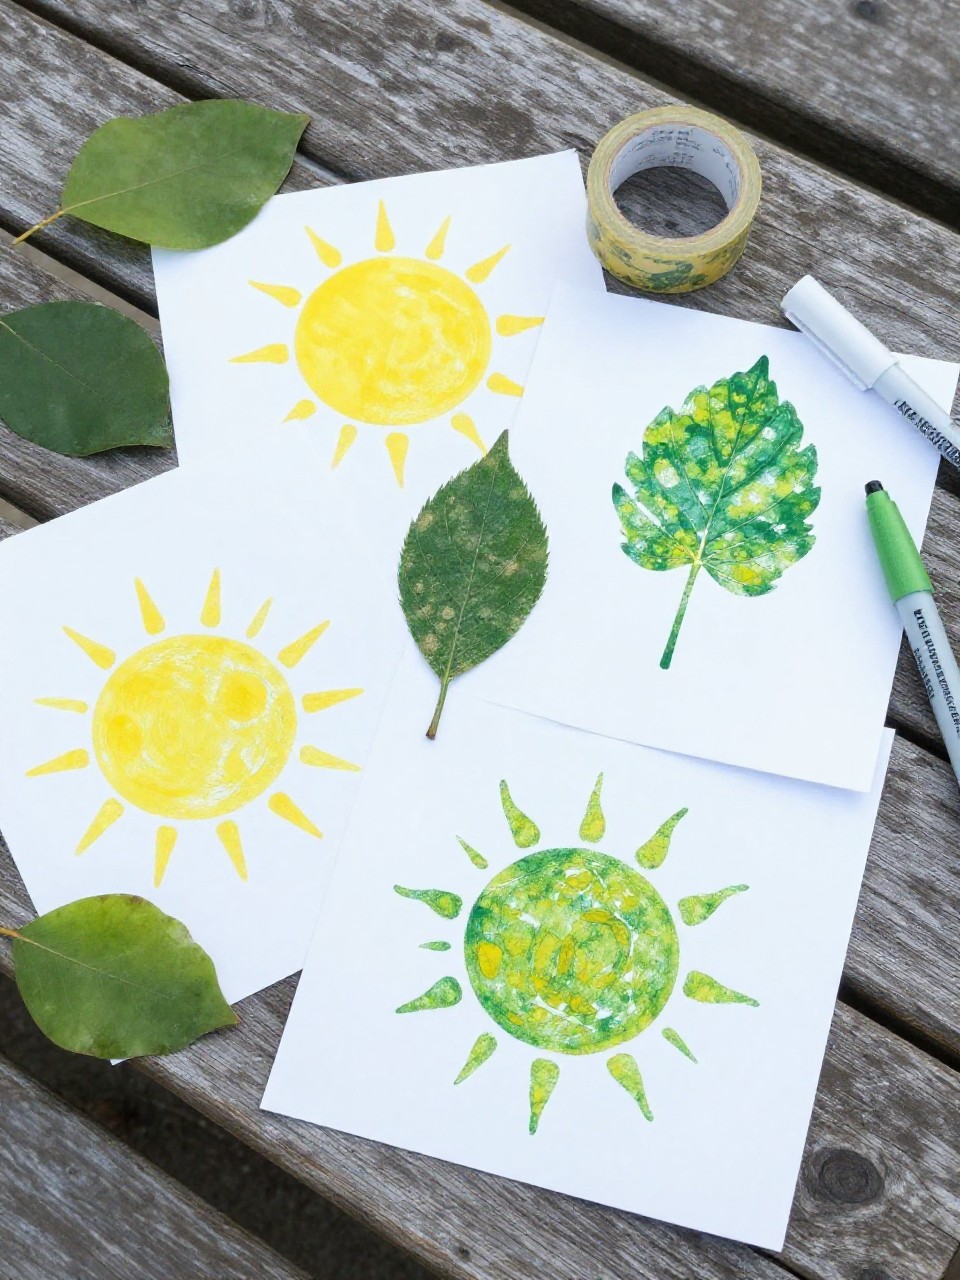
These prints show pale silhouettes of leaves and flowers against sun-faded paper, like a summer postcard from your yard. Kids enjoy collecting nature pieces and watching the sun slowly “paint” the paper.
Materials Needed:
- Dark construction paper
- Leaves, flowers, or small nature finds
- Clear plastic wrap or a lightweight acrylic sheet
- Tape or small rocks
- Marker for labeling (optional)
How to make it:
- Place nature items on the paper in a design.
- Cover with plastic wrap or acrylic and weigh edges so items stay flat.
- Leave in direct sunlight for several hours, then remove items.
- Label and display the silhouettes as end-of-summer art.
11. Painted Rock Ice Cream Cones
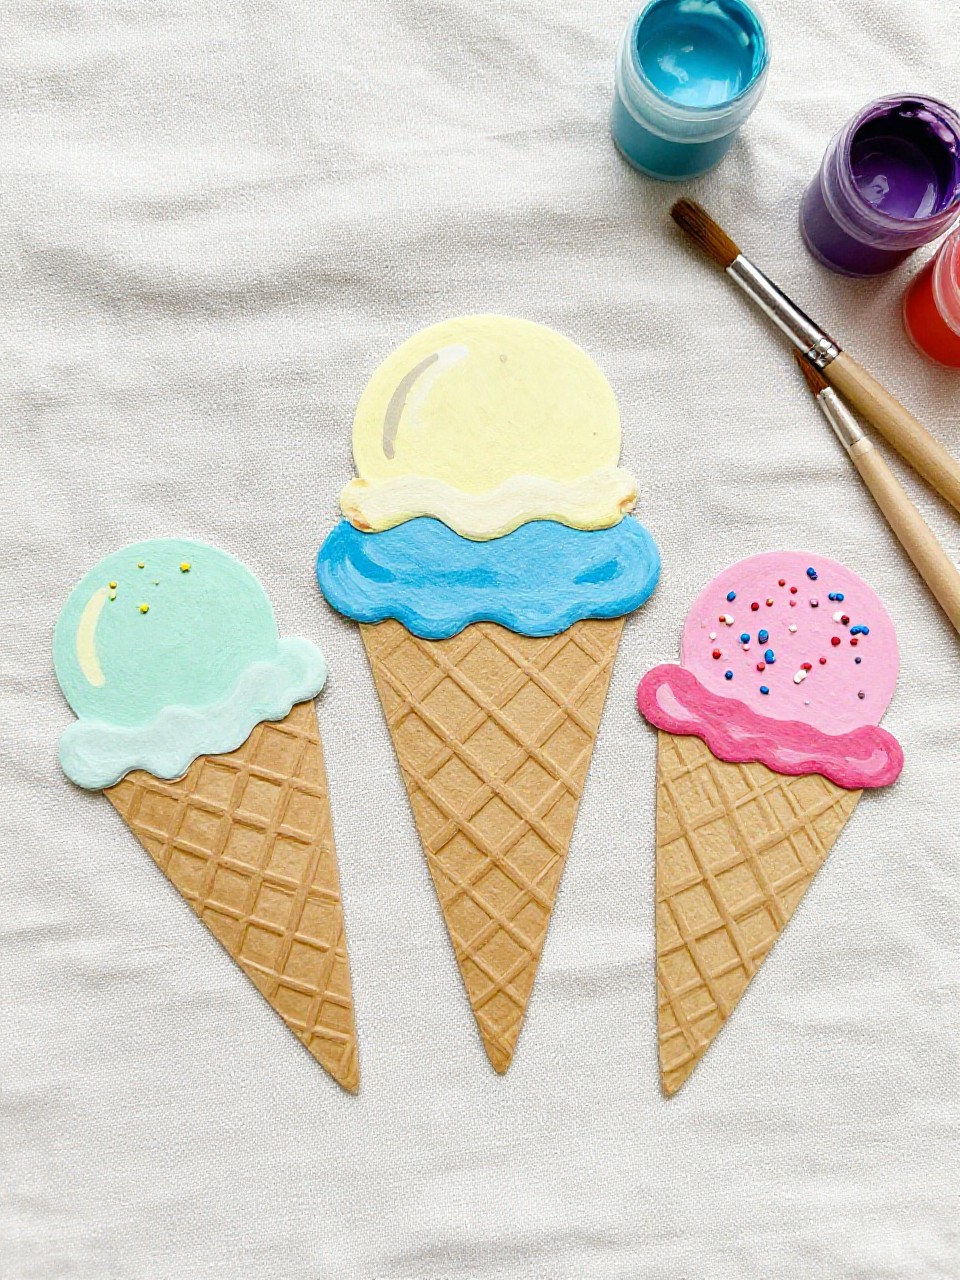
These rocks look like scoops of ice cream stacked on waffle cones with sprinkles and smiles. Kids love picking rock shapes for scoops and adding “flavors” and glitter, and the results make cute desk buddies.
Materials Needed:
- Smooth rocks (varied sizes)
- Acrylic paints and brushes
- Paint pen or fine marker
- Mod Podge or clear sealer (optional)
- Glitter (optional sprinkles)
How to make it:
- Wash and dry rocks; paint triangle “cones” and round “scoops.”
- Add lines for waffle texture and dots for sprinkles; draw faces if you want.
- Let dry and seal with Mod Podge for shine.
- Display in a bowl or gift to friends.
12. End-of-Summer Photo Postcards
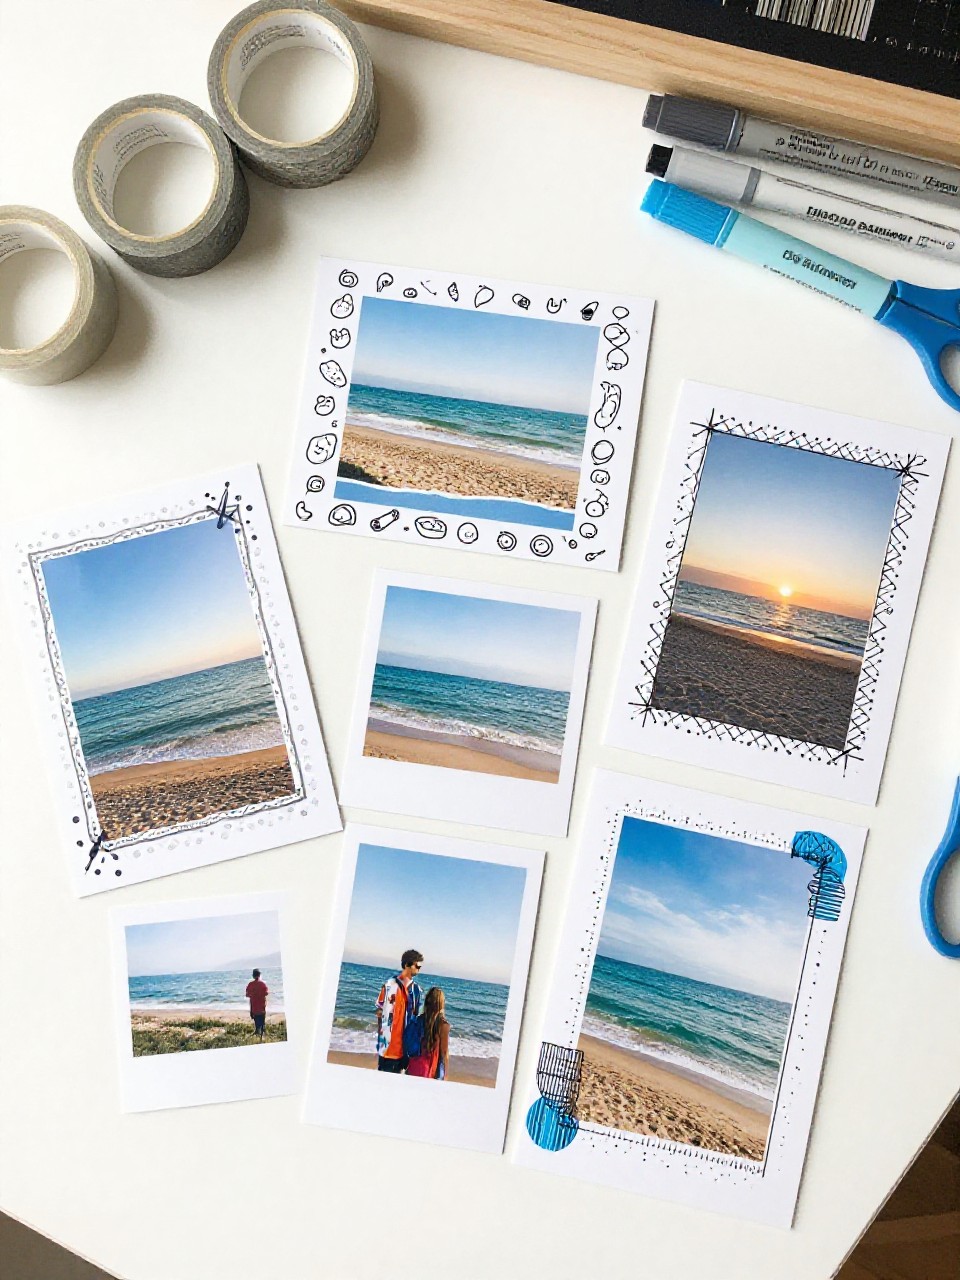
These look like bright postcards with doodled borders and simple collages from printed summer photos. Kids enjoy storytelling as they write short notes on the back and mail or trade them with friends.
Materials Needed:
- Blank index cards or postcard-sized cardstock
- Printed summer photos (small)
- Washi tape or glue stick
- Markers and stickers
- Postage stamps (optional for mailing)
How to make it:
- Glue or tape a photo on the front of the card.
- Add borders, captions, and stickers to match the memory.
- Write a short note on the back and address if mailing.
- Stamp and send, or keep in a memory box.
13. Sunset Silhouette Watercolor
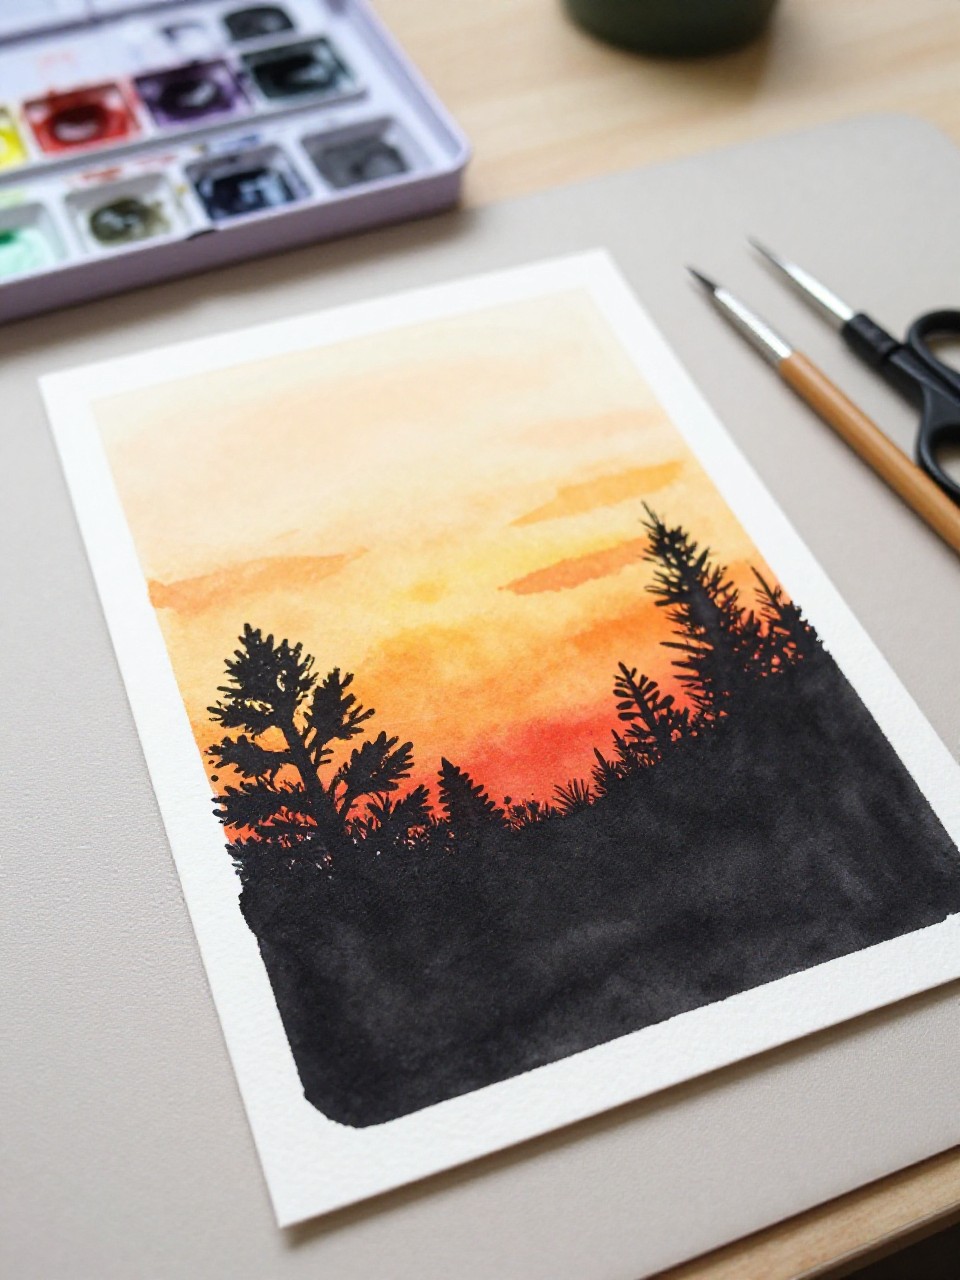
This painting shows a warm sunset wash with black silhouettes of palm trees, kites, or bikes in front. Kids enjoy the easy gradient sky and the dramatic shapes that pop when the paint dries.
Materials Needed:
- Watercolor paper
- Watercolor paints (yellow, orange, pink, purple)
- Black construction paper or black marker/paint
- Scissors and glue (if using paper silhouettes)
- Paintbrush
How to make it:
- Paint a sunset gradient across the paper and let dry.
- Cut simple silhouettes (palms, beach chairs, kids flying kites) from black paper.
- Glue shapes onto the dry sky or draw them with a black marker/paint.
- Press flat and display your evening scene.
14. Leaf-Printed Picnic Tote
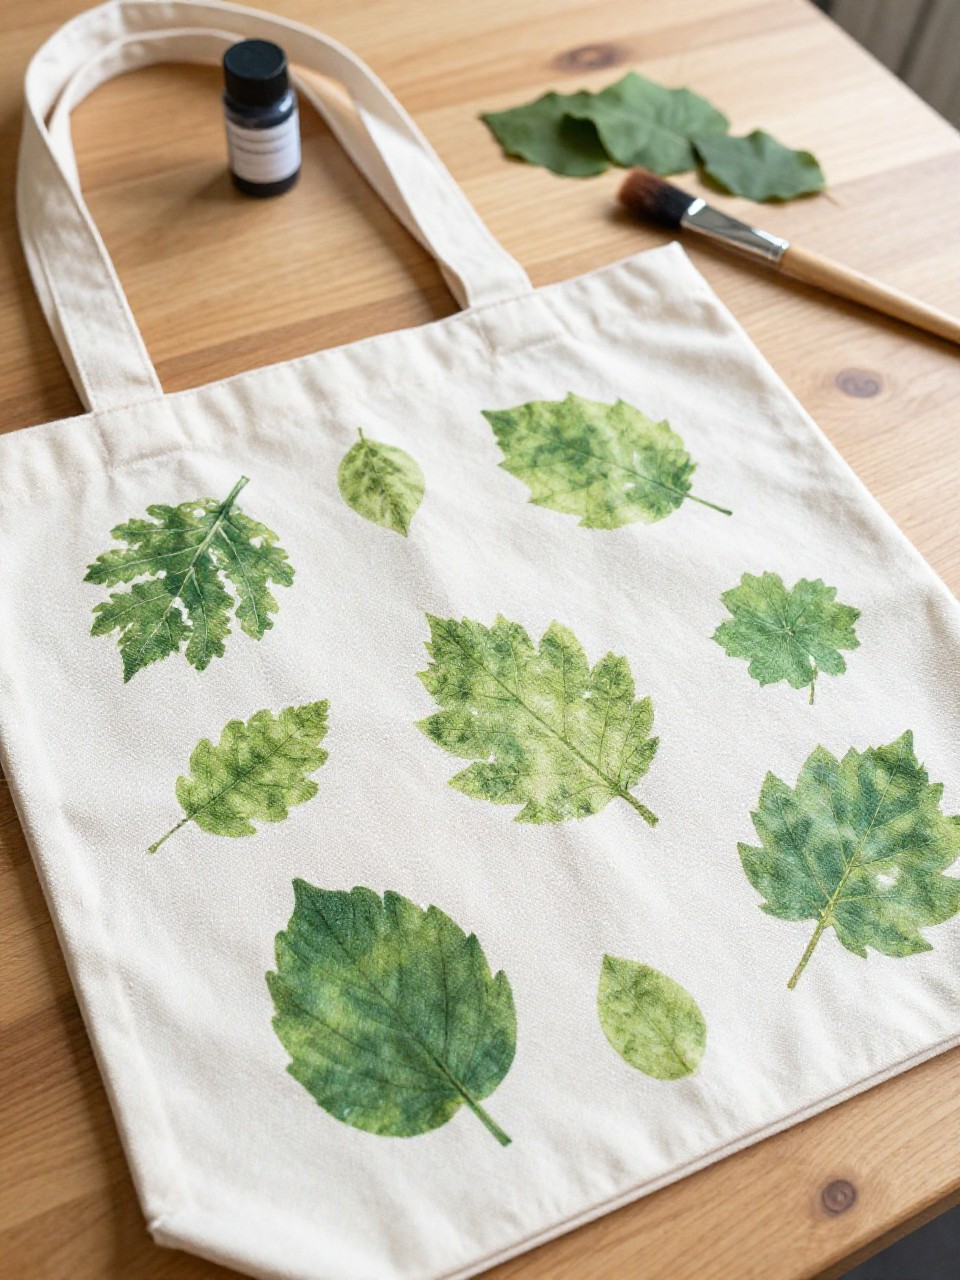
This tote looks like a summer picnic bag stamped with real leaf patterns in fresh greens and brights. Kids enjoy collecting leaves and pressing painty textures, and the finished bag is handy for books or snacks.
Materials Needed:
- Plain canvas tote bag
- Assorted leaves
- Fabric paint and foam brush
- Cardboard insert (inside bag to prevent bleed)
- Paper plate palette
How to make it:
- Slip cardboard inside the tote to keep it flat.
- Brush a thin coat of fabric paint onto a leaf’s veiny side.
- Press leaf paint-side down on the tote and lift to reveal the print; repeat with colors.
- Let dry per paint instructions and heat-set if required before using.