


In This Article Show
You put down that fresh layer of gravel or decorative stones to have a clean, low-maintenance area. For a while, it looked perfect. Then, you see the first green shoot pushing stubbornly through the rocks.

Then another. Soon, you’ll have a whole crop of weeds making your neat rock bed look messy and neglected. Pulling them one by one is a back-breaking game of whack-a-mole.
But don’t let it frustrate you. With the right approach, you can clear them out and keep them from coming back so easily.
1. Start With a Good, Old-Fashioned Pull
Sometimes the direct way is best, especially if you have more time than weeds.
Get the Whole Root
The key is to pull when the soil is moist, like after a rain or watering. The weeds will slide out much easier. Grab them as low to the rocks as you can and pull slowly and firmly to get the entire root system. A dandelion tool or a simple garden knife can be a huge help for getting under stubborn roots.
Make It Easier On Yourself
Consider a kneeling pad or a small stool. Work in sections so it doesn’t feel overwhelming, and toss the weeds directly into a bucket so you don’t leave any behind to re-root.

2. Use Boiling Water as a Natural Weed Killer
This method is brilliantly simple, free, and perfect for spots between rocks.
How and Why It Works
Simply boil a kettle or large pot of water. Carefully carry it to the rock bed and pour it directly over the weeds, aiming to saturate the center of each plant. The boiling water scalds the leaves and shocks the roots. It’s especially effective for young, annual weeds.
A Word of Caution
Be very careful to avoid splashing yourself or any plants you want to keep. This method works best on driveways, walkways, or areas where you don’t have any desirable plants nearby.
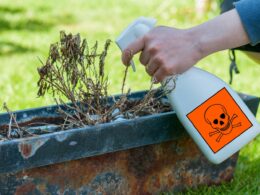
3. Try a Strong Vinegar Solution for a Broad Attack
For a wider area with lots of small weeds, a vinegar spray can be a great natural option.
The Stronger, The Better
Look for horticultural vinegar (which is 20-30% acetic acid) at garden centers, as it’s far more effective than household vinegar. You can also use strong household vinegar (10%).
Mix and Spray Carefully
Add a splash of dish soap to the vinegar in a spray bottle—this helps the solution stick to the weed leaves. On a sunny, calm day, spray the weeds thoroughly until they are dripping. The acetic acid burns the foliage. Be aware: this will burn any plant it touches, so aim carefully. You will likely need to re-spray in a week or two for tough, perennial weeds.
4. Stop New Weeds With a Barrier
Killing the weeds you have is only half the battle. To save future work, you need to stop new seeds from sprouting.
The Power of Landscape Fabric
If your rock bed doesn’t have it, installing quality landscape fabric is the best long-term fix. It blocks sunlight while allowing water to drain. Lay it down under your rocks, overlapping the edges by a good 6 inches.
Refresh Your Rock Layer
Over time, the rock layer gets thin, and dirt accumulates on top, creating a perfect place for seeds to grow. Rake the rocks to remove debris and top them up with a fresh, 2-3 inch layer of stone. This creates a deeper barrier that sunlight can’t penetrate.
5. The Real Secret: Consistency and Prevention
Weeds are a fact of gardening life, but they don’t have to run your rock bed.
Make a habit of walking your rock areas every couple of weeks. When you see a new, tiny weed, pull it or zap it with boiling water right away—it takes ten seconds. That consistent, small effort saves you from the big, exhausting cleanup later.
Getting rid of weeds in rocks is about being proactive. Start by pulling or pouring hot water on what’s there, then focus on building a good barrier with fabric and fresh rocks. You’ll spend less time bending over and more time enjoying the neat, crisp look you originally wanted. Now, go put that kettle on—it’s time to fight back.