


In This Article Show
Growing Jerusalem artichokes at home is easier than you might think. I’ve found these nutritious and delicious tubers to be a rewarding addition to my garden. Native to North America, Jerusalem artichokes are a perennial plant that can thrive in many climates.
Jerusalem artichokes need 110 to 150 days to grow before harvest. I plant them in spring once the soil warms up. They prefer temperatures between 65-90°F to grow well. I make sure to space the tubers about 12-18 inches apart when planting.
Jerusalem artichokes have many culinary uses. I love their nutty flavor in soups and roasted dishes. Growing my own ensures I have a fresh supply for cooking. With proper care, these plants will return year after year, providing a bountiful harvest each fall.
Getting Started With Jerusalem Artichokes

Growing Jerusalem artichokes at home is easy and rewarding. I’ll cover the key things to know about choosing a spot, preparing the soil, and picking varieties to plant.
Choosing the Right Location
I always plant Jerusalem artichokes in full sun. They need at least 6–8 hours of direct sunlight daily to thrive. I pick a spot in my garden away from other plants, as they can grow up to 8 feet tall and spread quickly. These plants do well in zones 3 to 8.
I make sure there’s enough space between plants. I leave 2–3 feet between each one. This gives them room to grow and makes harvesting easier.
Jerusalem artichokes can be invasive, so I choose a spot where I don’t mind them spreading. A corner of the garden or a dedicated bed works well.
Understanding Soil Requirements
Jerusalem artichokes aren’t picky about soil, but I still prepare it well. I aim for a slightly acidic to neutral pH, around 6.0 to 7.0. I make sure the soil drains well. Standing water can rot the tubers. If my soil is heavy clay, I mix in some sand to improve drainage.
These plants love organic matter. I add compost or well-rotted manure to the soil before planting. This feeds the plants and helps retain moisture.
I don’t worry too much about fertilizer. Jerusalem artichokes usually grow fine without it. But if my soil is poor, I add a balanced organic fertilizer.
Selecting Jerusalem Artichoke Varieties
There are several varieties of Jerusalem artichokes to choose from. Here are some popular ones:
- Stampede: Early maturing, good for short growing seasons
- Fuseau: Smooth, less knobby tubers, easier to clean
- Red Fuseau: Similar to Fuseau, but with reddish skin
- Violet de Rennes: Purple-skinned variety with nutty flavor
I pick varieties based on my climate and how I plan to use them. For eating raw, I prefer smoother types like Fuseau. I always get my tubers from a reliable source. This helps avoid diseases and ensures I’m getting true-to-type plants.
Planting and Growing Techniques

Growing Jerusalem artichokes is simple with the right methods. I’ll cover how to prepare your soil, plant the tubers, and care for your crop.
Pre-Planting Soil Preparation
I start by picking a sunny spot for my Jerusalem artichokes. They like well-draining soil rich in organic matter. I mix in compost to boost nutrients.
Soil pH should be between 6.0 and 7.5. I test my soil and add lime if needed to raise the pH. I loosen the soil about 12 inches deep. This helps the tubers grow big and makes harvesting easier.
Step-By-Step Planting Guide
I planted Jerusalem artichokes in spring when the soil warms to 50°F. Here’s my process:
- Dig holes 4–5 inches deep, 12–18 inches apart
- Place tubers with “eyes” facing up
- Cover with soil and water well
For bigger harvests, I space rows 3–4 feet apart. This gives plants room to spread. I mulch around plants to keep the soil moist and stop weeds. Straw or leaves work great for this.
Ongoing Care and Maintenance
Jerusalem artichokes are low-maintenance, but I still give them some care:
- Water weekly if it doesn’t rain
- Feed with a balanced fertilizer once a month
- Remove weeds that pop up
I don’t need to water much once the plants are tall. Their deep roots find moisture well. Tall stems might need staking in windy areas. I use bamboo poles for support.
Sunroots, another name for these plants, attract bees and butterflies. This helps my whole garden. I harvest tubers in the fall after the frost kills the tops. Some I leave for next year’s crop.
Harvesting and Storage

Harvesting and storing Jerusalem artichokes is easy when you know the right techniques. I’ll show you how to tell when they’re ready, the best ways to dig them up, and how to keep them fresh.
Recognizing Harvest Time
I wait for the yellow flowers to die back before harvesting my Jerusalem artichokes. This usually happens after the first frost. The plants turn brown and wilt, signaling that the tubers are ready.
I check the soil temperature too. When it drops below 50°F (10°C), it’s time to start digging. This is often in late fall or early winter, depending on my location.
Sometimes I do a test dig to check tuber size. If they’re big enough, I start harvesting even if the plants are still green.
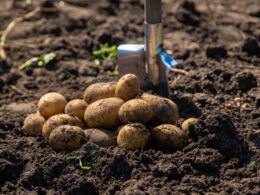
Proper Harvesting Technique
I use a garden fork to dig up my Jerusalem artichokes. It’s better than a shovel because it’s less likely to damage the tubers. I start by loosening the soil around the plant. Then I gently lift the whole plant out of the ground. I shake off excess dirt and separate the tubers from the stems.
I’m careful not to bruise or cut the tubers. Any damage can lead to faster spoiling. If I don’t need all the tubers at once, I leave some in the ground. They’ll keep well there and I can dig them up as needed.
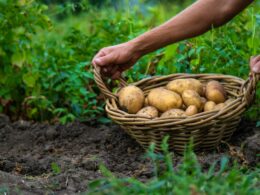
Storing Jerusalem Artichokes
I store my harvested Jerusalem artichokes in a cool, dark place. A root cellar or basement works great.
Here’s how I keep them fresh:
- Clean off dirt, but don’t wash them
- Put them in plastic bags with some ventilation
- Keep temperature between 32°F and 34°F (0°C to 1°C)
- Maintain high humidity (85-95%)
Under these conditions, my tubers stay good for 2-5 months. For short-term storage, I put them in the fridge. They last about a week this way. If I have extras, I sometimes store them in damp sand. This mimics their natural growing conditions and helps them last longer.
Common Issues and Expert Solutions
Growing Jerusalem artichokes can come with some challenges. I’ll cover the main problems you might face and how to fix them.
Dealing with Pests and Diseases
Aphids often attack Jerusalem artichokes. I spray them off with a strong jet of water. For bigger infestations, I use insecticidal soap. Slugs and snails can also be a problem. I put out beer traps or use copper tape around the plants.
Powdery mildew is a common disease. I space plants well for good airflow. If it shows up, I remove the affected leaves and spray them with a mix of milk and water.
Root rot can occur in wet soil. I make sure the soil drains well and avoid overwatering. If plants look wilted, I check the roots and remove any rotted parts.
Addressing Nutritional Deficiencies
Yellow leaves often mean nitrogen shortage. I add compost or a balanced fertilizer to the soil. If leaves have dark veins but yellow between, it’s likely iron deficiency. I use iron chelate to fix this.
Purple leaves point to a phosphorus lack. I mix bone meal into the soil to boost phosphorus levels. Pale or curled leaves can mean potassium deficiency. I add wood ash or a potassium-rich fertilizer to help.
Managing Environmental Stress
Too much sun can scorch leaves. I provide shade on very hot days. In cold areas, I mulch heavily to protect the tubers from freezing.
Wind can damage tall stems. I stake plants or create windbreaks if needed. Drought stress causes wilting. I water deeply once a week during dry spells.
Overcrowding leads to weak plants. I thin out crowded areas, leaving 12-18 inches between plants. This also helps prevent disease spread.
Frequently Asked Questions
Growing Jerusalem artichokes can bring up some common questions. Here are the answers to help you successfully cultivate these tasty tubers at home.
What is the ideal soil type for cultivating Jerusalem artichokes?
Jerusalem artichokes grow best in well-draining, fertile soil. I recommend using loamy soil with plenty of organic matter. Sandy or clay soils can work too if amended with compost. The pH should be slightly acidic to neutral, between 6.0-7.0.
How do you plant Jerusalem artichokes in containers?
To grow Jerusalem artichokes in containers, I use large pots at least 18 inches deep and wide. I fill them with rich potting mix and plant 1-2 tubers per container about 4 inches deep. Regular watering is key since containers dry out faster than garden beds.
During which month is it best to plant Jerusalem artichoke tubers?
I plant Jerusalem artichoke tubers in early spring, usually in March or April. This gives them plenty of time to grow before winter. In warmer areas, fall planting is also an option. The soil should be workable and past the risk of hard frosts.
How deep should Jerusalem artichoke tubers be planted?
I plant Jerusalem artichoke tubers about 4-6 inches deep. This depth protects them from drying out while allowing easy sprouting. I space the tubers 12-18 inches apart in rows 3-4 feet apart to give them room to spread.
How tall can Jerusalem artichokes grow, and how does this impact spacing?
Jerusalem artichokes can grow quite tall, often reaching 6-10 feet in height. Their height affects spacing needs. I plant them at least 3-4 feet apart to allow for their spread. In small gardens, I use stakes or cages to support the tall stems.
What is the average yield of Jerusalem artichokes per plant?
A single Jerusalem artichoke plant can produce 2-5 pounds of tubers. The exact yield depends on growing conditions and variety. With good care, a 10-foot row might yield 10-20 pounds of tubers. I’ve found that well-established plants tend to be more productive.