


In This Article Show
Keeping kids busy or planning a simple classroom activity can be tough, especially on rainy days. Paper is easy to find, low-cost, and perfect for quick wall art that looks cheerful. In this list, you’ll find fun and simple wall hanging crafts you can make with paper—no fancy tools needed.
Each idea is beginner-friendly and ready to brighten a bedroom, hallway, or classroom. Let’s jump into the projects and start decorating your walls.
1. Rainbow Paper Strip Wall Hanging
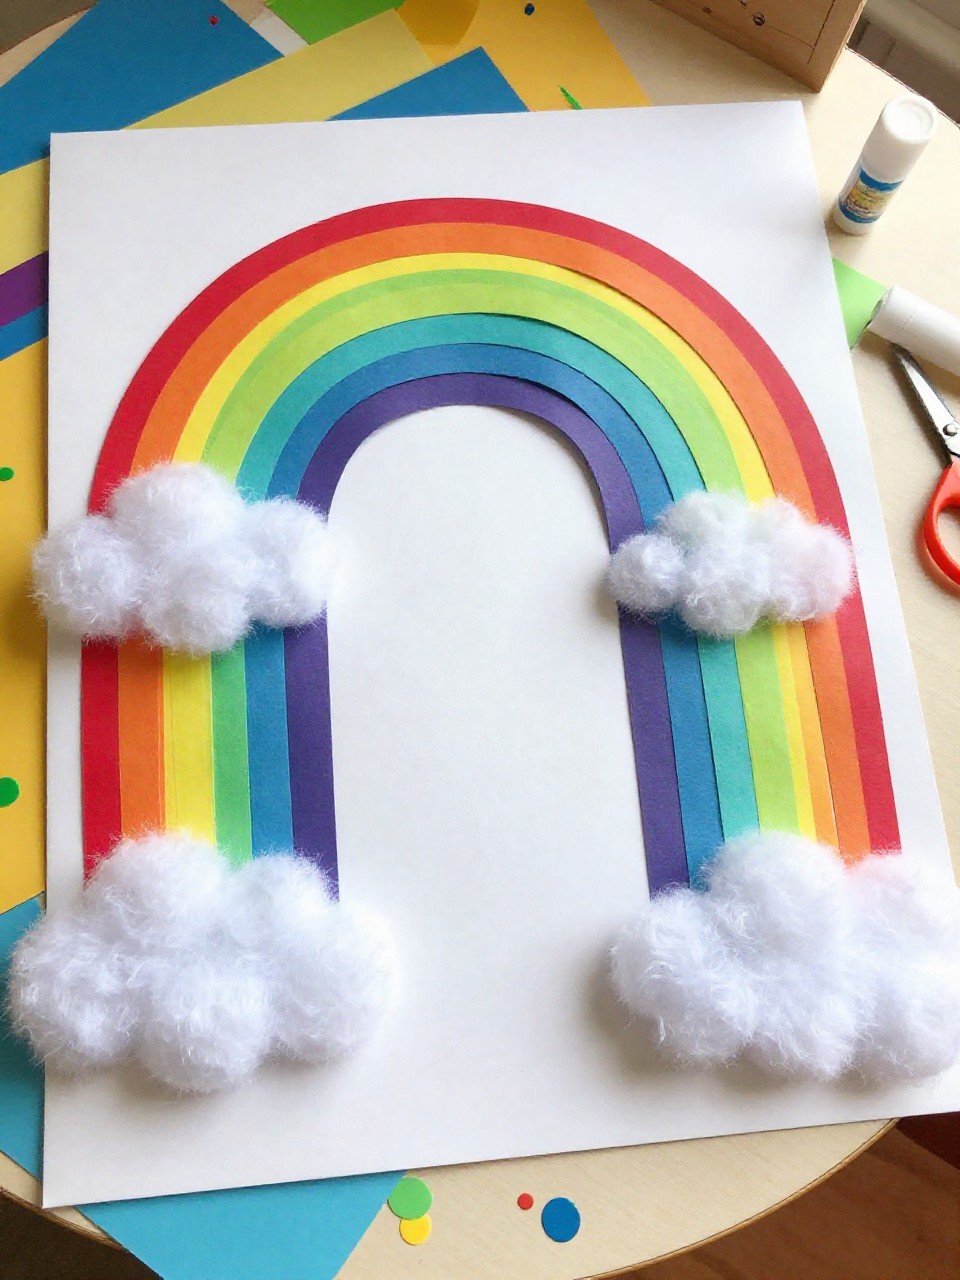
This wall hanging shows a bright rainbow made from long paper strips hanging in an arc with fluffy clouds at the top. Kids love choosing the colors and watching the rainbow grow as they glue each strip, and it’s simple enough for beginners.
Materials Needed:
- White cardstock (for cloud base)
- Colored paper (red, orange, yellow, green, blue, purple)
- Glue stick
- Scissors
- Hole punch and string for hanging
How to make it:
- Cut a cloud shape from white cardstock and punch two holes near the top for hanging.
- Cut colored paper into even strips and glue them to the back of the cloud in rainbow order.
- Add small paper raindrops or glitter to the cloud for extra detail.
- Tie string through the holes and hang on the wall; smooth any curled strips.
2. Paper Flower Garland Banner
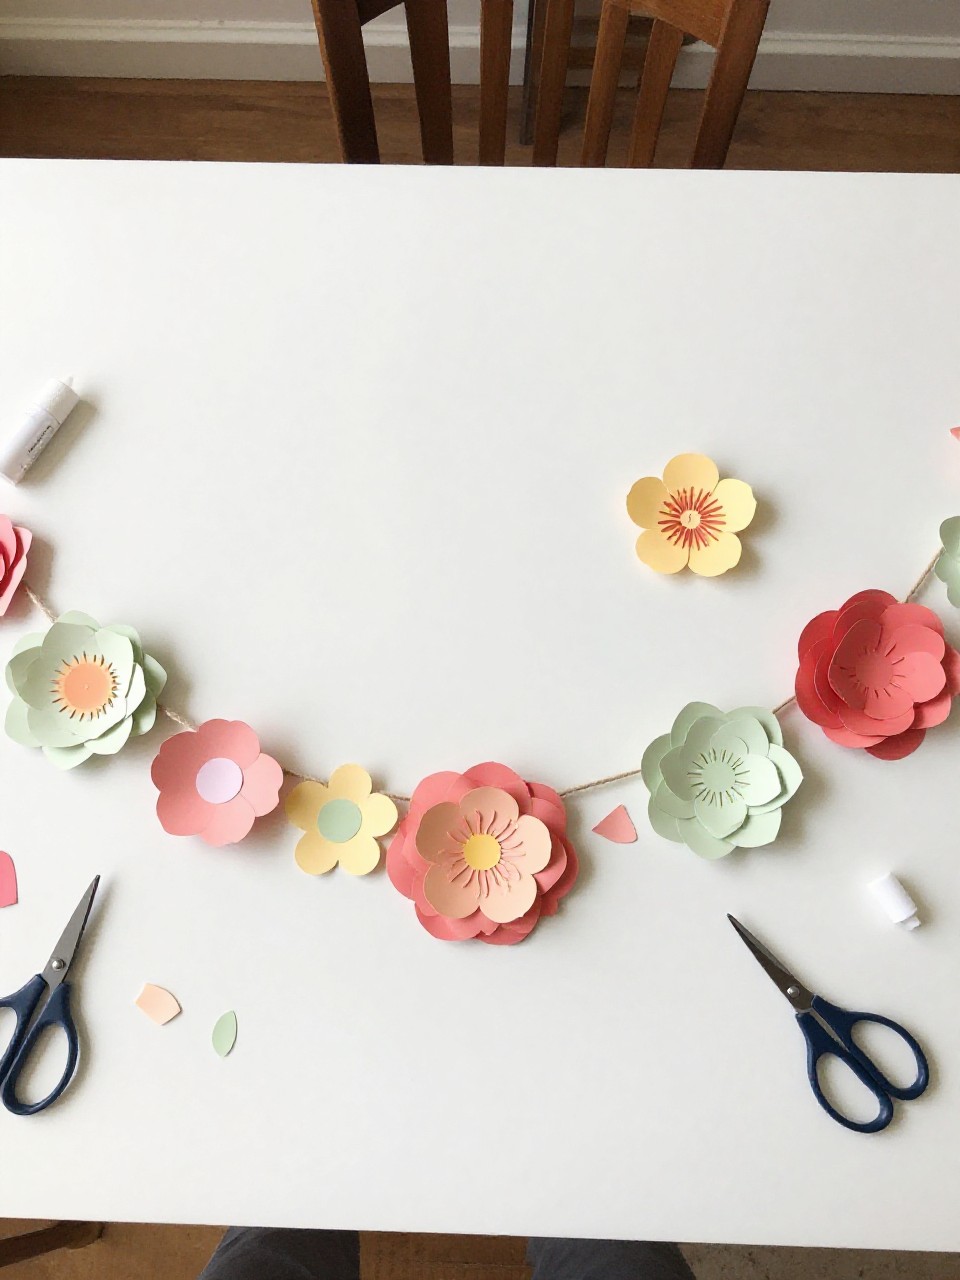
This banner features layered paper flowers linked on a string, creating a soft floral line across the wall. Kids enjoy mixing colors and stacking petals to make their own garden look, and it’s a great first scissor project.
Materials Needed:
- Colored paper (assorted colors)
- String or twine
- Glue stick
- Scissors
- Tape (for the back)
How to make it:
- Cut simple flower shapes in different sizes; cut small circles for centers.
- Layer two or three flowers, glue together, and add the center.
- Tape or glue the backs of the flowers along a string, spacing evenly.
- Hang across the wall or door frame; fluff petals for dimension.
3. Geometric Paper Mosaic Wall Art
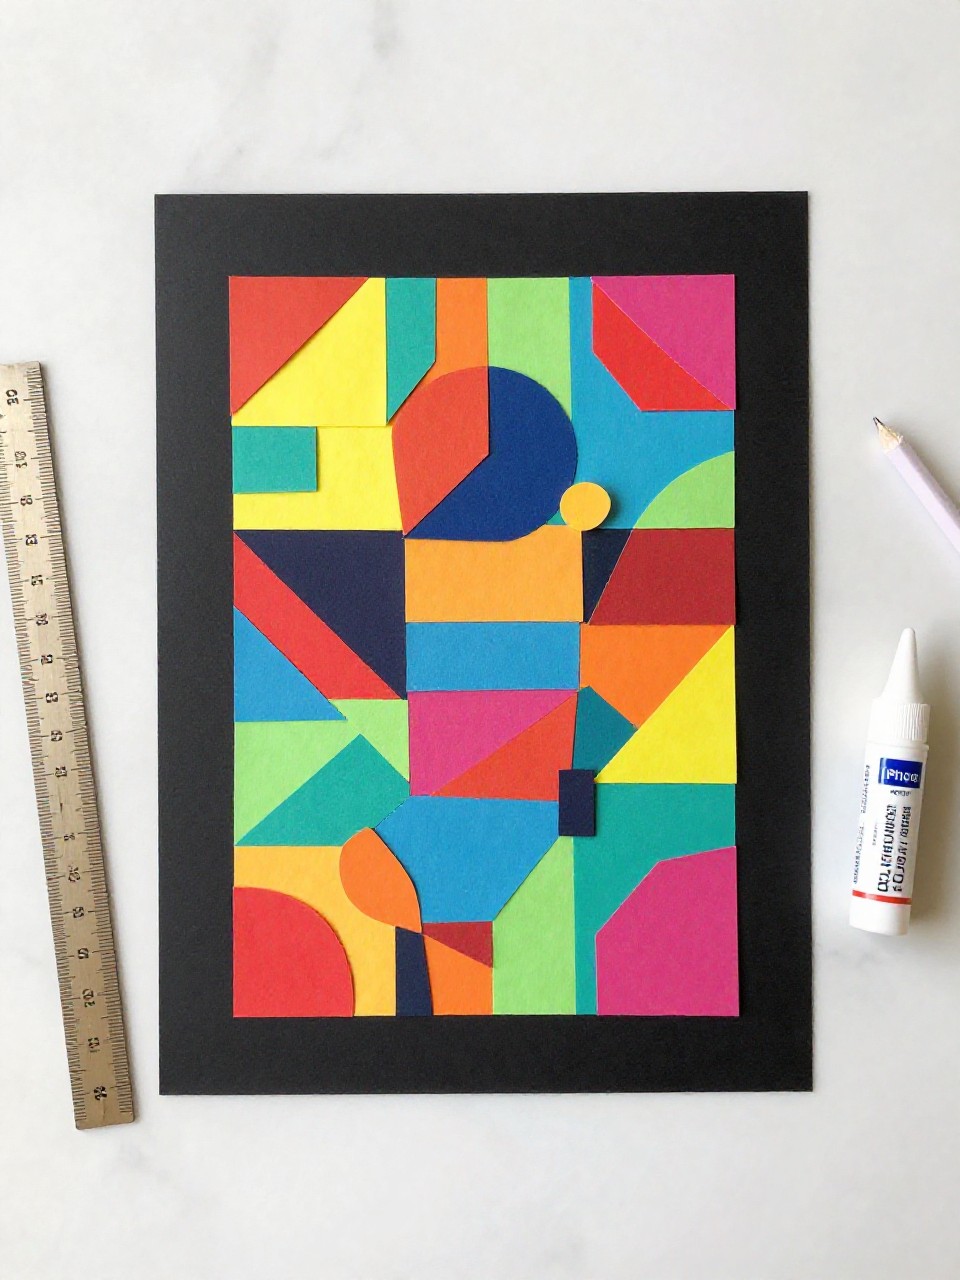
This piece looks like a modern mosaic made from colorful paper shapes fitted into a simple rectangle or circle. Kids love arranging the shapes like a puzzle and seeing a bold pattern appear quickly.
Materials Needed:
- Black cardstock (background)
- Colored paper (cut into triangles, squares, hexagons)
- Glue stick
- Ruler and pencil
- Frame (optional)
How to make it:
- Lightly draw a border on the black cardstock to plan your design area.
- Cut small geometric shapes from colored paper.
- Arrange and glue shapes in a pattern, leaving thin “grout” gaps for contrast.
- Let dry flat, then hang with tape or place in a simple frame.
4. Paper Leaf Hanging Mobile
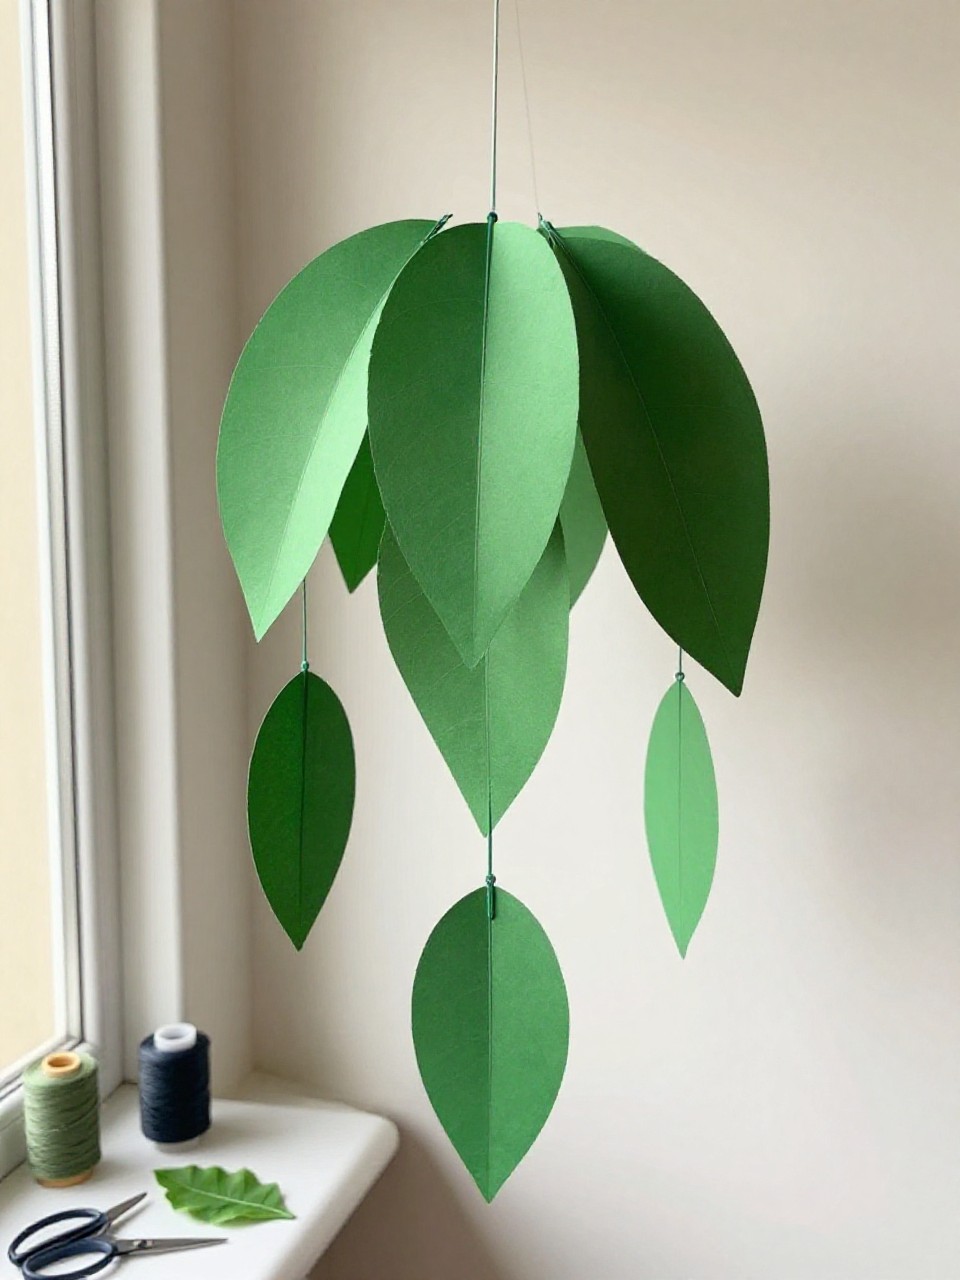
This hanging shows paper leaves dangling at different heights from a simple stick or dowel. Kids enjoy tracing and cutting leaf shapes and watching them twirl gently when the air moves.
Materials Needed:
- Green paper (various shades)
- Thin string or thread
- Small stick or wooden dowel
- Hole punch
- Tape or glue
How to make it:
- Trace and cut leaf shapes in different sizes and greens.
- Punch a small hole at the top of each leaf.
- Tie leaves to strings of different lengths and knot onto the stick.
- Hang the stick on the wall with string; gently shape the leaves.
5. Layered Sunset Paper Landscape
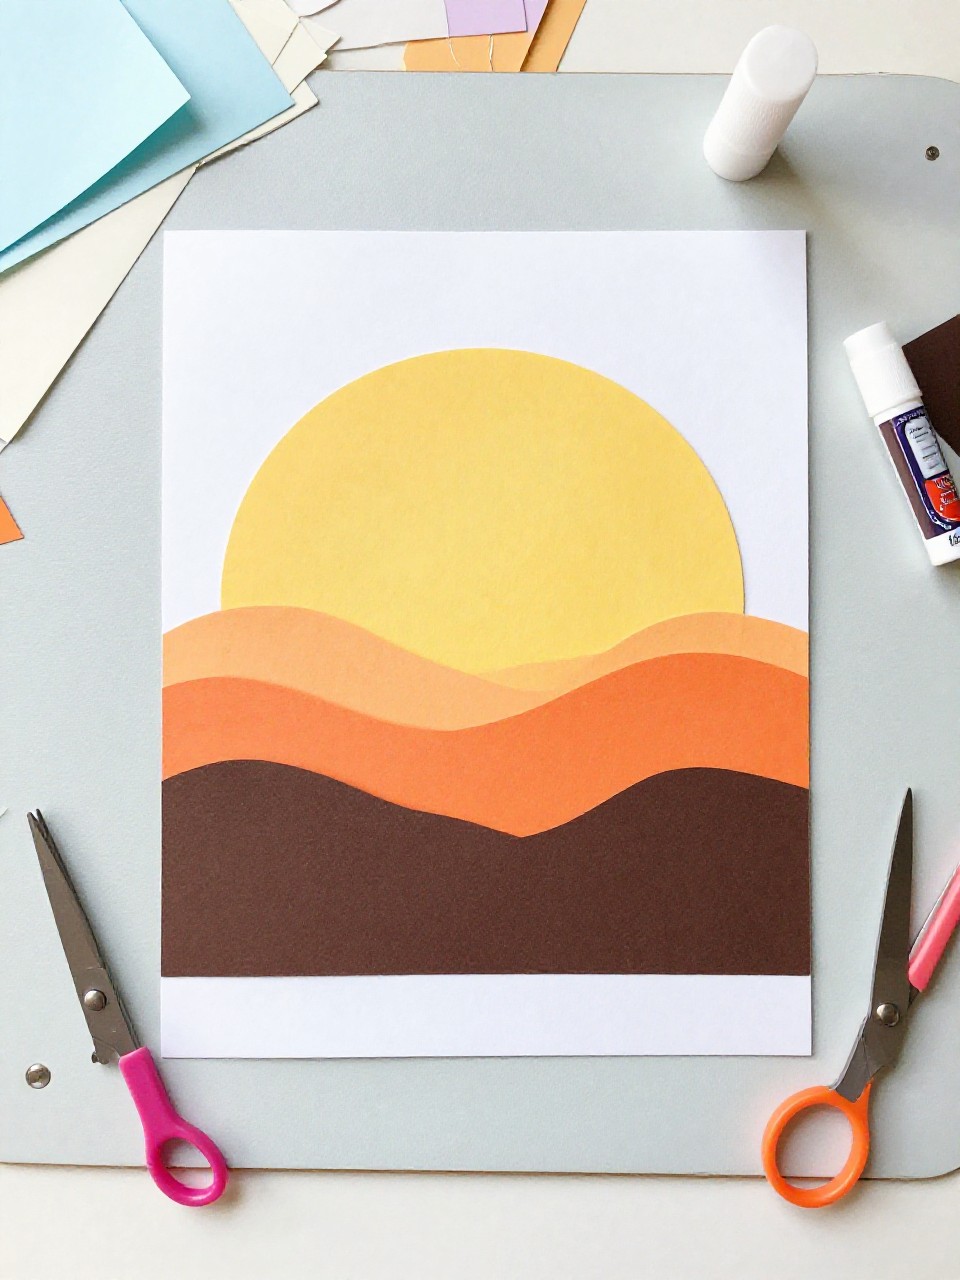
This artwork shows hills or waves layered in warm paper colors, with a sun setting behind them. Kids love choosing gradients and seeing depth appear as they stack layers.
Materials Needed:
- Colored paper (yellows, oranges, reds, purples)
- Blue or black cardstock (background)
- Glue stick
- Scissors
- White gel pen (optional stars)
How to make it:
- Cut wavy hill or ocean shapes from warm-colored paper.
- Glue layers from bottom to top on the background, overlapping edges.
- Add a sun circle and small birds or stars with pen.
- Let dry flat and hang with tape or frame.
6. Paper Heart Wall Cascade
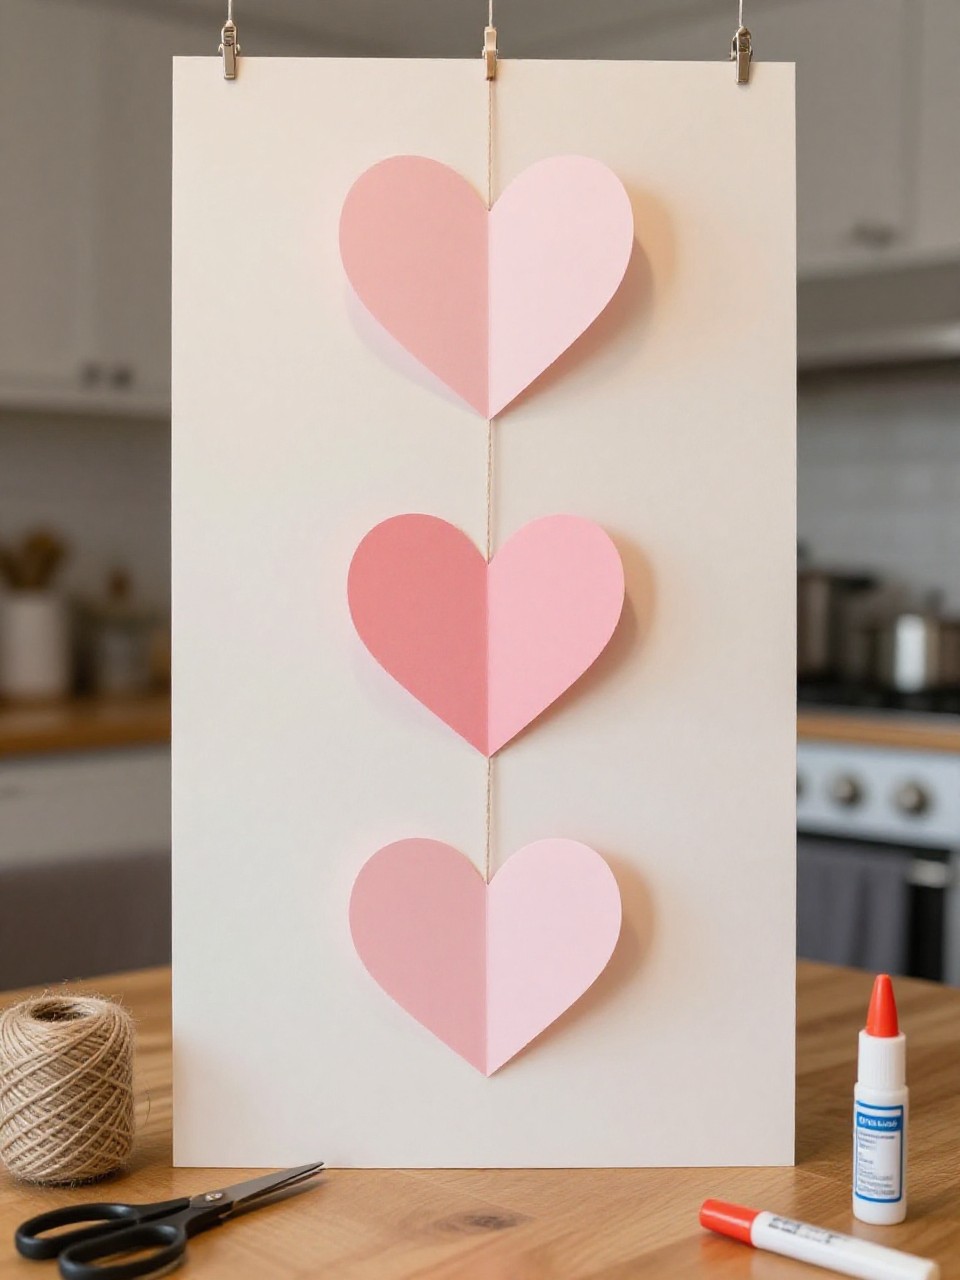
This piece features rows of folded paper hearts cascading downward, creating a sweet 3D effect. Kids enjoy the quick fold-and-glue steps and the playful movement of the hearts.
Materials Needed:
- Colored paper (pinks, reds, pastels)
- Cardstock strip or wooden dowel (top bar)
- String
- Glue stick
- Hole punch or needle
How to make it:
- Cut heart shapes in two sizes; fold each heart down the center.
- Glue pairs of hearts back-to-back onto strings to make mini chains.
- Tie or tape strings to the top bar, spacing them across.
- Hang on the wall and fluff hearts for dimension.
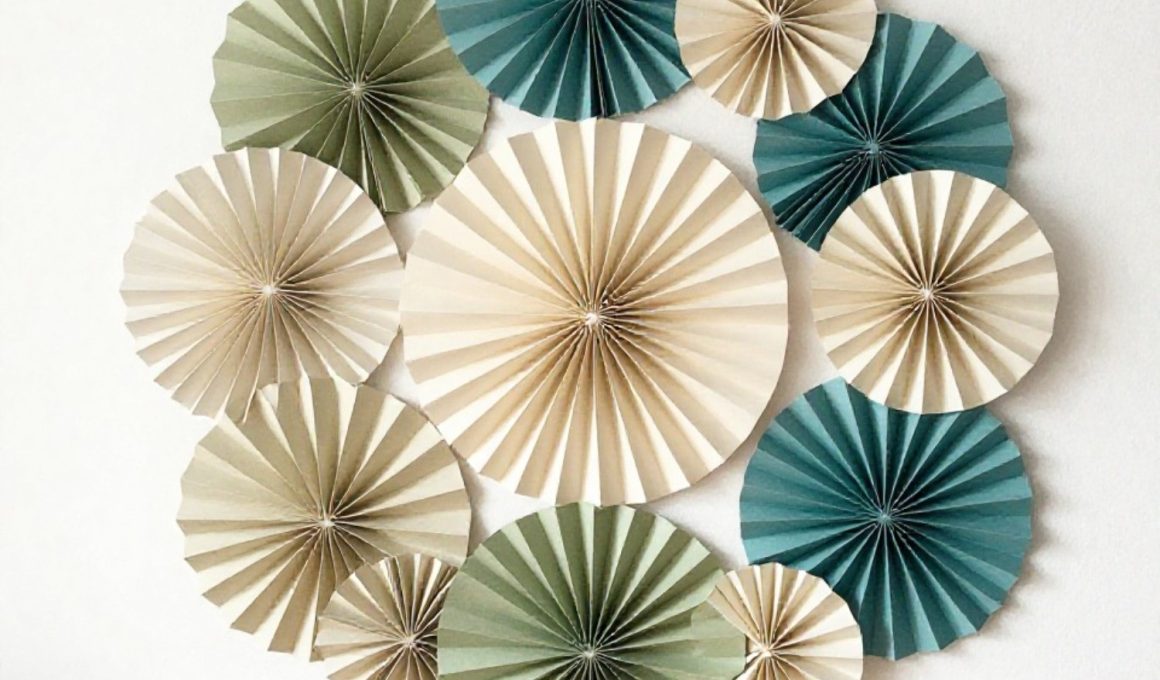
7. Paper Fan Medallion Wall Set

This set shows round fan medallions in different sizes and colors grouped like a gallery. Kids love the simple fold-repeat pattern and the big, bold results.
Materials Needed:
- Colored paper
- Glue stick or tape
- Stapler (optional)
- Stick-on dots or tape for hanging
- Circle for center accents (optional)
How to make it:
- Accordion-fold paper lengthwise; make two or three folded strips per medallion.
- Join strips into a ring with tape or staples and press flat into a circle.
- Glue a small circle to the center as a finish.
- Arrange medallions on the wall with stick-on dots.
8. Paper Feather Dream Dangler
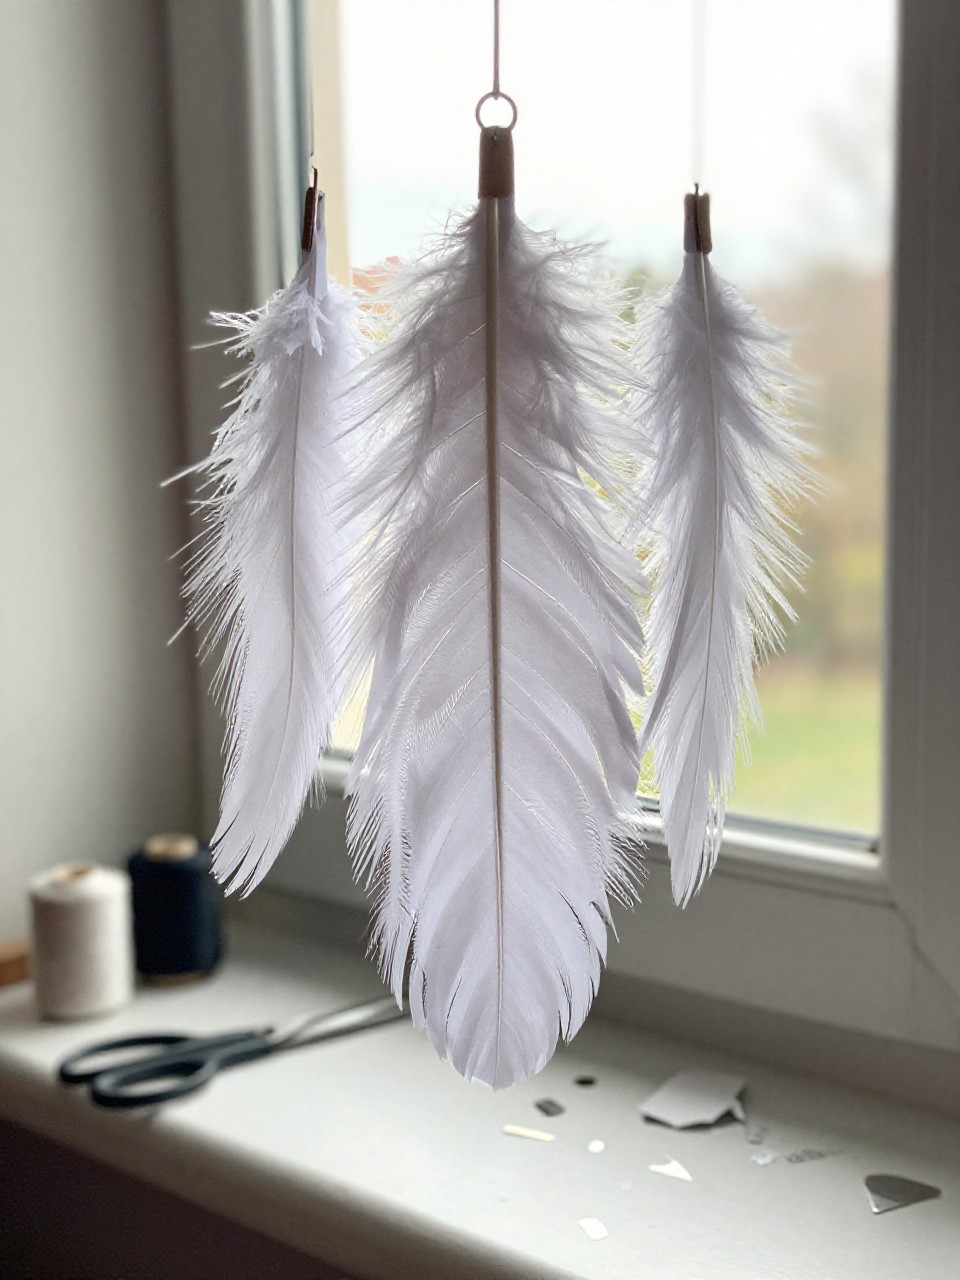
This hanging features a small hoop with colorful paper feathers hung below. Kids enjoy drawing simple feather lines and picking bright or metallic paper.
Materials Needed:
- Cardstock (for hoop)
- Colored or metallic paper (feathers)
- String or thread
- Glue stick
- Hole punch and scissors
How to make it:
- Cut a ring from cardstock to make a simple hoop.
- Cut feather shapes and snip small fringe lines along the edges.
- Punch holes, tie feathers to strings, and knot to the hoop.
- Add a hanging loop and display near a bed or desk.
9. Stained-Glass Tissue Paper Panel
This wall panel looks like stained glass with bright tissue “glass” inside a black paper frame. Kids love the see-through colors and how light glows through it.
Materials Needed:
- Black construction paper (frame)
- Colored tissue paper
- Clear contact paper or glue stick
- Scissors
- Hole punch and string
How to make it:
- Cut a window frame from black paper with openings inside.
- Stick tissue paper pieces to clear contact paper or glue them behind the frame.
- Trim edges and seal with another contact paper layer if using.
- Punch holes, add string, and hang in bright light.
10. Paper Butterfly Wall Swarm
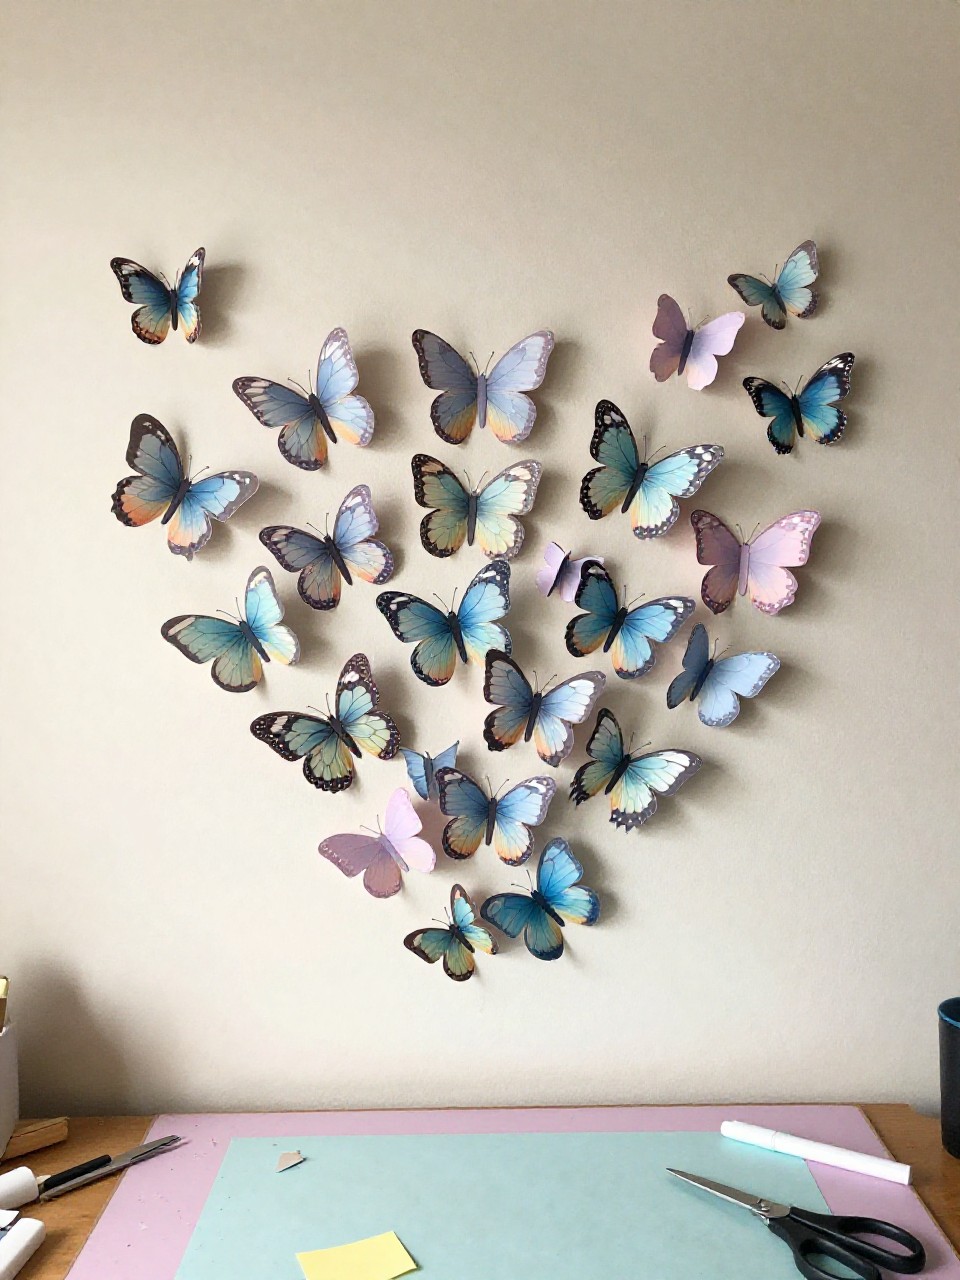
This decoration shows a cluster of paper butterflies sweeping across the wall, from small to large. Kids enjoy bending the wings to make them look like they’re flying and arranging them in a swirl.
Materials Needed:
- Colored paper or patterned scrapbook paper
- Butterfly template (simple)
- Scissors
- Glue dots or removable tape
- Black marker (antennae)
How to make it:
- Trace and cut butterflies in several sizes.
- Fold each butterfly gently down the center to raise the wings.
- Draw small antennae and decorate wings with dots or lines.
- Stick to the wall in a curved path, largest to smallest.
11. Paper Chain Tassel Wall Banner
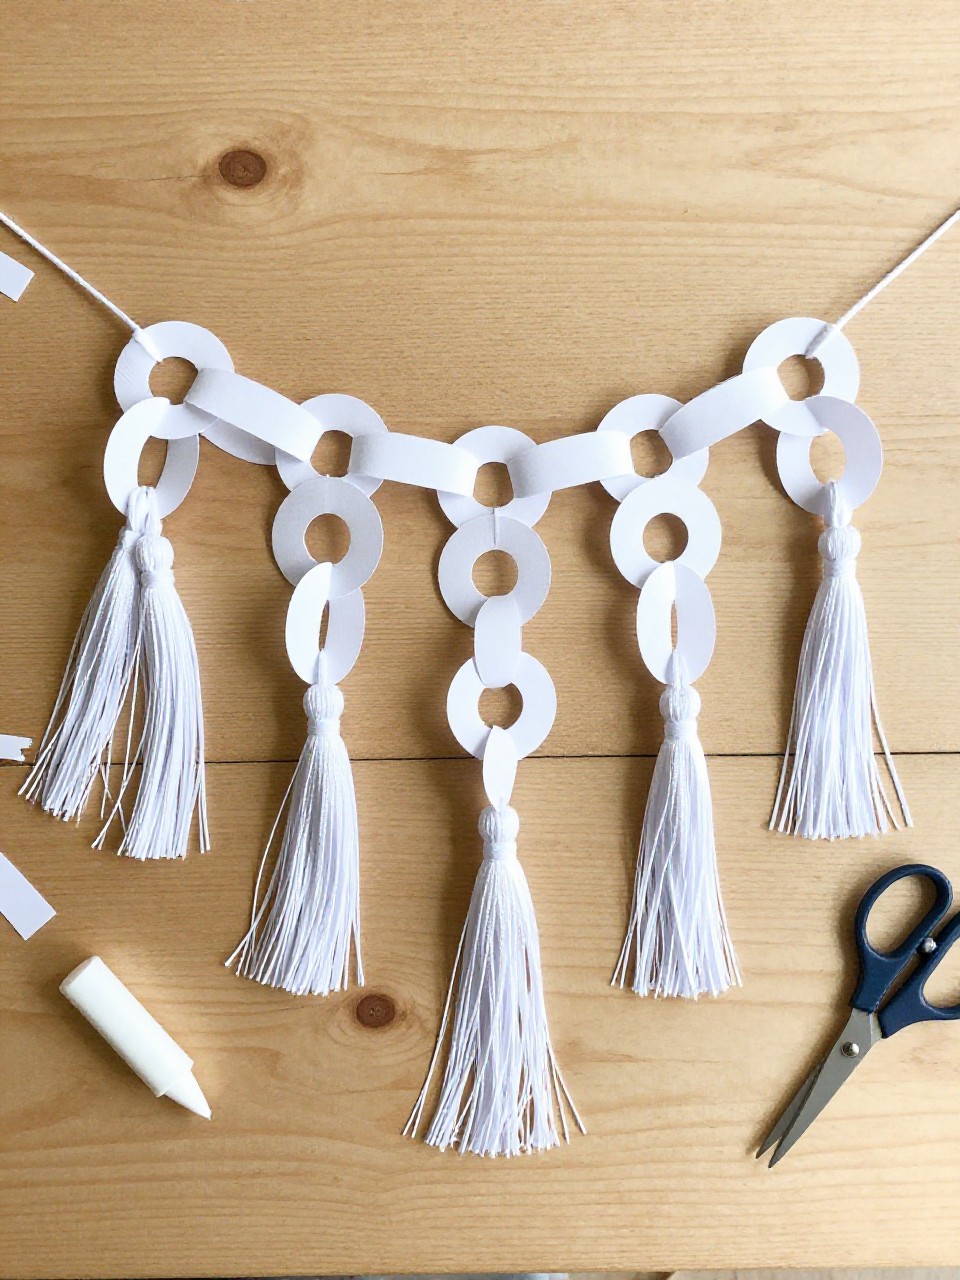
This hanging features a chunky paper chain with small paper tassels hanging from some links. Kids love the easy repeating steps and the gentle swing of the tassels.
Materials Needed:
- Colored paper (cut into strips)
- Glue stick or tape
- Thin paper or tissue (for tassels)
- Scissors
- String for hanging ends
How to make it:
- Make a paper chain by looping and gluing strips through each other.
- Cut small tassels from tissue or thin paper and twist tops.
- Tie or glue tassels to select chain links.
- Add string to both ends of the chain and hang like a garland.
12. Origami Star Wall Strings
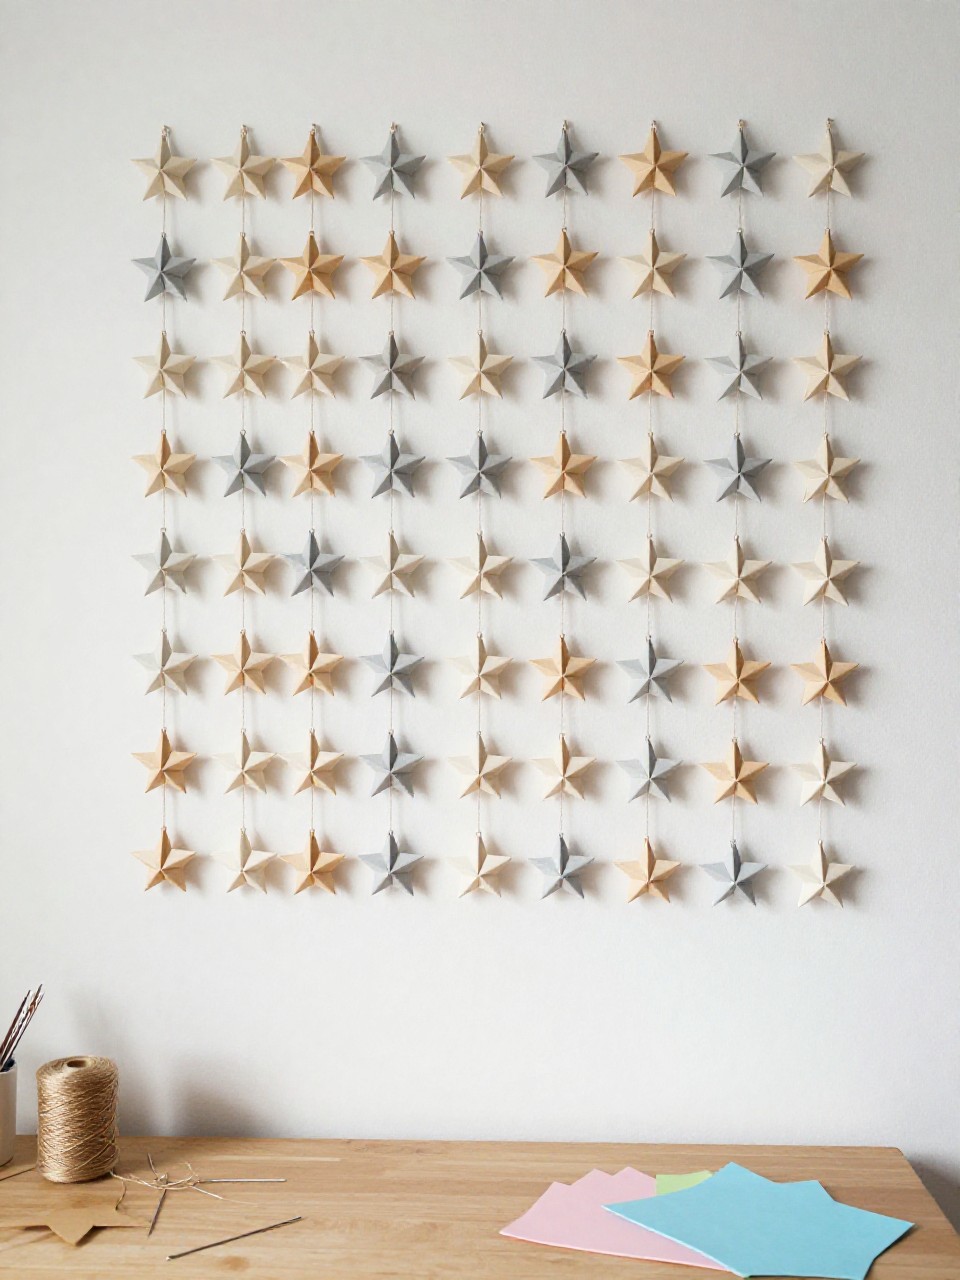
These hanging strings show rows of puffy origami stars or flat stars in soft colors. Kids enjoy the tiny folds and the clean, magical look when several stars line up together.
Materials Needed:
- Origami paper (small squares)
- Needle and thread or thin fishing line
- Tape
- Ruler (for spacing)
- Beads (optional ends)
How to make it:
- Fold several origami stars; keep sizes consistent for each strand.
- Thread stars onto the line, spacing them with small knots or beads.
- Make three to five strands and tape them to a simple top bar.
- Hang on the wall and adjust spacing so stars sit evenly.
13. Paper Weaving Wall Panel
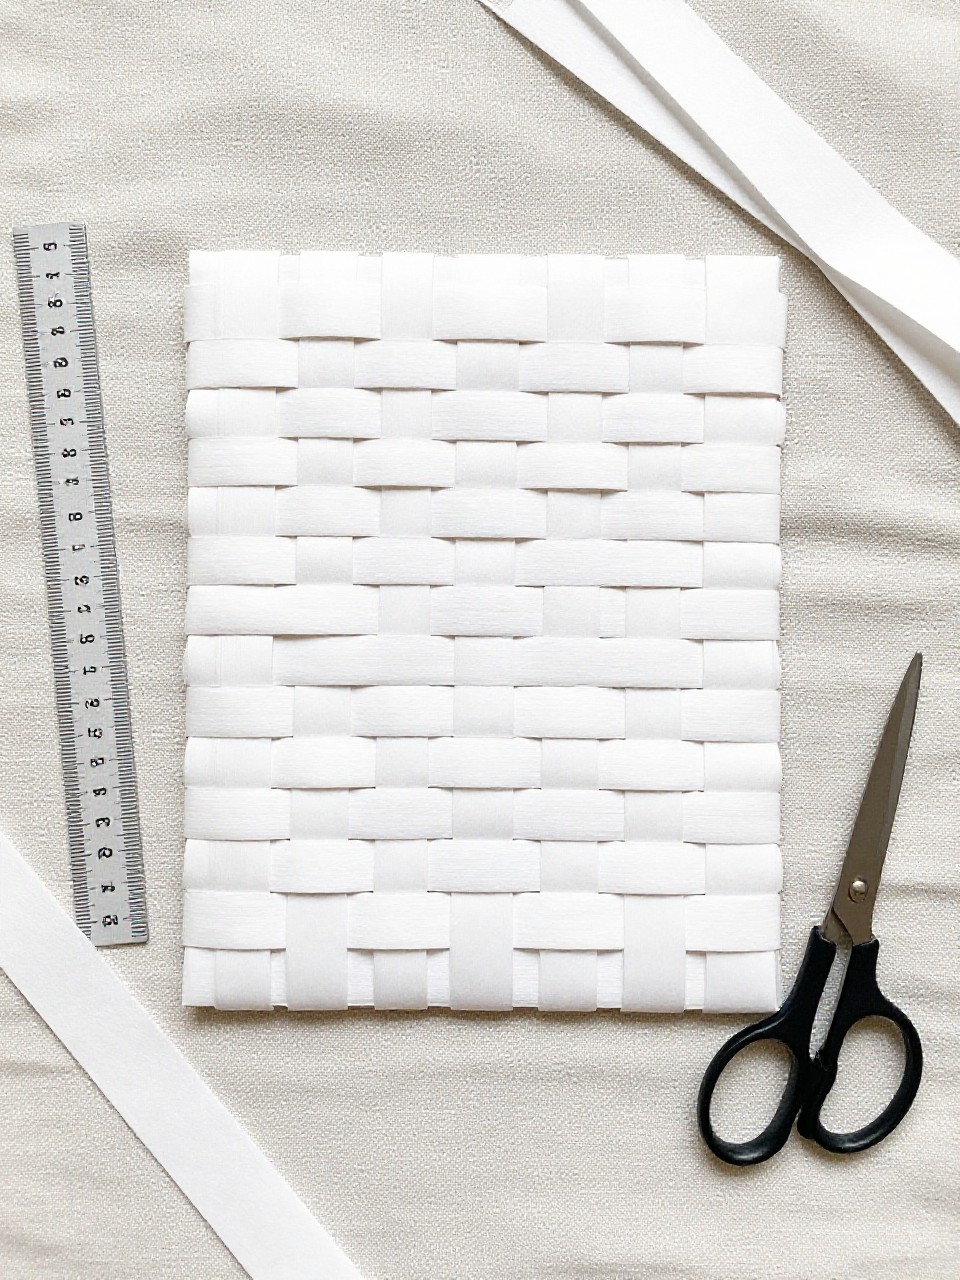
This square panel shows a colorful woven pattern made from paper strips tucked over and under. Kids enjoy the rhythm of weaving and seeing colors mix into new patterns.
Materials Needed:
- Cardstock (loom base with slits)
- Colored paper (cut into strips)
- Glue stick
- Scissors
- Ruler and pencil
How to make it:
- Cut vertical slits in a cardstock square, leaving a border.
- Weave colored strips over and under the slits across the base.
- Push strips snugly together and glue ends on the back.
- Add a hanging loop and mount flat on the wall.
14. Paper Hot Air Balloon Wall Display
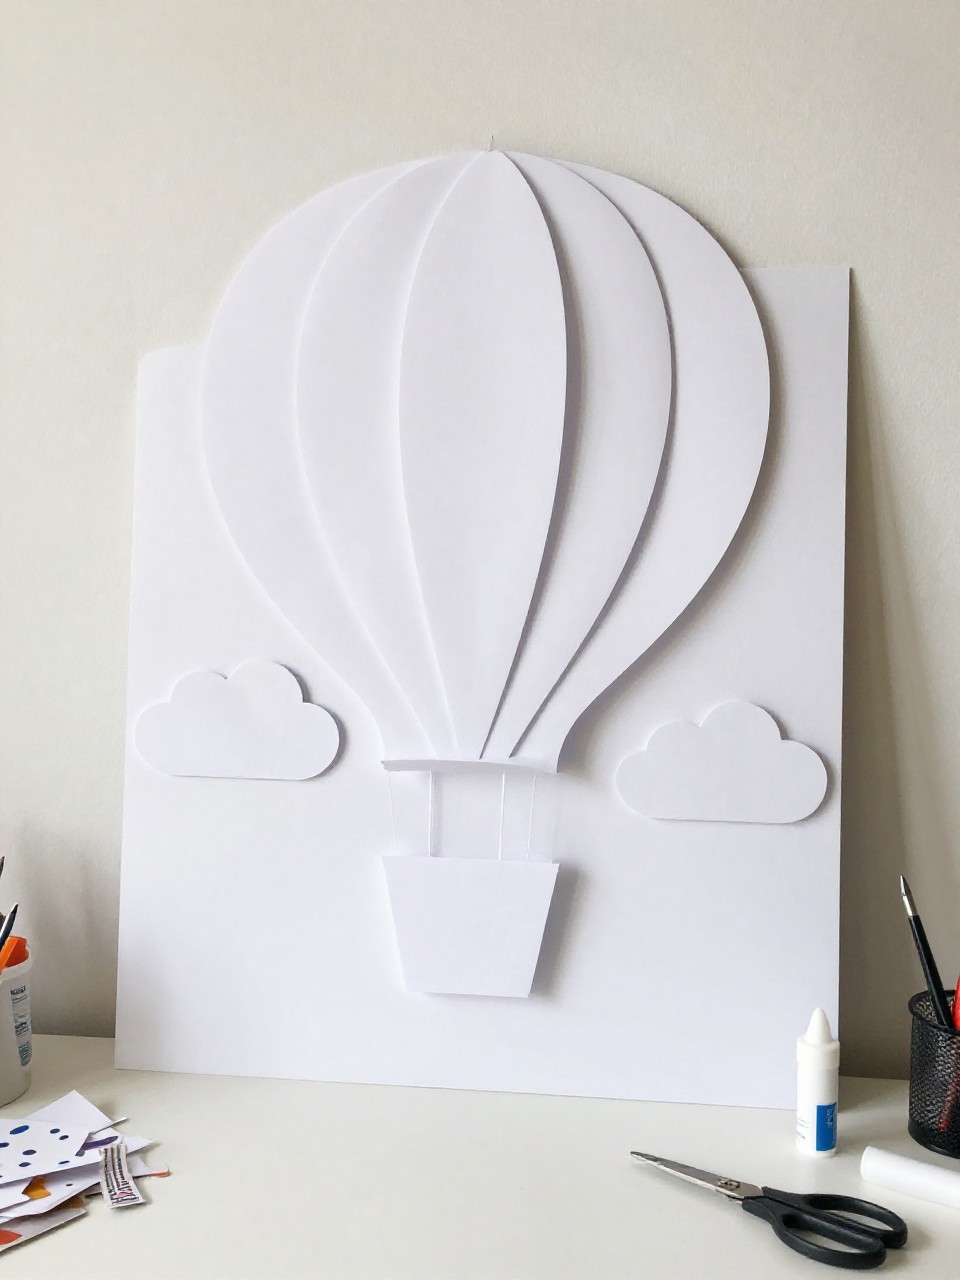
This wall art shows 3D paper balloons floating above paper clouds, each balloon made from folded ovals. Kids love popping the balloon layers open and choosing patterns for each “ride.”
Materials Needed:
- Colored or patterned paper
- White cardstock (clouds and background)
- Glue stick
- Scissors
- Marker (tiny basket lines)
How to make it:
- Cut several ovals; fold each in half and glue halves together to form a 3D balloon.
- Cut small rectangles for baskets and draw lines for ropes.
- Glue clouds and balloons onto the background in a sky layout.
- Let dry and hang; gently fluff balloon layers.
15. Paper Shape Animal Wall Parade
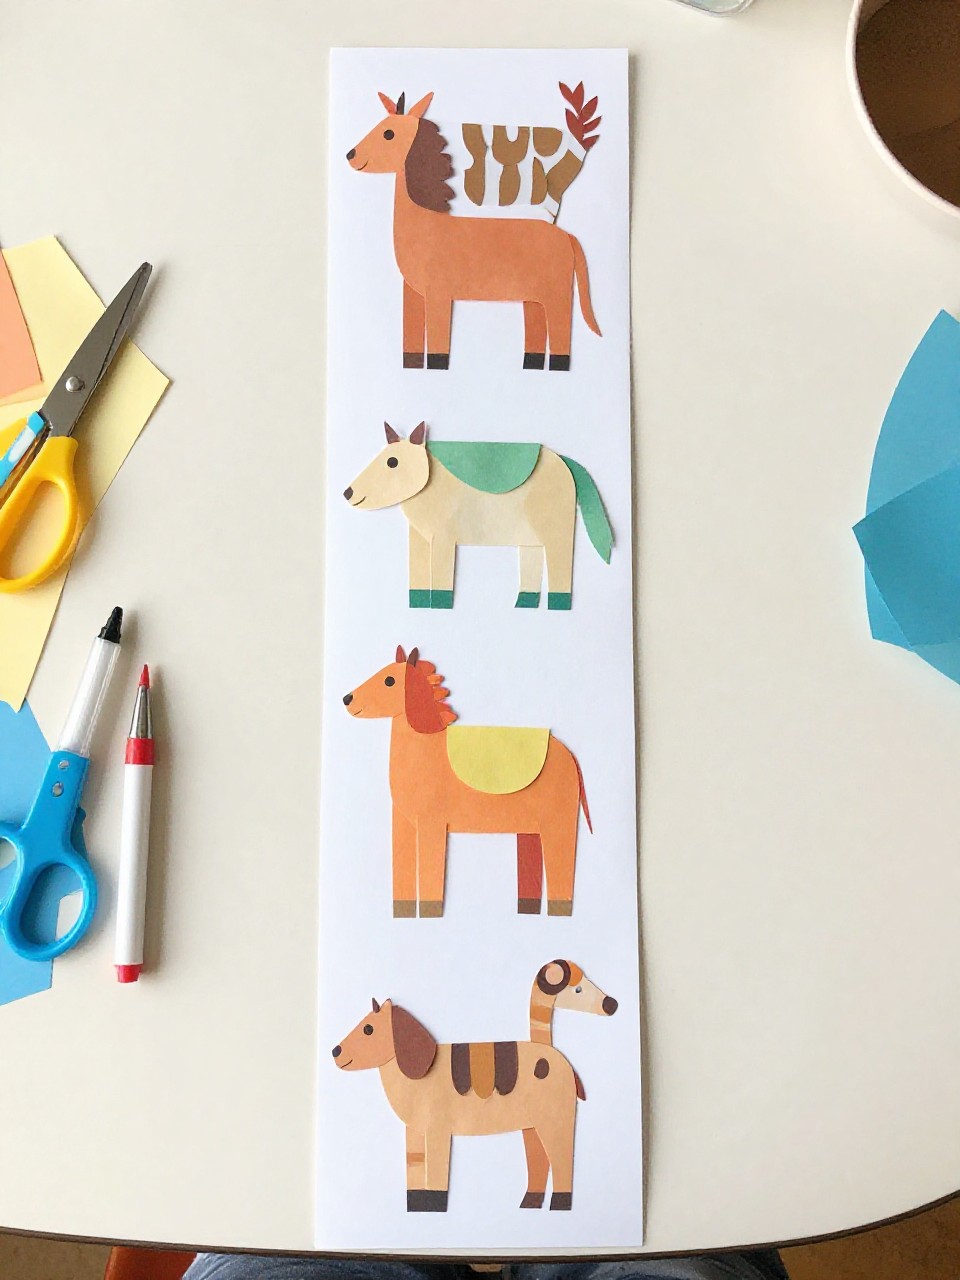
This display shows a line of cute animals made only from simple paper shapes (circles, ovals, triangles). Kids love turning basic shapes into friendly faces and arranging them in a parade.
Materials Needed:
- Colored paper
- Black marker (eyes and details)
- Glue stick
- Scissors
- Long strip of cardstock (for the “parade” base)
How to make it:
- Cut circles, ovals, and triangles in various colors for animal bodies and ears.
- Glue shapes onto the long base to build animals like a cat, fox, bear, or bird.
- Add eyes, noses, and whiskers with marker.
- Hang the strip on the wall like a cheerful border.
16. Confetti Dot Wall Hanging
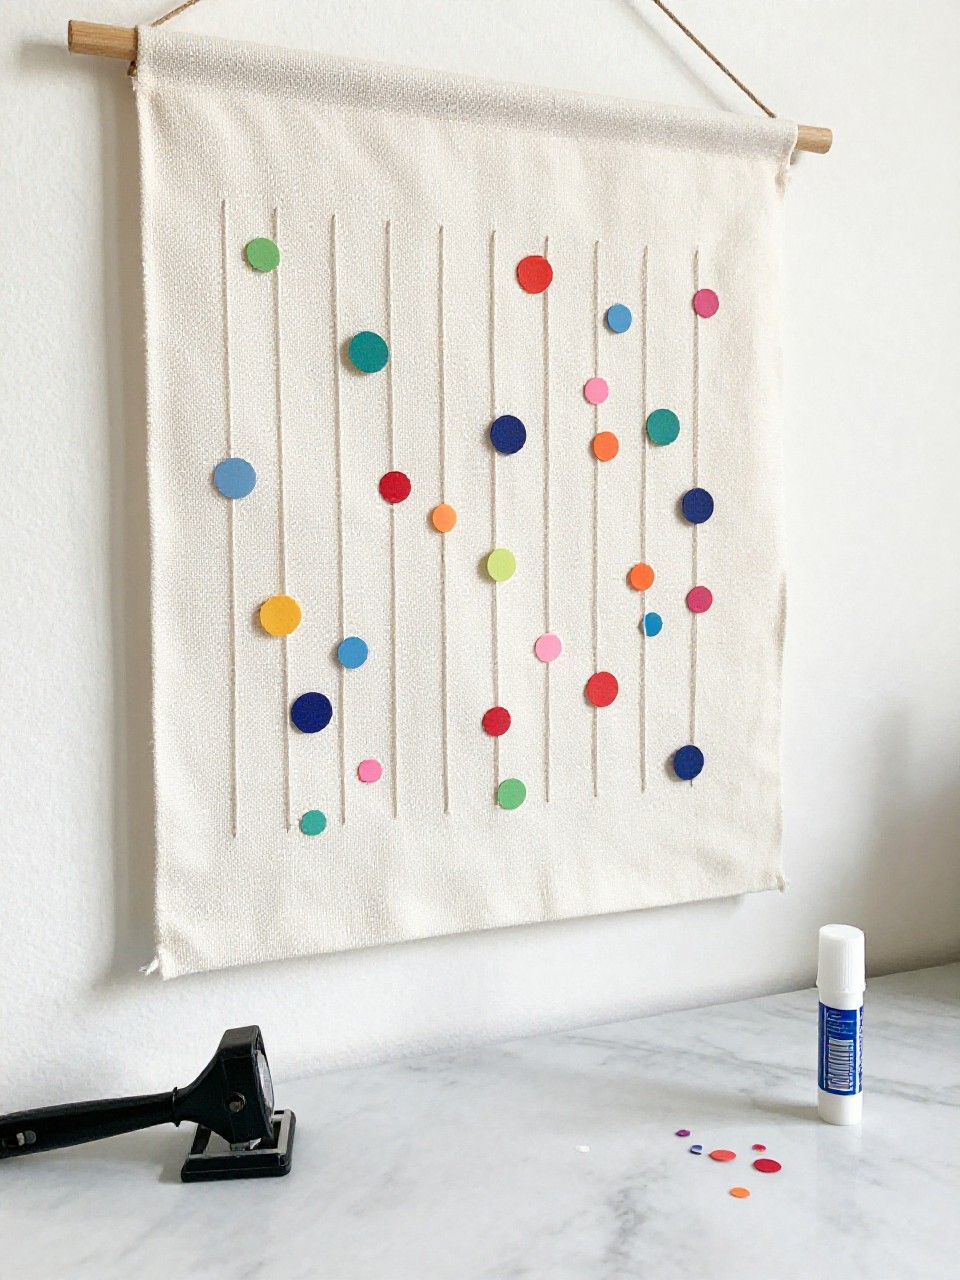
This hanging features a clean top bar with long strings of colorful paper dots that look like falling confetti. Kids enjoy punching circles and watching the colors dance together.
Materials Needed:
- Colored paper
- Circle punch or scissors
- Thread or string
- Glue stick or tape
- Wooden dowel or cardstock strip (top)
How to make it:
- Punch or cut many paper circles in different sizes.
- Sandwich the string between two circles with glue to make dot chains.
- Tie or tape dot chains to the top bar, keeping lengths varied.
- Hang on the wall and trim ends for a neat finish.
17. Paper Mountain Banner with Moon
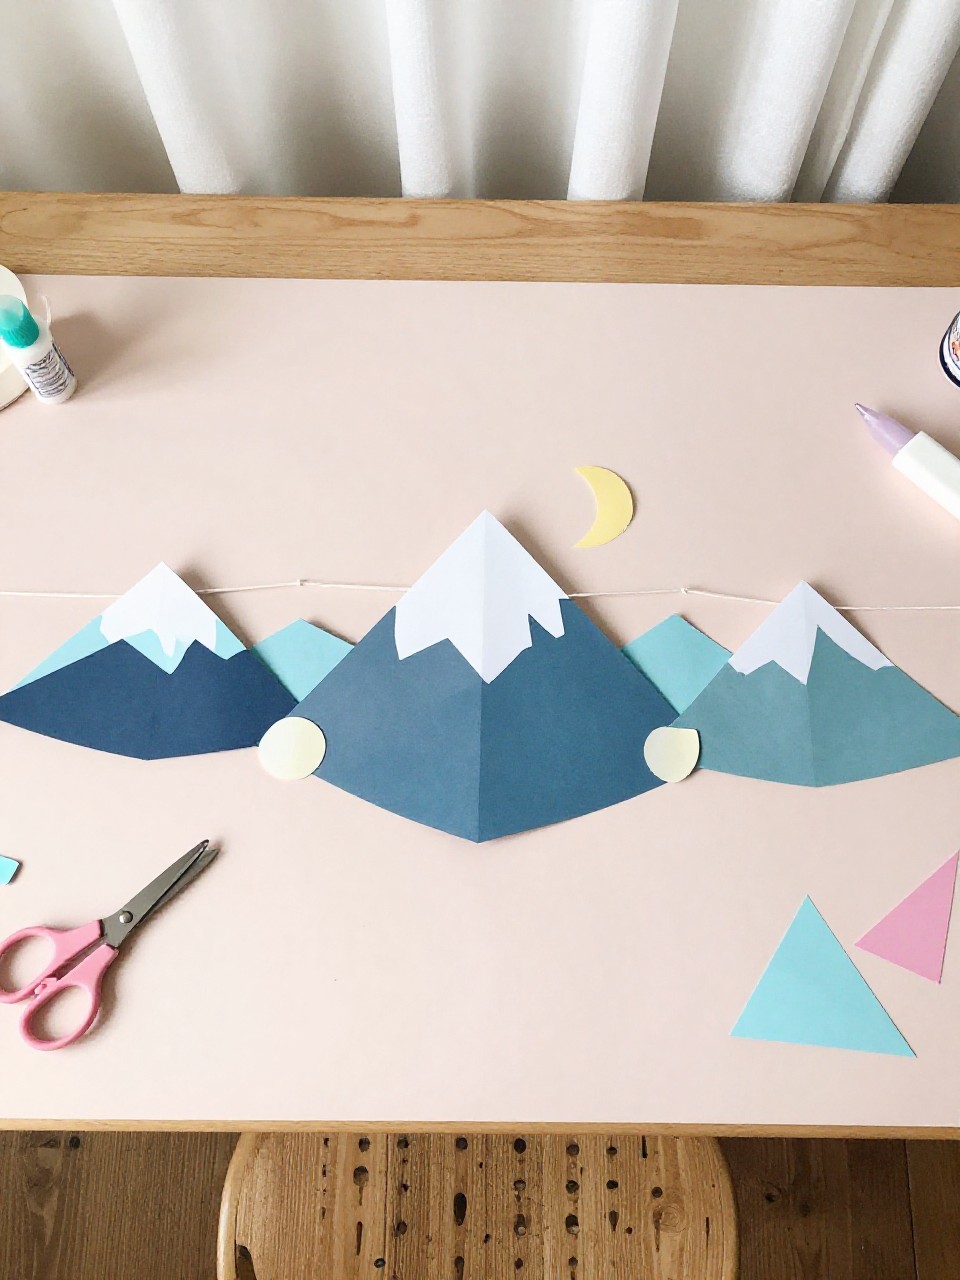
This banner shows layered paper mountains in cool colors with a big moon and tiny stars above. Kids like placing each mountain peak and adding snowy caps for a calm, night-sky scene.
Materials Needed:
- Colored paper (blues, grays, white)
- Dark cardstock (sky background)
- Glue stick
- Scissors
- Hole punch and string
How to make it:
- Cut triangle mountain shapes and small white caps.
- Glue mountains to the sky background, overlapping for depth; add a moon circle.
- Punch tiny star holes or glue small star pieces.
- Punch top corners, add string, and hang as a banner panel.