


In This Article Show
Keeping kids busy can feel hard, especially on rainy days or during long afternoons. If you’re looking for simple projects that use easy supplies, tissue paper crafts are perfect. They are colorful, budget-friendly, and great for both kids and adults.
This list gives you clear, fun ideas that build fine motor skills and spark creativity. Let’s jump into bright and crinkly tissue paper art you can start today.
1. Tissue Paper Stained Glass Suncatcher
This craft looks like a bright mini “stained glass” window that glows when sunlight shines through it. Kids love sticking colorful tissue shapes and seeing the light make them sparkle, and adults enjoy the clean, pretty finish on a window.
Materials Needed:
- Black construction paper or black cardstock (for frame)
- Colorful tissue paper squares
- Clear contact paper or laminating sheets
- Scissors
- Hole punch and string (optional for hanging)
How to make it:
- Cut a window frame from black paper and stick it onto clear contact paper.
- Press tissue paper pieces inside the frame, overlapping colors.
- Cover with a second sheet of contact paper and trim edges.
- Hang on a sunny window and enjoy the glowing colors.
2. Crinkled Tissue Paper Flower Bouquet
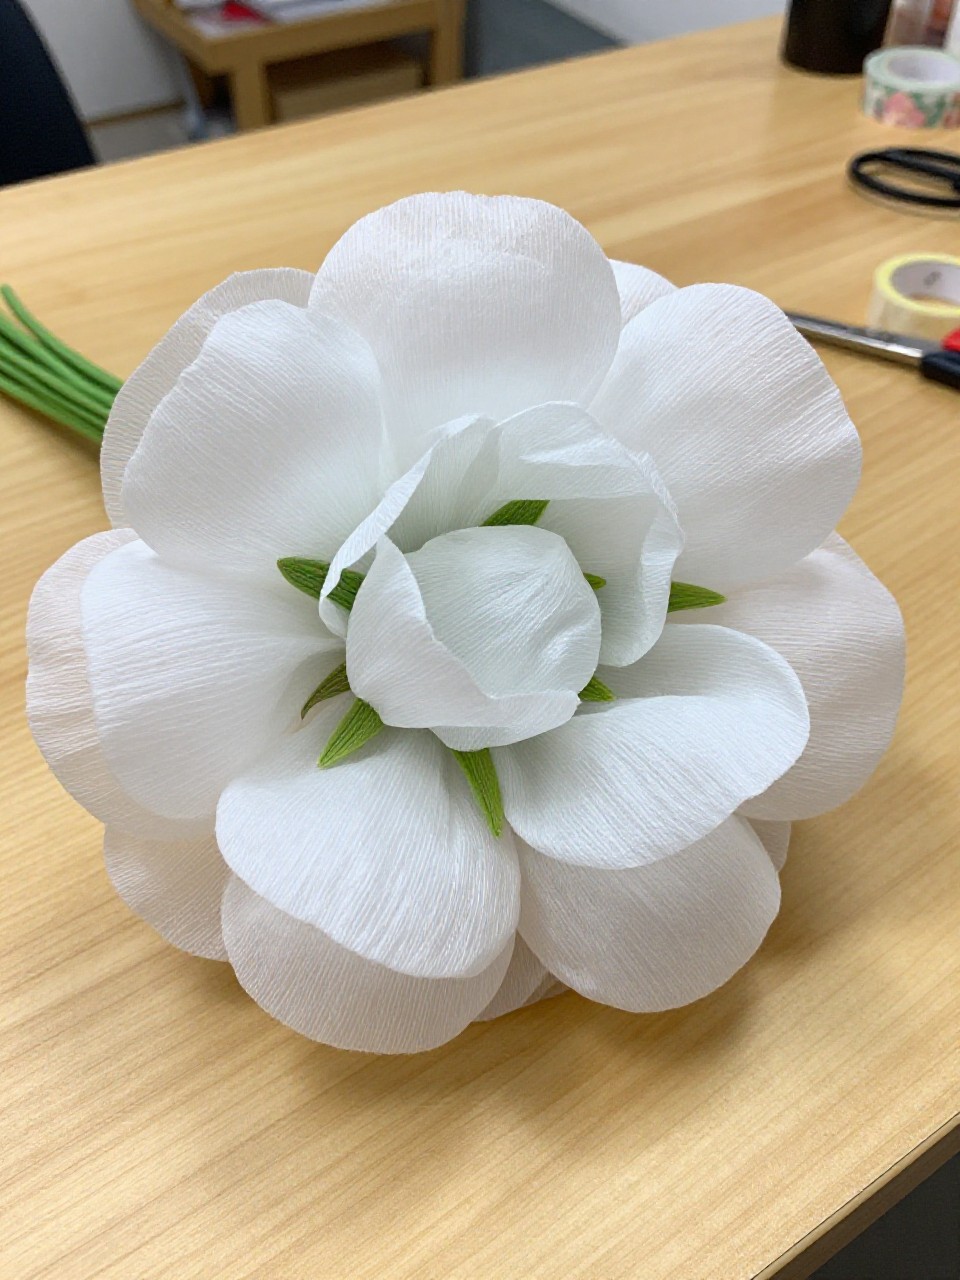
This bouquet features fluffy, layered blossoms in bright colors with paper or straw stems. It’s satisfying to scrunch and twist tissue into petals, and the result makes a cheerful gift or table centerpiece.
Materials Needed:
- Tissue paper sheets in various colors
- Green pipe cleaners or paper straws
- Scissors
- Tape or floral tape
- Small vase or jar (optional)
How to make it:
- Stack 4–6 tissue rectangles and accordion-fold them.
- Wrap a pipe cleaner around the center to make the stem.
- Trim petal tips round or pointy, then gently pull layers apart and fluff.
- Arrange in a vase for a bright, long-lasting bouquet.
3. Tissue Paper Collage Canvas
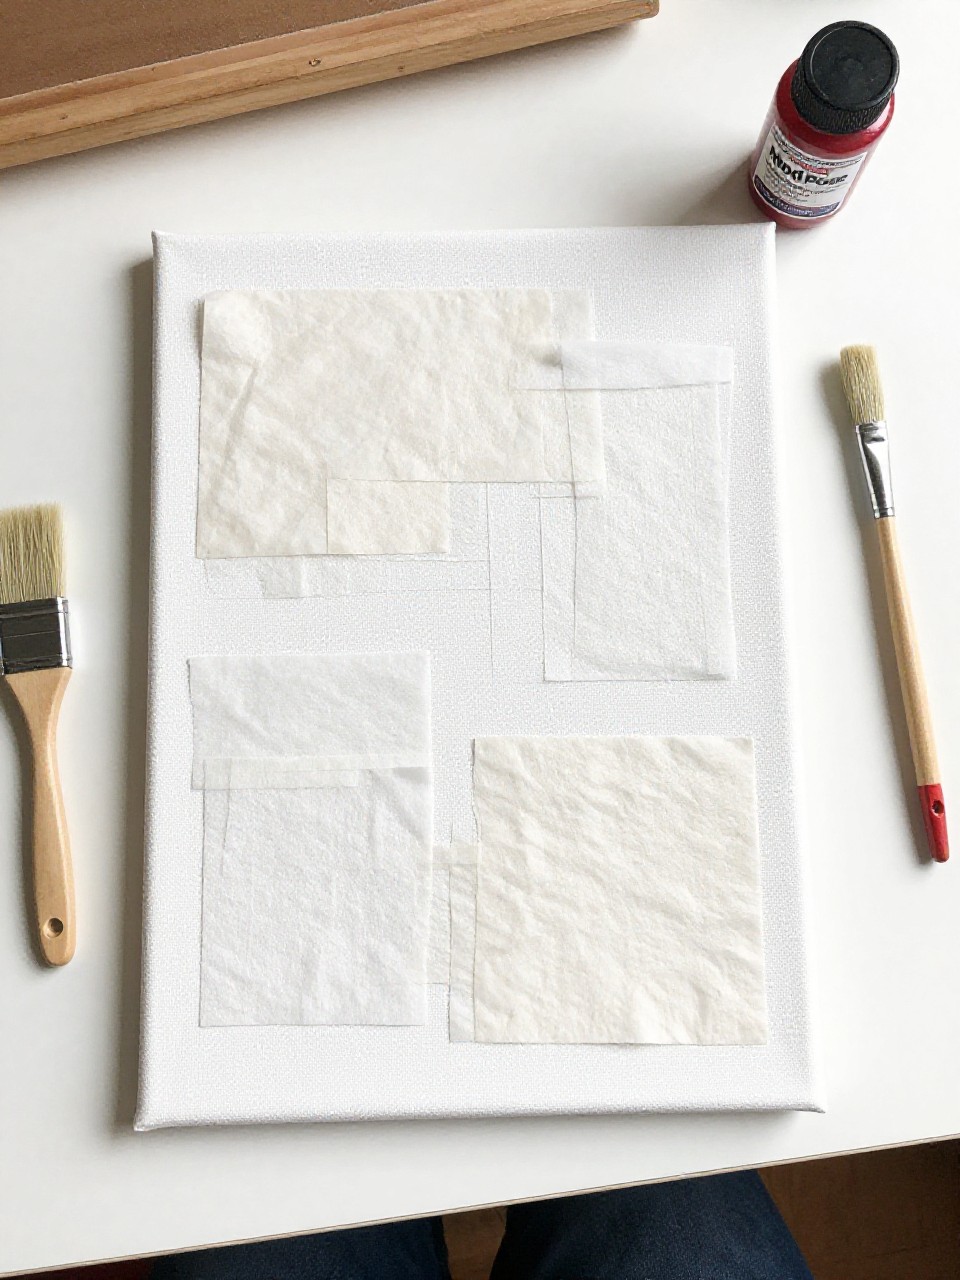
This project creates a bold abstract art piece with layered color patches that look like painted brushstrokes. Kids love tearing and placing pieces to make patterns, while adults enjoy making modern wall art in minutes.
Materials Needed:
- Pre-stretched canvas or thick cardstock
- Tissue paper in assorted colors
- Mod Podge or watered-down white glue
- Foam brush
- Optional: metallic tissue or glitter tissue
How to make it:
- Tear or cut tissue into shapes and plan your layout on the canvas.
- Brush a thin layer of Mod Podge, place tissue, and smooth gently.
- Overlap colors and seal with a top coat of Mod Podge.
- Let dry and hang your custom artwork.
4. Tissue Paper Confetti Bowls

These small bowls look like they’re made of colorful confetti, perfect for holding keys or hair ties. Kids enjoy painting glue and layering colors, and the peel-off reveal feels magical.
Materials Needed:
- Balloon or small bowl as a mold
- Tissue paper confetti or small squares
- Mod Podge or watered-down white glue
- Foam brush
- Petroleum jelly (if using a real bowl as mold)
How to make it:
- Inflate a balloon or coat a small bowl with petroleum jelly and wrap with plastic.
- Brush glue on the mold’s exterior and add tissue layers, overlapping.
- Add 3–4 layers, then seal with more glue.
- Let dry, pop balloon or lift off mold, and trim the rim.
5. Tissue Paper Butterfly Window Art
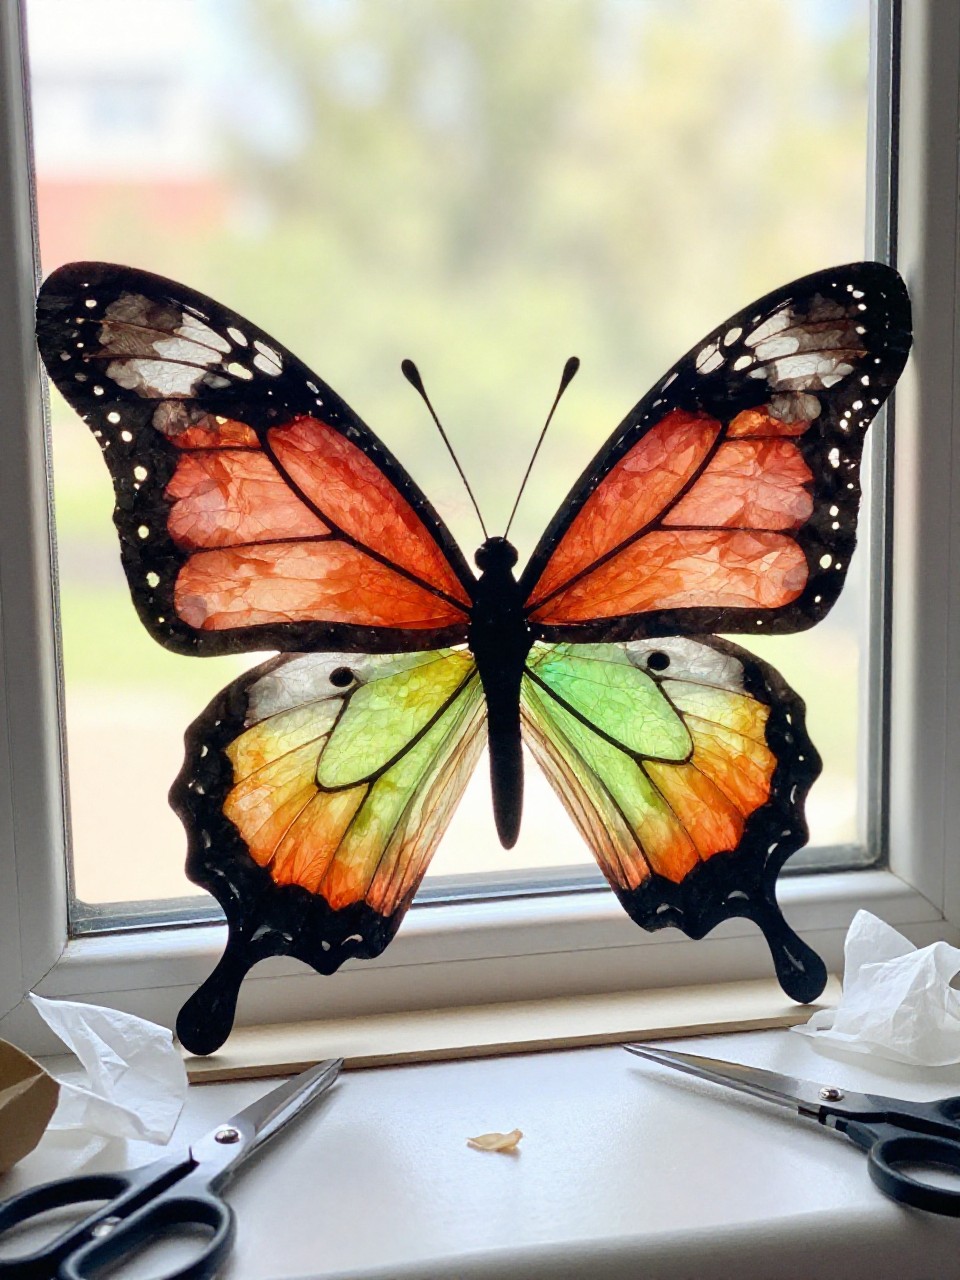
This makes a bright butterfly silhouette with colorful see-through wings that glow on glass. Kids love choosing wing patterns and adults appreciate the clean shape that displays well.
Materials Needed:
- Black cardstock
- Tissue paper in bright colors
- Clear contact paper
- Scissors and pencil
- String or tape for hanging
How to make it:
- Fold black cardstock and cut a butterfly outline with open wing panels.
- Stick the frame onto contact paper, sticky side up.
- Fill wing spaces with tissue pieces, then seal with another contact sheet.
- Trim and hang in a sunny spot.
6. Tissue Paper Hot Air Balloon Mobile
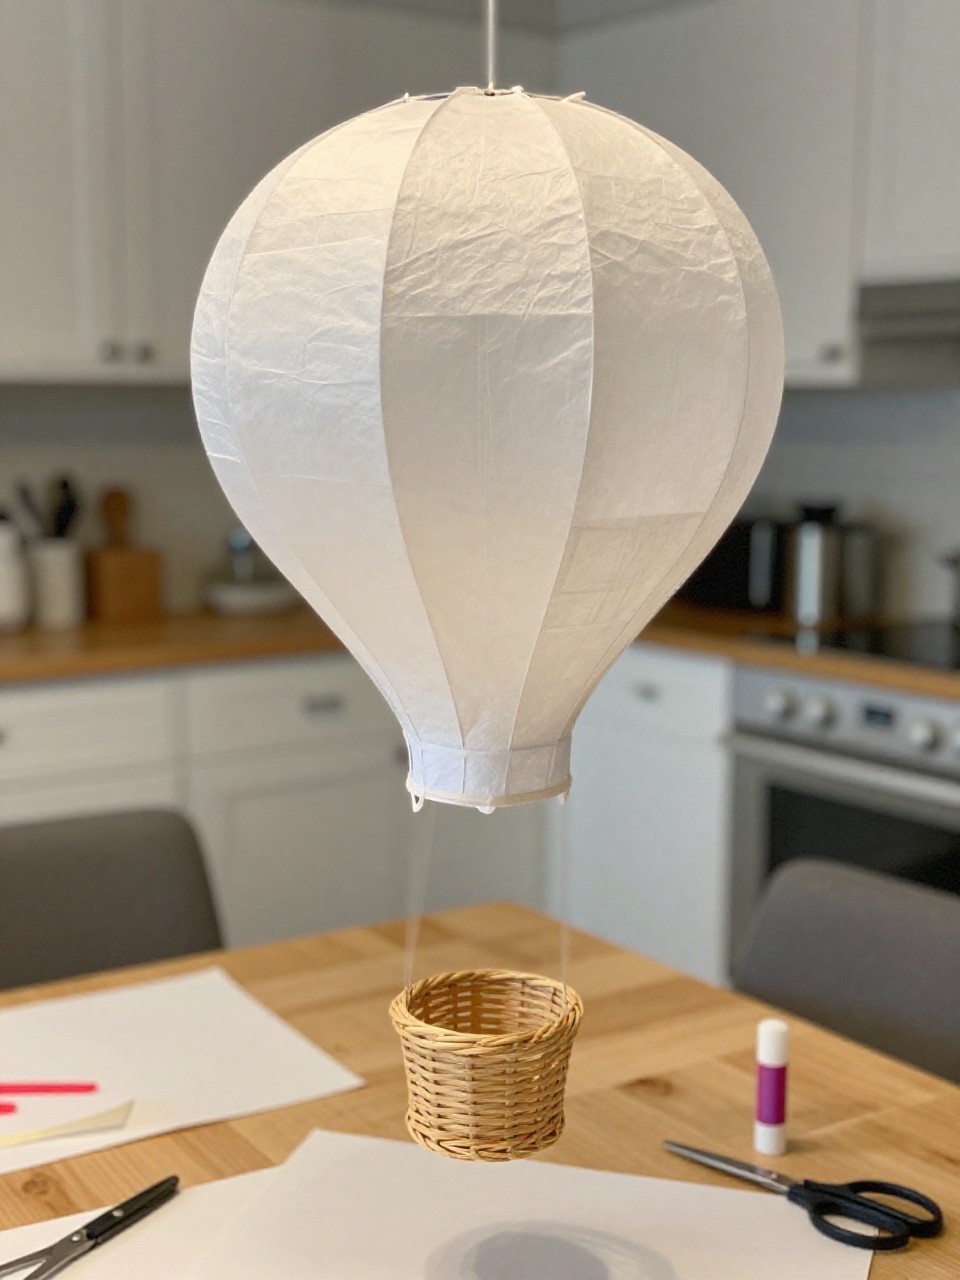
A round, patchwork balloon hangs above a tiny basket, turning gently in the air. It’s relaxing to glue the colorful panels together, and the finished mobile adds happy color to any room.
Materials Needed:
- Tissue paper sheets
- Paper lantern (round) or cardstock balloon template
- Small paper cup or mini basket
- String or fishing line
- Glue stick and tape
How to make it:
- If using a lantern, assemble it; if not, cut and tape a 3D balloon shape from cardstock.
- Glue tissue panels or squares all around the balloon form.
- Attach strings to a small cup basket and tape to the balloon base.
- Hang from the ceiling and enjoy the gentle sway.
7. Torn Tissue Paper Animal Portraits
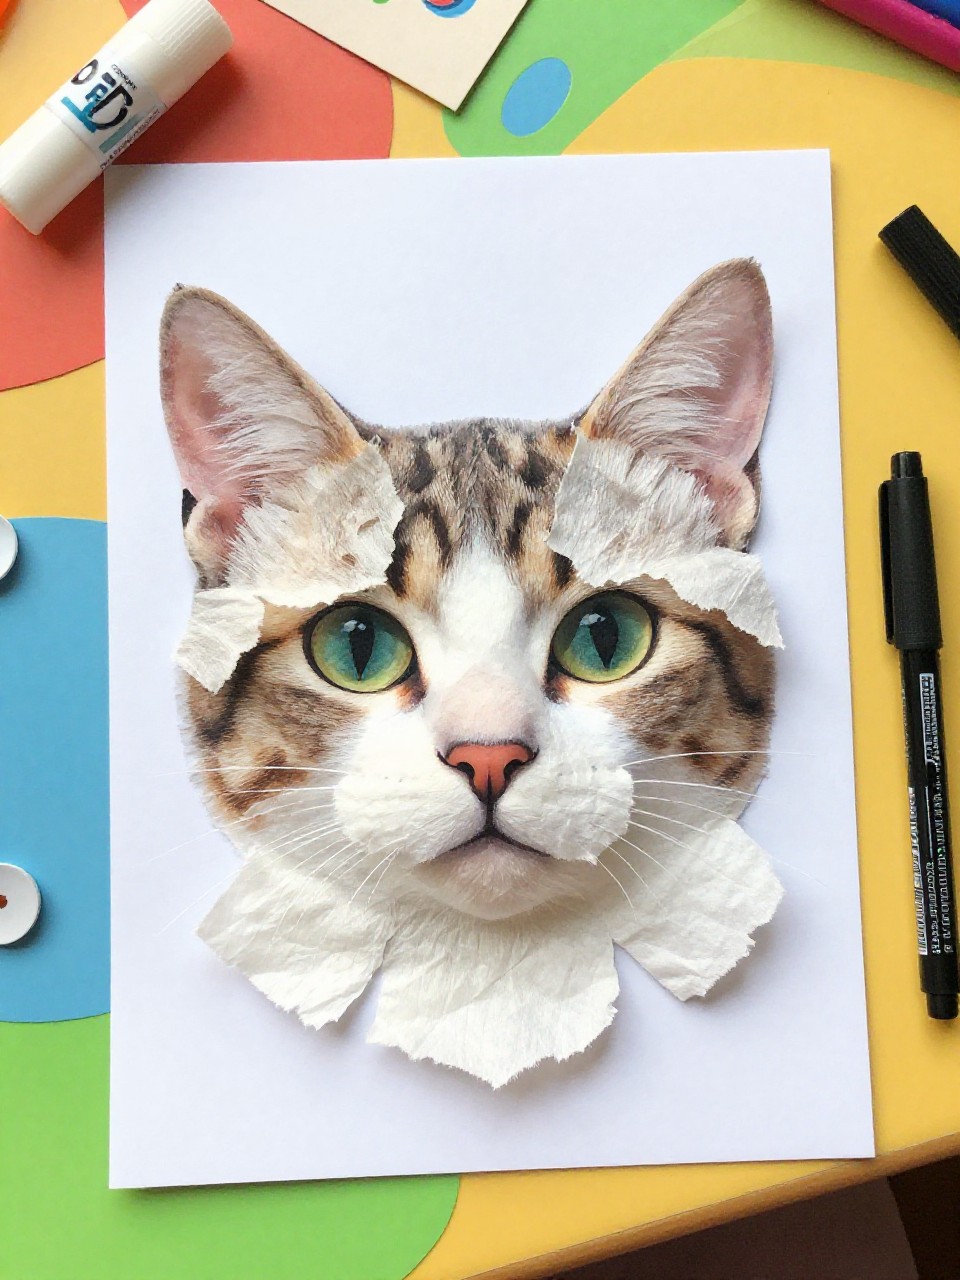
These portraits look like mosaic animals—cats, dogs, or jungle friends—made from torn tissue shapes. Kids love choosing colors and building fur or feathers with simple pieces, and it builds fine motor skills.
Materials Needed:
- White cardstock
- Tissue paper in natural and fun colors
- Pencil for sketching
- Glue stick
- Black marker for outlines
How to make it:
- Lightly sketch a simple animal face or silhouette on cardstock.
- Tear tissue into small pieces and glue inside the sketch, layering colors.
- Add a few darker pieces for shadows and lighter ones for highlights.
- Outline features with marker and display.
8. Tissue Paper Lantern Jars
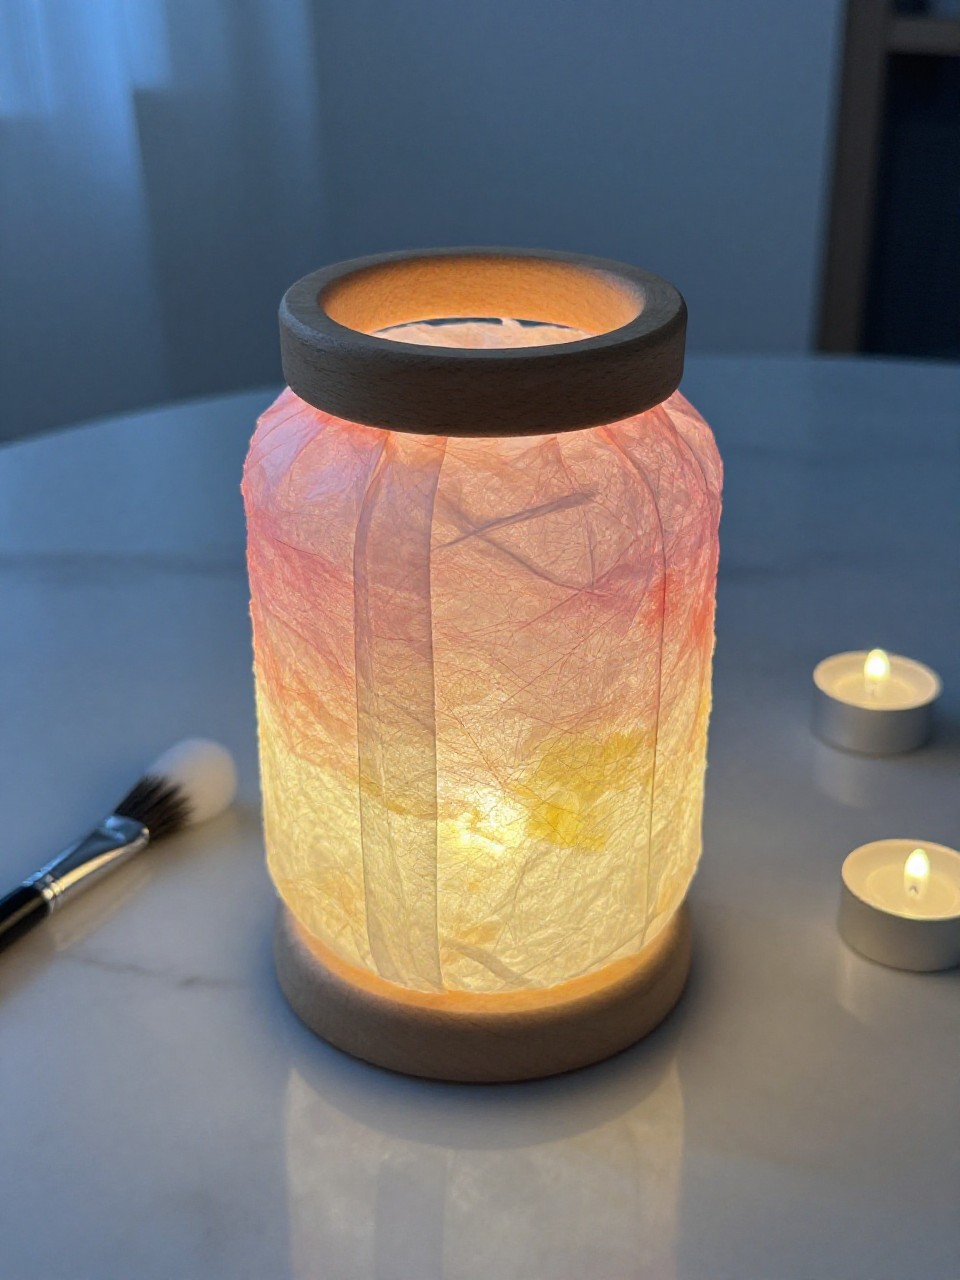
Glass jars turn into soft-glowing lanterns with layered tissue and a tealight inside. Kids enjoy designing patterns; adults love the cozy glow on shelves and patios.
Materials Needed:
- Clean glass jars
- Tissue paper pieces
- Mod Podge or watered-down glue
- Foam brush
- LED tealights or fairy lights
How to make it
- Brush glue on the outside of the jar.
- Press tissue pieces all around, overlapping for color blends.
- Seal with a top coat and let dry.
- Place an LED tealight inside and enjoy the warm light.
9. Tissue Paper Rainbow Cloud
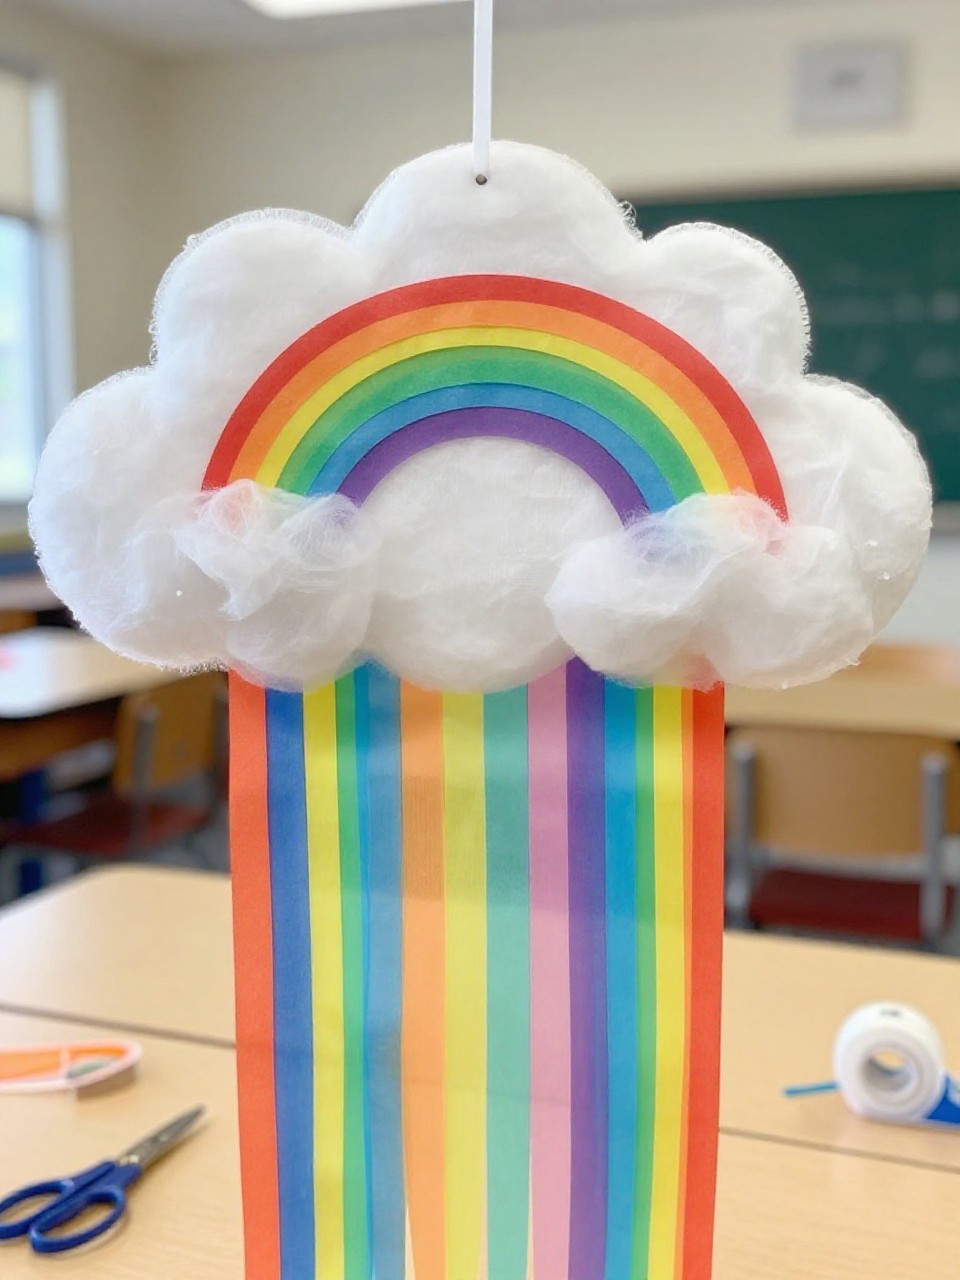
A puffy paper cloud hangs with long rainbow tissue streamers that flutter. Kids love the instant color and movement, and it’s simple enough for preschoolers with help.
Materials Needed:
- White cardstock or paper plate
- White tissue for fluff
- Colored tissue strips (red to violet)
- Glue stick and tape
- String for hanging
How to make it:
- Cut or use a paper plate to make a cloud shape.
- Crumple white tissue balls and glue to cover the cloud.
- Tape colored tissue strips to the back in rainbow order.
- Add a string and hang near a window or door.
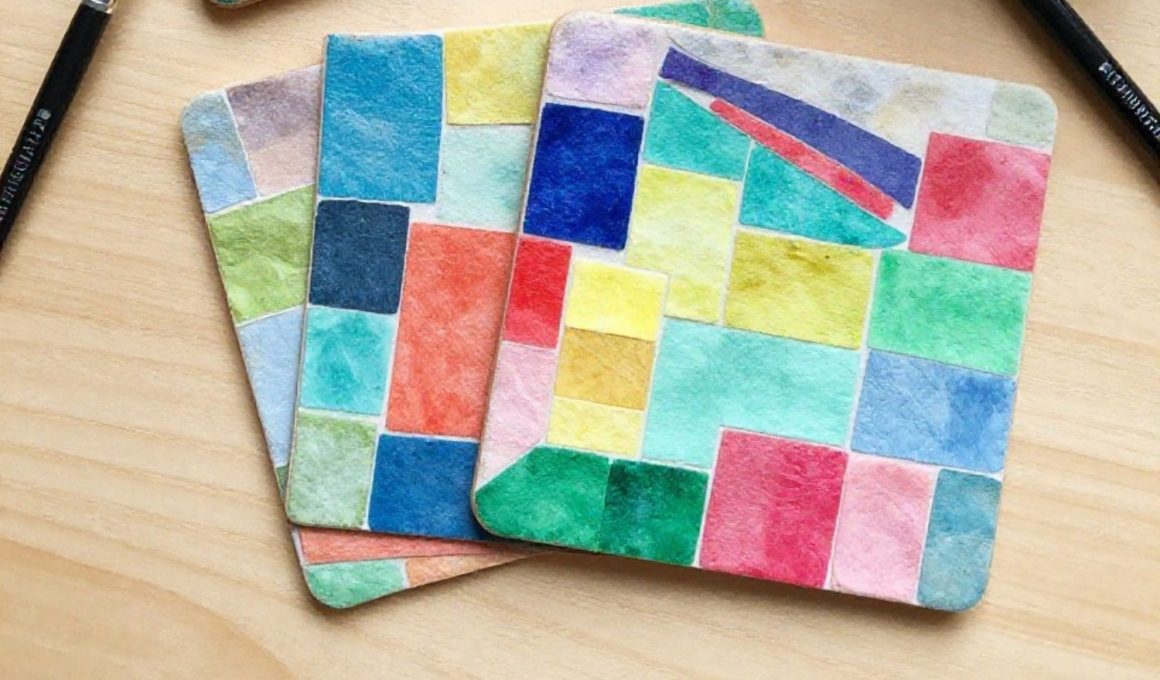
10. Tissue Paper Mosaic Coasters
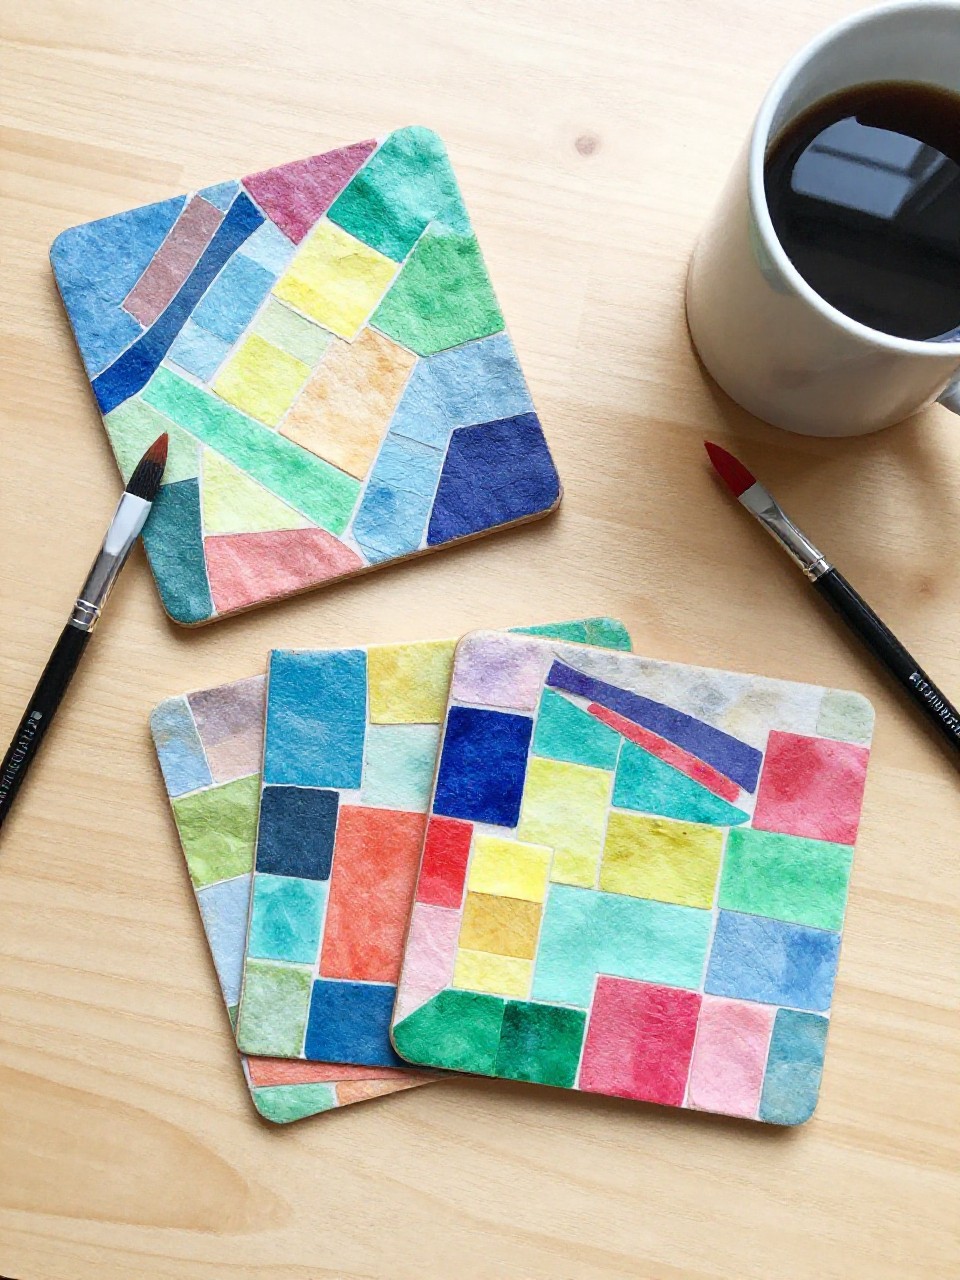
These coasters look like tiny stained glass tiles sealed under a smooth finish. Kids enjoy making matching sets in favorite colors, and adults appreciate a useful craft that protects tables.
Materials Needed:
- Thick cardboard or wooden coaster blanks
- Tissue paper squares
- Mod Podge (dishwasher-safe or outdoor if desired)
- Foam brush
- Clear acrylic sealer spray (optional)
How to make it:
- Cut cardboard into 4-inch squares if not using blanks.
- Arrange tissue squares in a mosaic pattern and glue down.
- Brush on several thin coats of Mod Podge to seal, drying between coats.
- Let cure fully and use for cups and mugs.
11. Tissue Paper Watercolor Cards
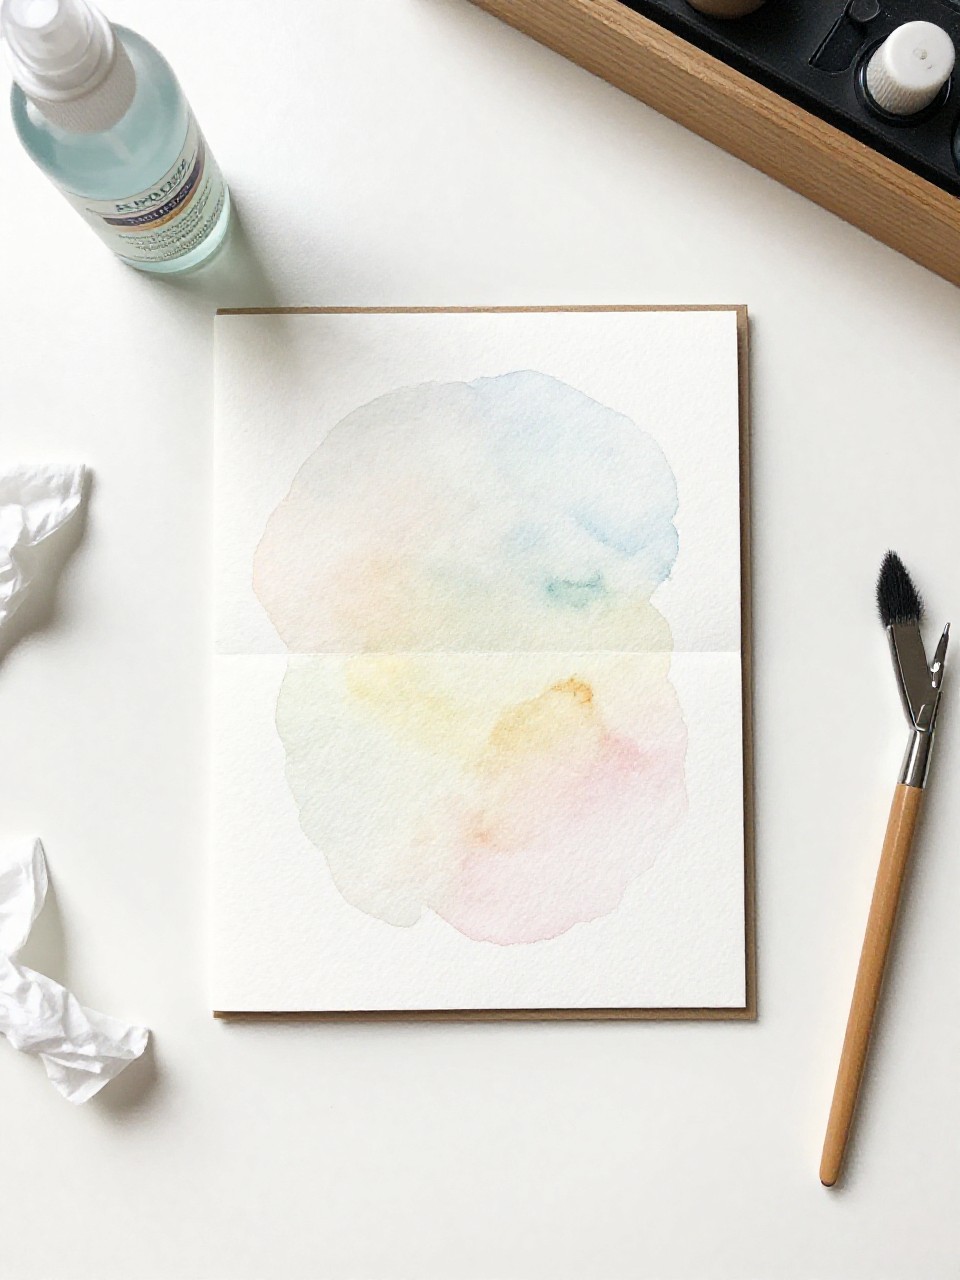
These greeting cards have soft, blended colors that look painted, made by bleeding tissue dye onto paper. It feels like magic to lift the tissue and see the gentle gradients, perfect for birthdays or thank-yous.
Materials Needed:
- Bleeding tissue paper (not colorfast)
- Watercolor paper or blank cards
- Spray bottle or paintbrush with water
- Paper towels
- Tape (low-tack)
How to make it:
- Tape paper edges to a surface to prevent warping.
- Place bleeding tissue shapes on the paper and mist with water.
- Let colors bleed and blend, then remove tissue carefully.
- Dry flat, fold into a card, and add a message.
12. Tissue Paper Planet Mobile
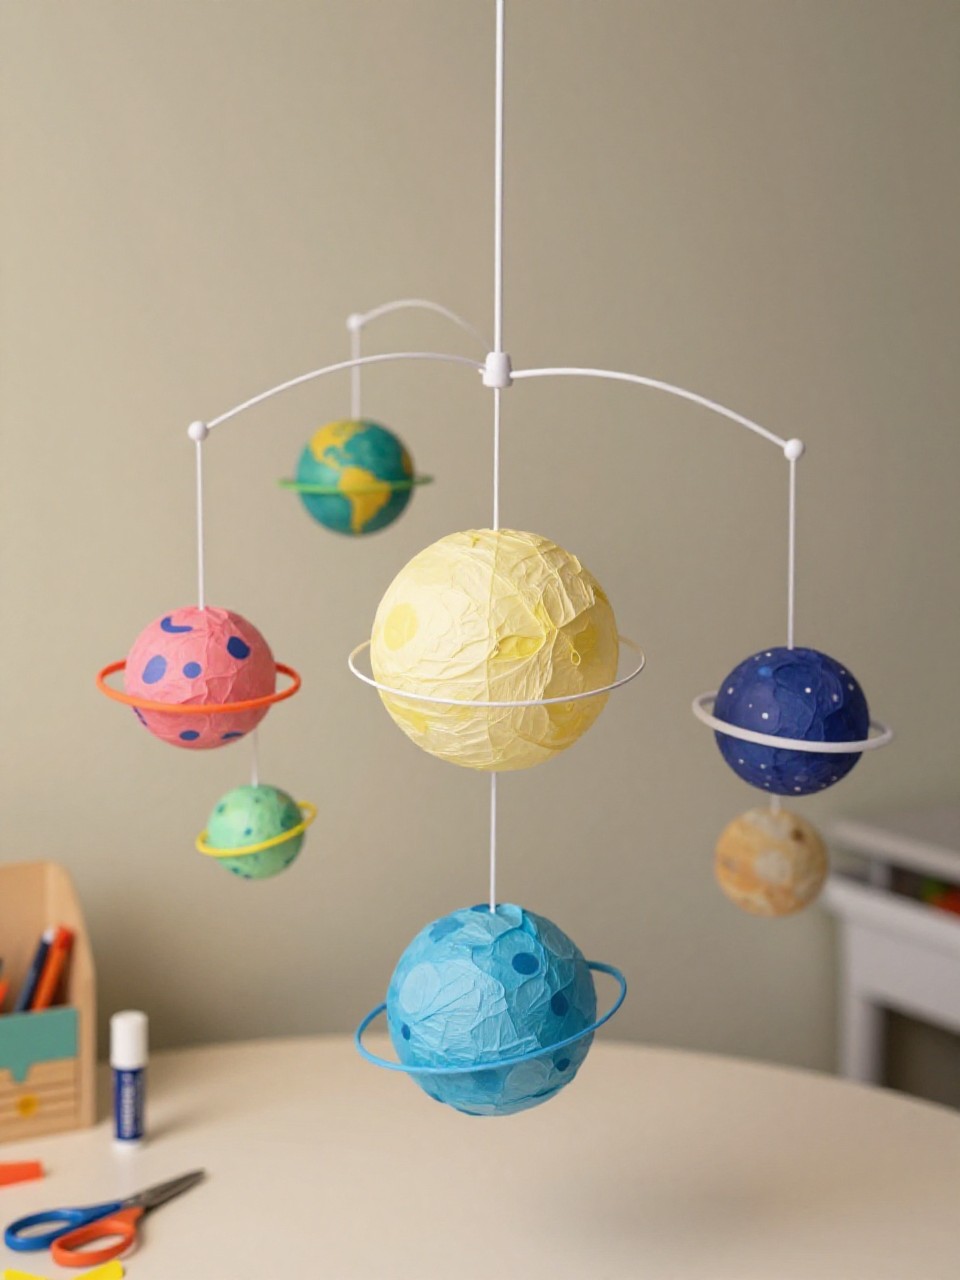
Planets made from tissue-covered circles hang at different lengths to make a mini solar system. Kids love picking planet colors and adding rings or spots, and it makes a cool STEM display.
Materials Needed:
- Cardboard circles or foam balls
- Tissue paper in space colors
- Glue stick or Mod Podge
- String or fishing line
- Embroidery hoop or stick for hanging
How to make it:
- Cut or form circles; if using foam balls, flatten slightly for hanging.
- Cover each planet with tissue pieces, sealing with glue.
- Add rings to Saturn with a cardboard ring wrapped in tissue.
- Tie planets to the hoop or stick and hang from the ceiling.
13. Tissue Paper Leaf Rubbing Art
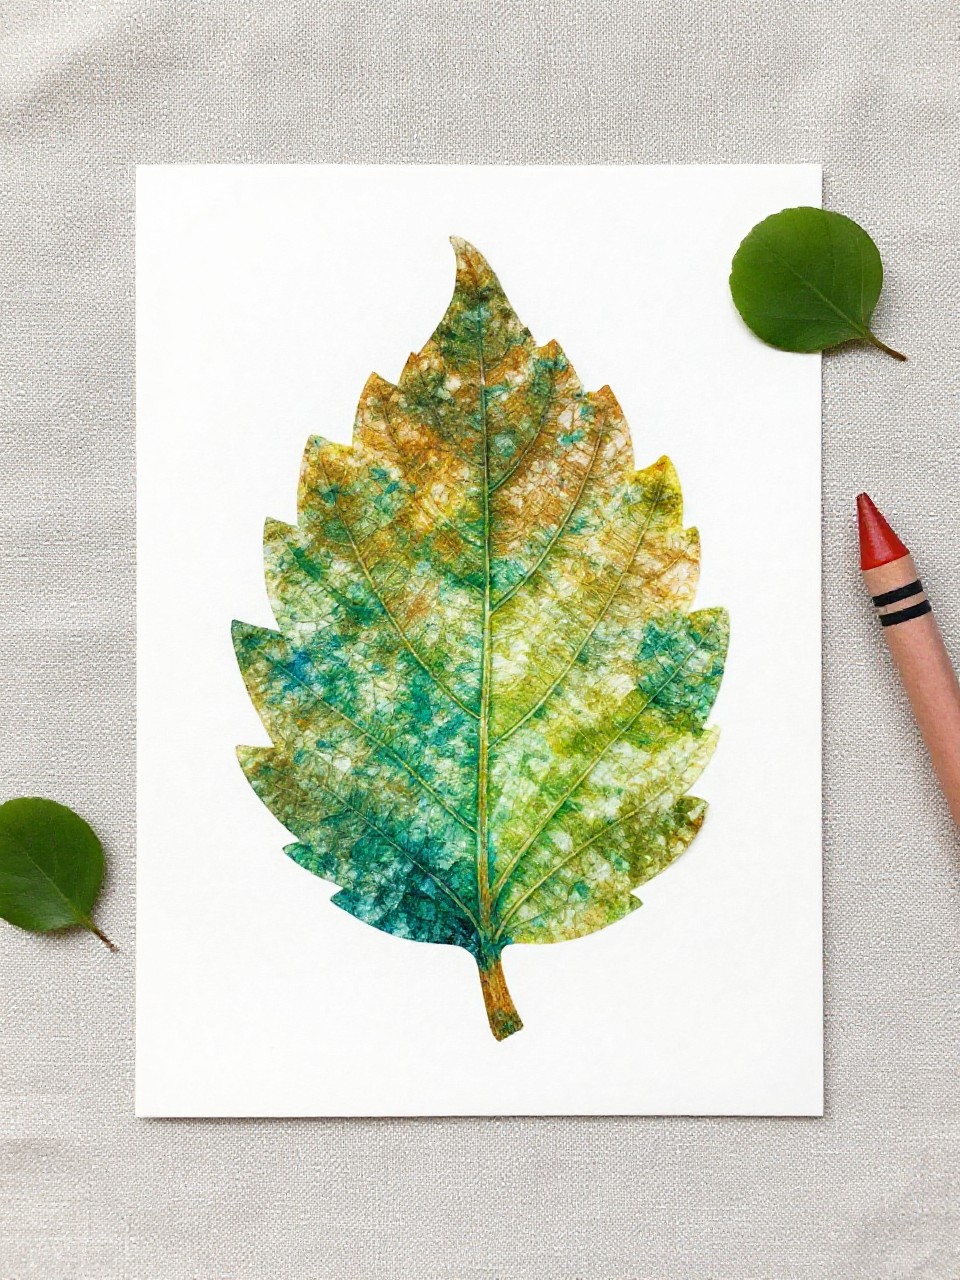
This art shows bright leaf shapes with textured veins made by rubbing, then filled with tissue color. Kids enjoy hunting for leaves and layering colors inside the outlines.
Materials Needed:
- Real leaves
- White paper
- Crayon or pastel for rubbings
- Tissue paper pieces
- Glue stick
How to make it:
- Place leaves under paper and rub with the side of a crayon to reveal veins.
- Tear tissue into shapes and glue inside the leaf outlines.
- Overlap tissue for blended color effects.
- Let dry and hang as seasonal decor.
14. Tissue Paper Fiesta Banners (Papel Picado)
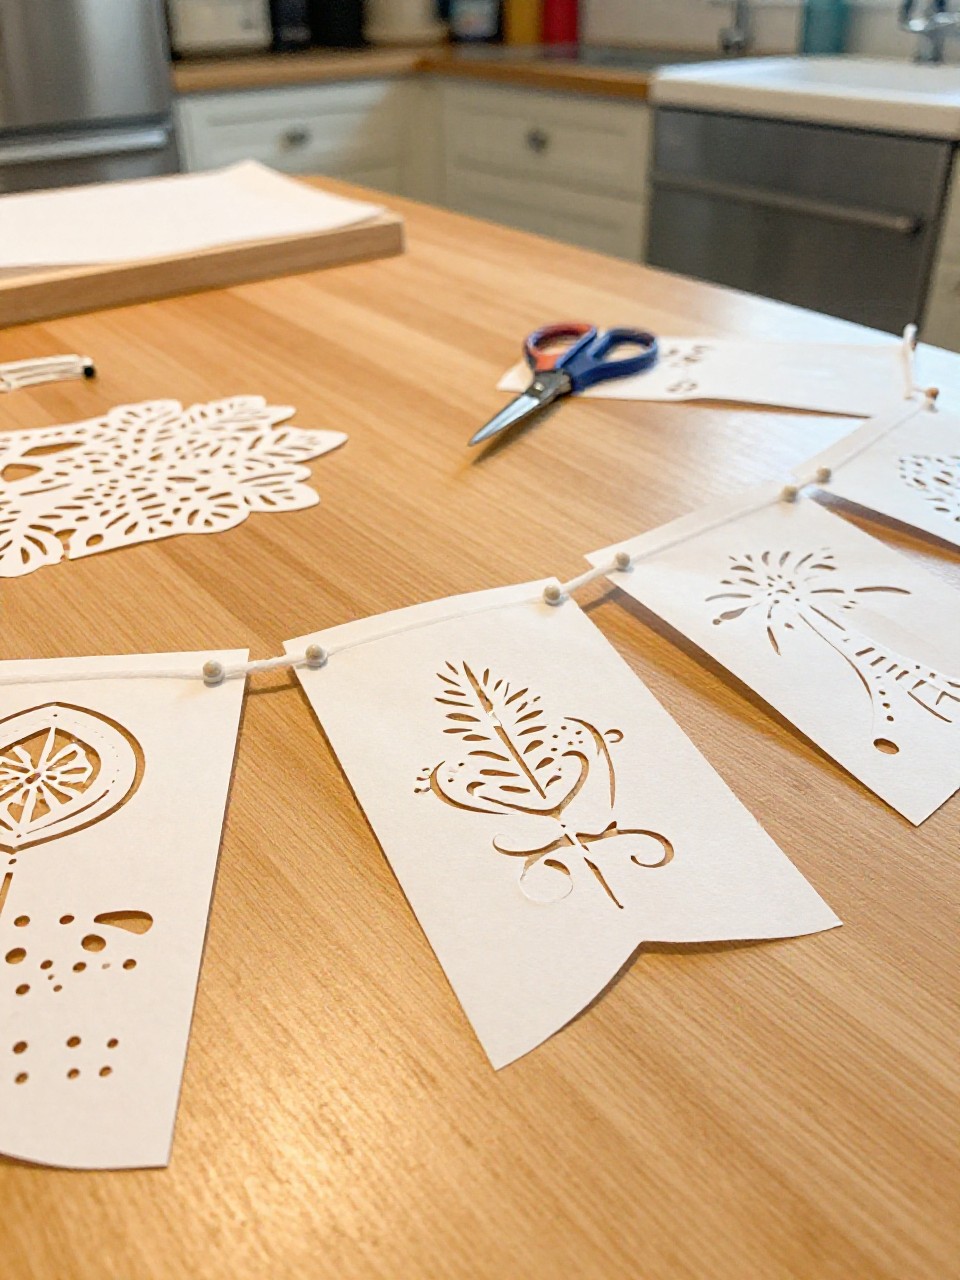
These banners look like festive cut-out flags in bright colors strung across a room. Kids enjoy punching patterns safely and watching them flutter, and adults like how quickly they fill a space with color.
Materials Needed:
- Tissue paper sheets
- Scissors and hole punch
- String or twine
- Glue stick or tape
- Ruler (optional)
How to make it:
- Fold tissue rectangles and cut simple shapes along folds to make patterns.
- Open each flag to reveal the design.
- Fold a top edge over the string and glue or tape to secure.
- Hang across a doorway or wall.
15. Tissue Paper Ocean Wave Collage
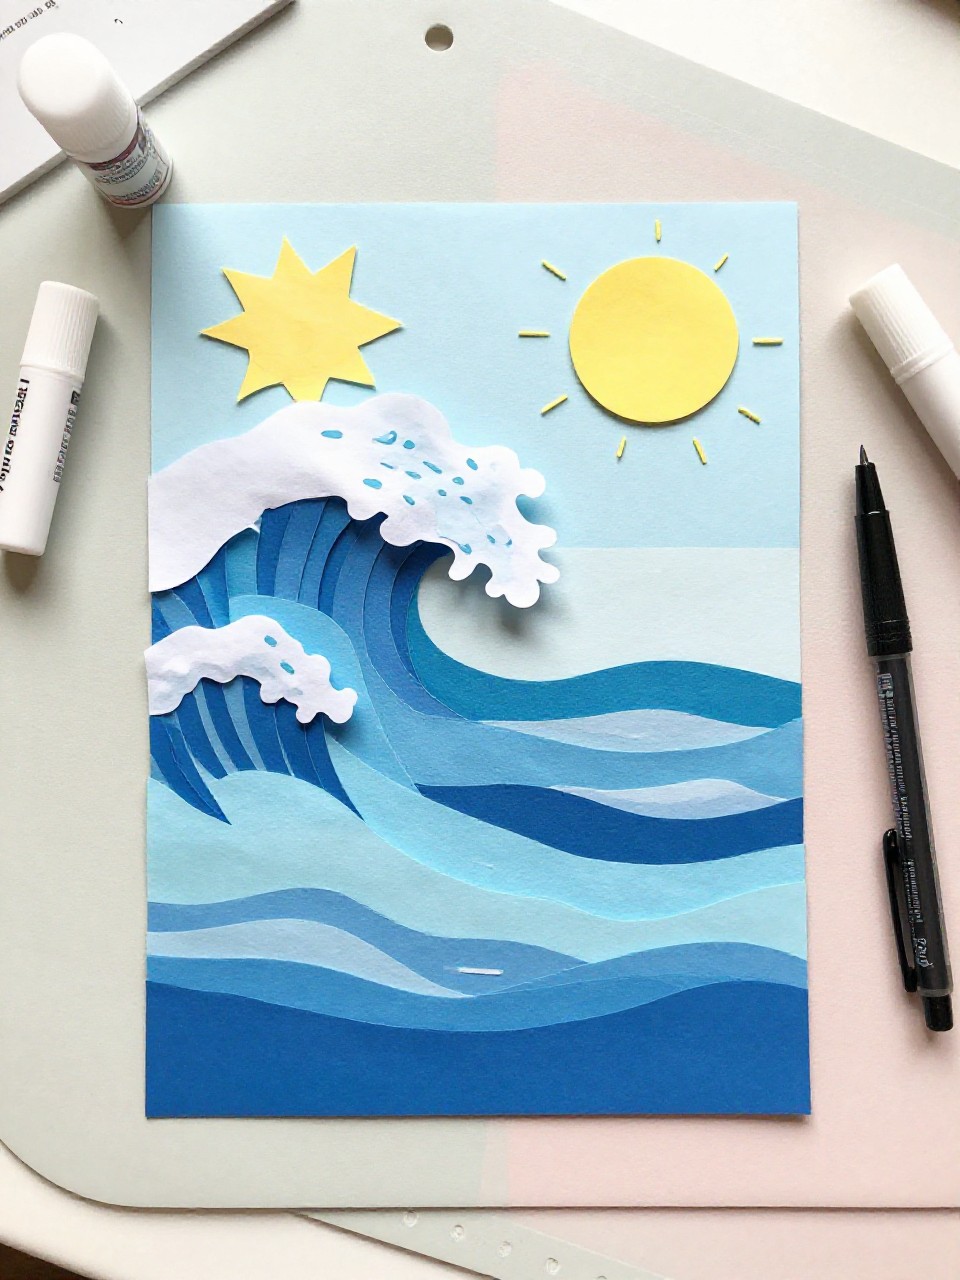
This collage shows rolling ocean waves with layered blue and teal tissue and a bright sun. Kids enjoy ripping strips to make wave movement, while adults can add details like foam or a sailboat.
Materials Needed:
- Blue, teal, and white tissue paper
- Yellow/orange tissue for the sun
- Cardstock or canvas board
- Glue stick
- Optional: black pen for details
How to make it:
- Tear blue tissue into long wavy strips.
- Glue strips from bottom to top, overlapping for depth.
- Add white torn bits as sea foam and a tissue sun in the corner.
- Draw a tiny boat or birds and display.
16. Tissue Paper Heart Sun Catchers
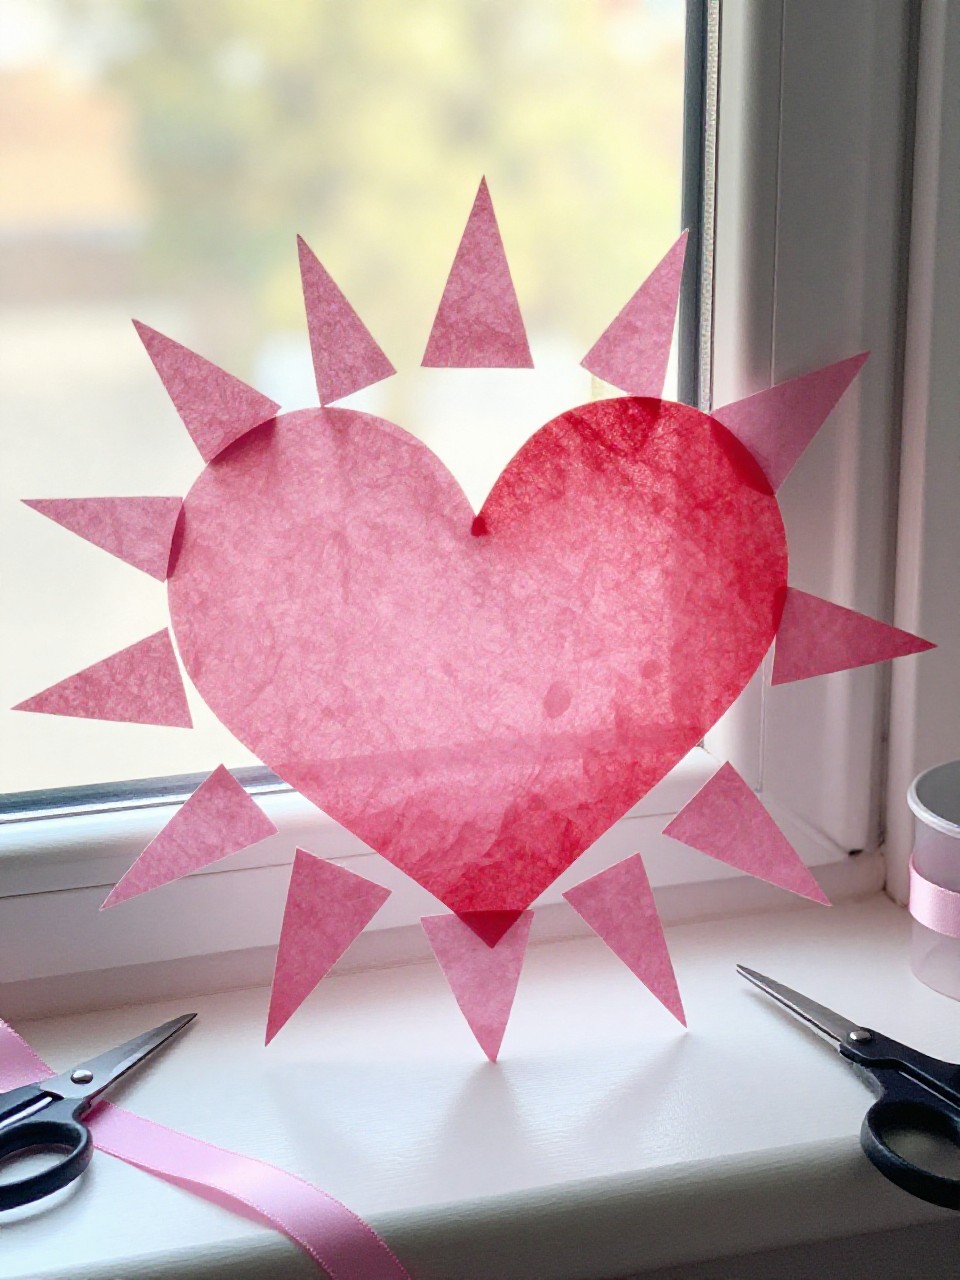
These heart-shaped frames glow in pinks and reds when hung in a window. Kids love choosing sweet color mixes for gifts, and they’re quick to make for parties or Valentine’s Day.
Materials Needed:
- Red or pink cardstock
- Tissue paper in warm colors
- Clear contact paper
- Scissors
- Ribbon or string
How to make it:
- Cut a heart outline from cardstock and stick it onto contact paper.
- Fill the center with tissue pieces, overlapping for rich color.
- Seal with a second contact sheet and trim.
- Add ribbon and hang in a sunny spot.
17. Tissue Paper Jellyfish Hangers
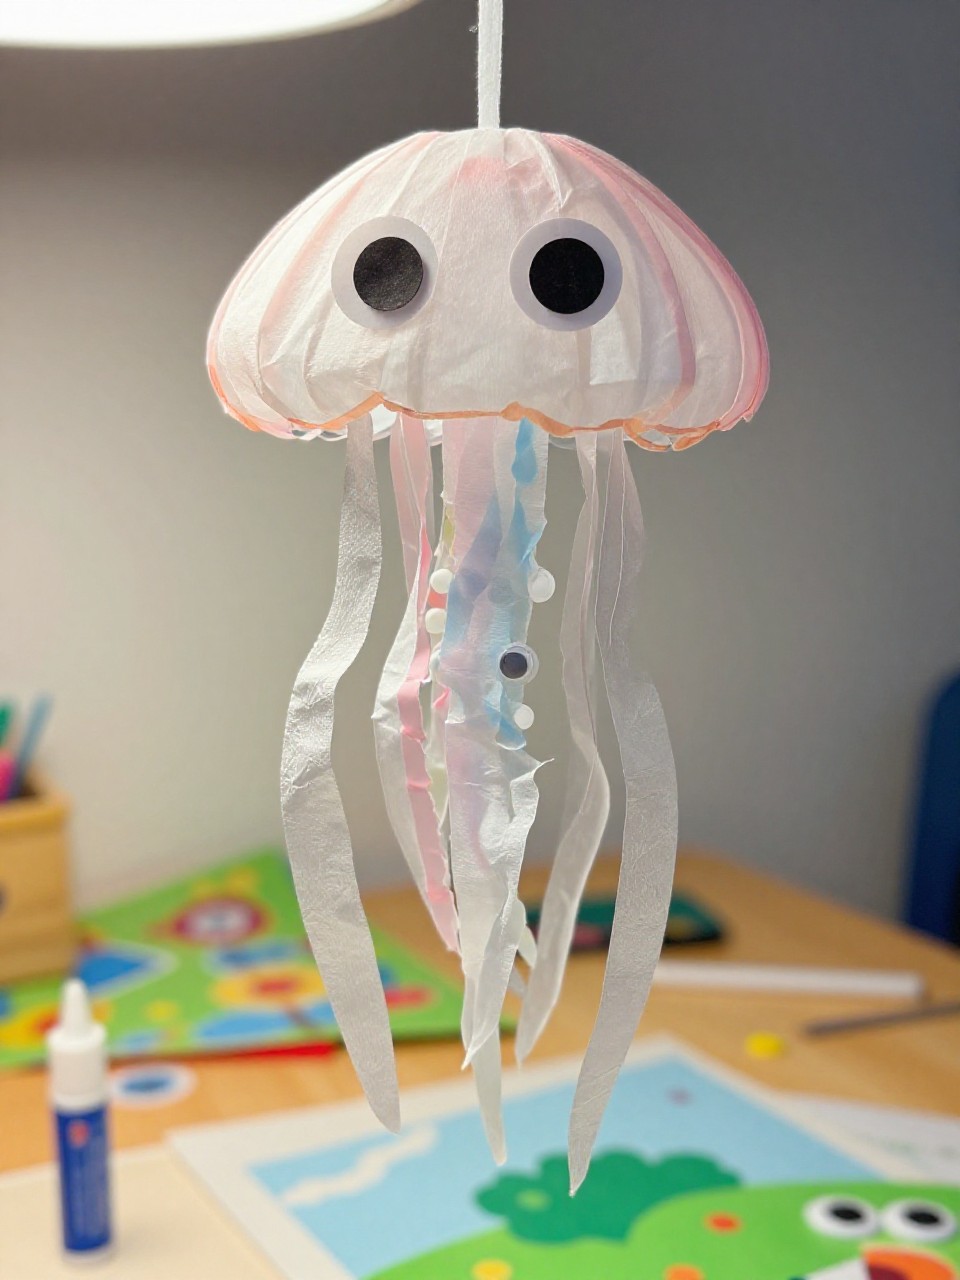
These jellyfish have round, colorful tops with long, curly tissue tentacles that sway. Kids enjoy curling strips and giving each jellyfish a funny face, and they look adorable hanging from shelves.
Materials Needed:
- Paper bowls or cardstock circles
- Tissue paper in ocean colors
- Glue stick and tape
- Googly eyes or marker
- String for hanging
How to make it:
- Cover a paper bowl with tissue pieces to make the jellyfish cap.
- Cut long tissue strips and tape them inside the rim as tentacles.
- Add eyes and a smile with googly eyes or marker.
- Tie on a string and hang where they can flutter.