

In This Article Show
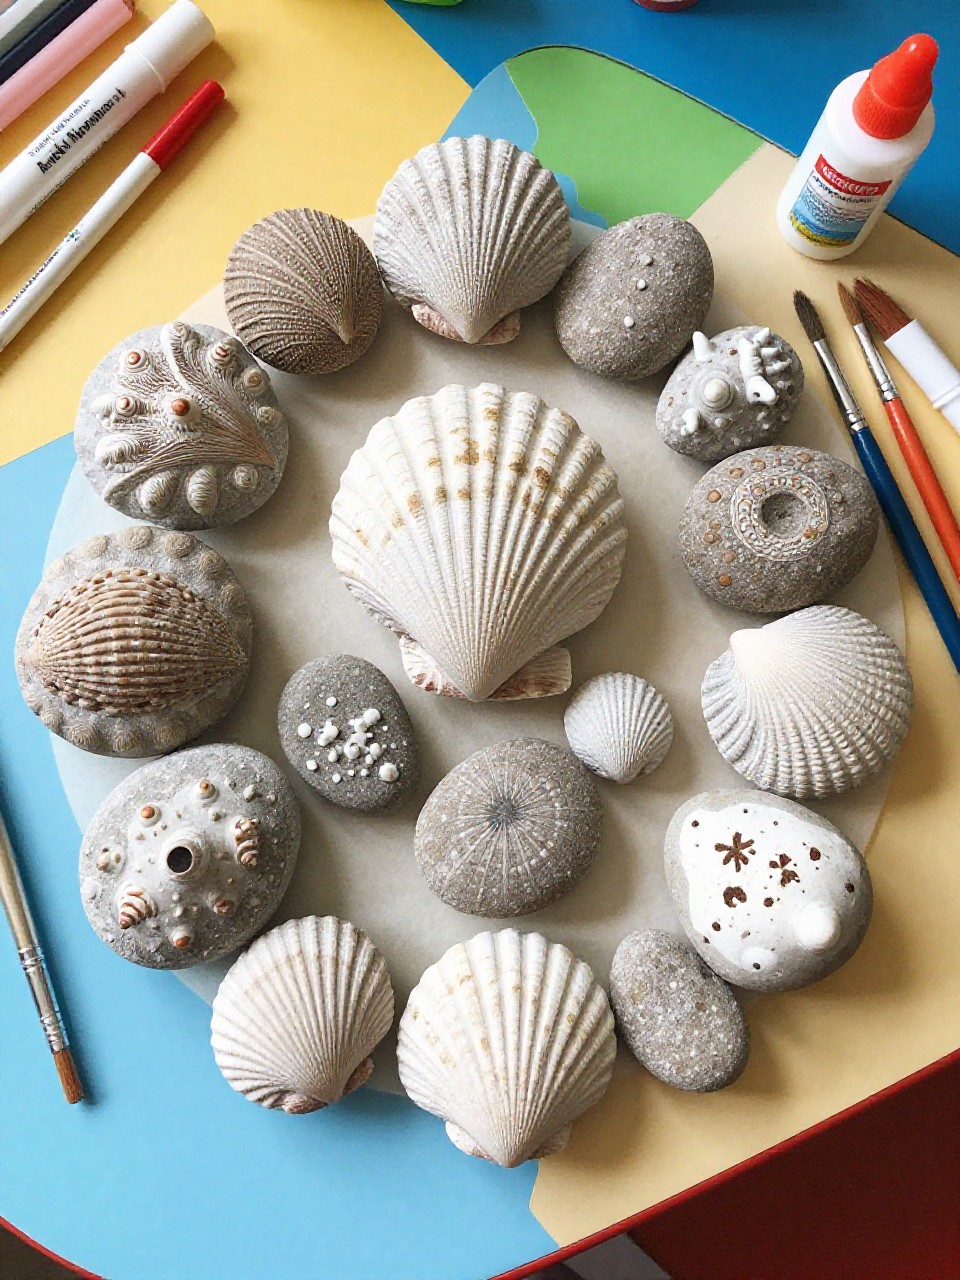
Here’s a simple, happy list of beach shell crafts to try when you need easy activities for kids, rainy-day projects, or calm classroom ideas. If your shells are piling up from summer walks, these quick crafts turn them into keepsakes and gifts.
You’ll find beginner-friendly projects that use common supplies and inspire creativity. Let’s dive into fun, simple shell ideas the whole family can make together.
1. Painted Rainbow Shells
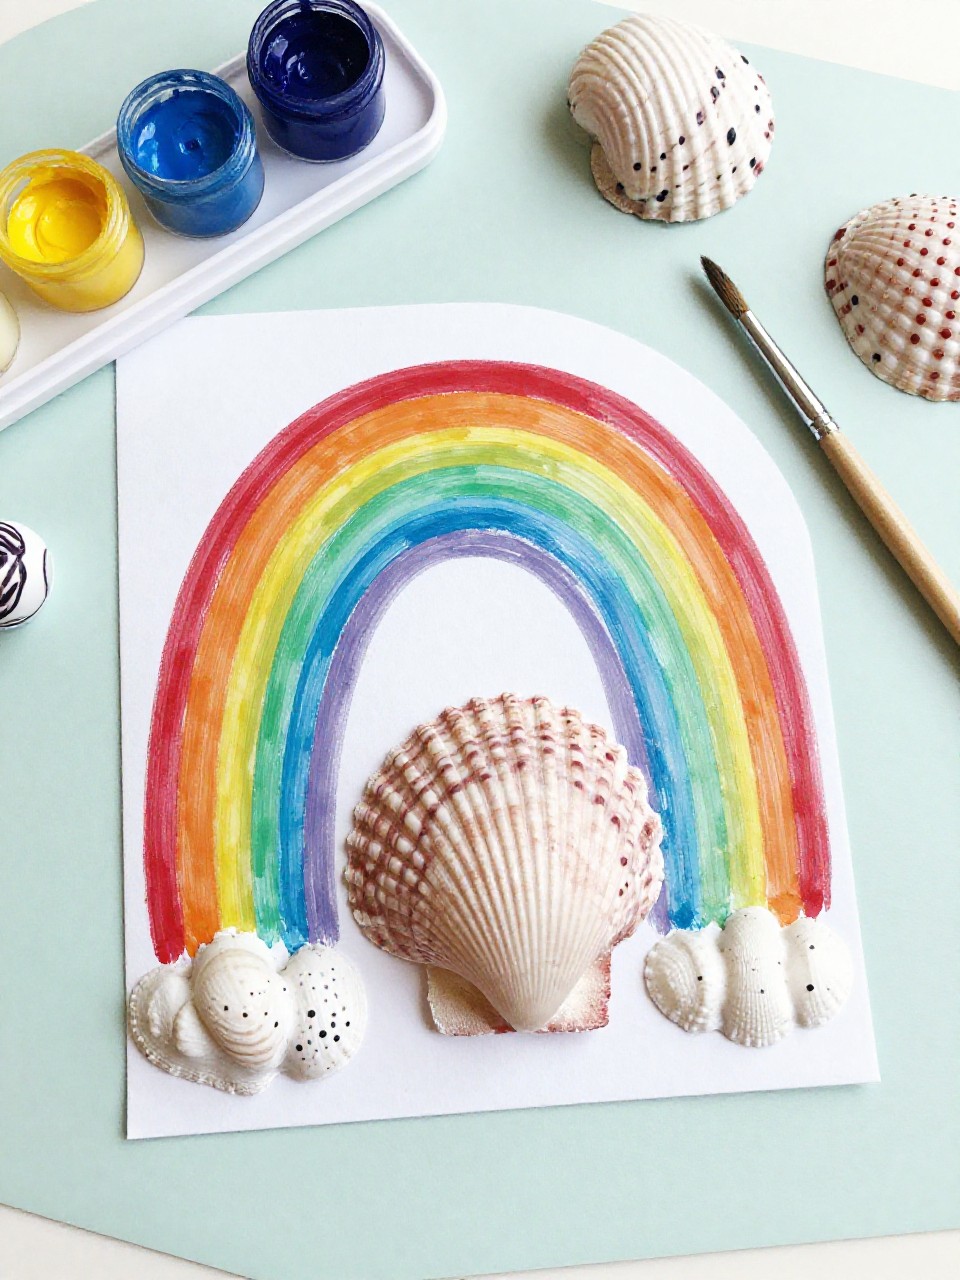
These shells pop with bright stripes and dots, turning plain beach finds into tiny art pieces. Kids love choosing colors and patterns, and the quick results feel satisfying for beginners.
Materials Needed:
- Clean seashells (assorted sizes)
- Acrylic paint or paint pens
- Small paintbrushes
- Cup of water and paper towel
- Clear sealer (mod podge or spray)
How to make it:
- Rinse and dry shells; lay them on scrap paper.
- Paint shells in bold stripes, dots, or swirls using bright colors.
- Add extra details like hearts, stars, or initials.
- Let dry and seal; display in a bowl or along a windowsill.
2. Shell Picture Frame
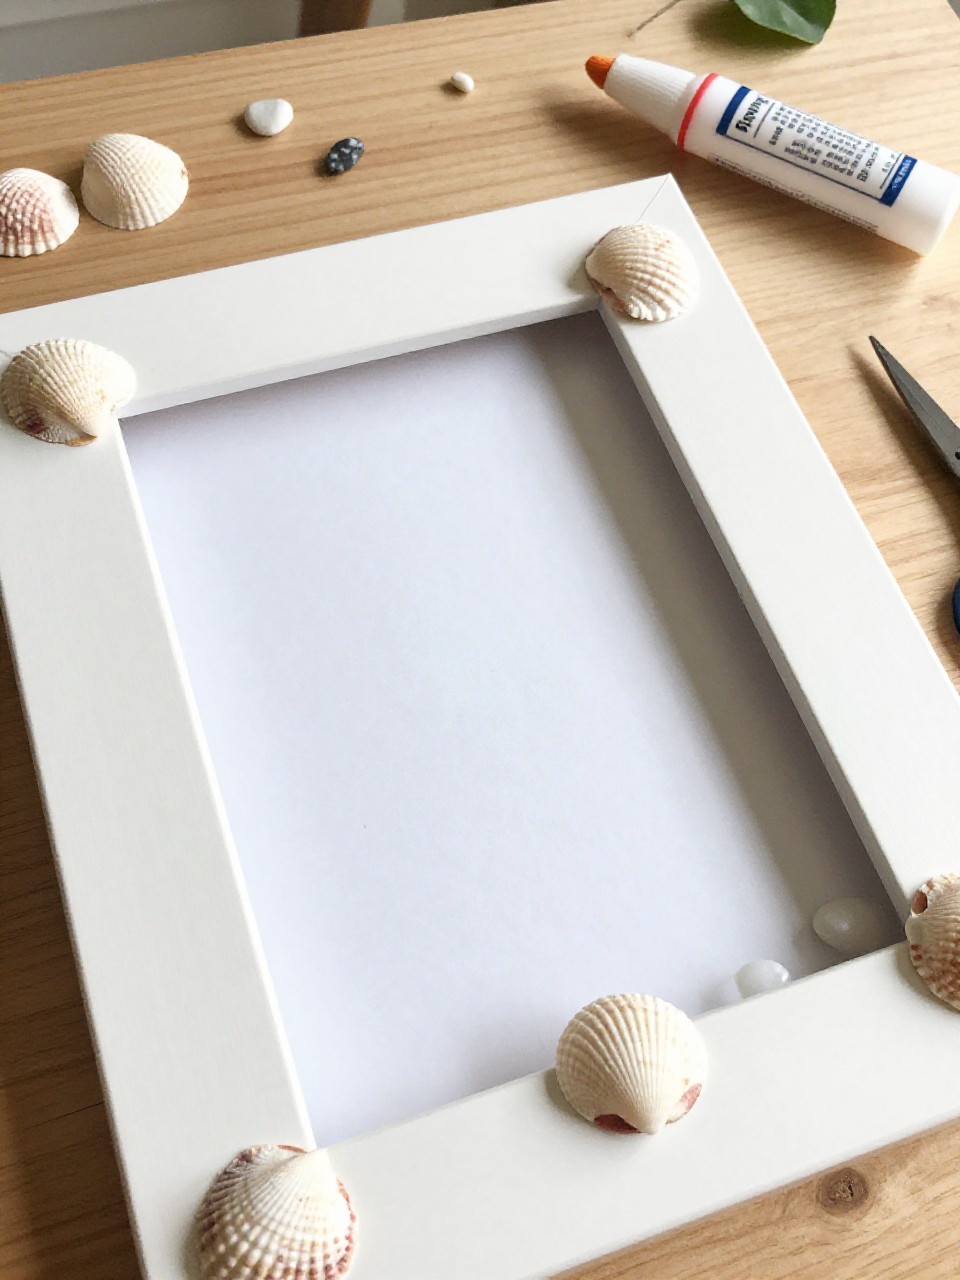
A plain photo frame turns beachy with a rim of pretty shells and tiny pebbles. Kids enjoy arranging patterns and seeing a favorite photo become a coastal memory.
Materials Needed:
- Inexpensive wooden frame (flat edge)
- Seashells and small pebbles
- Strong craft glue or hot glue (adult help)
- Sand (optional)
- Ribbon (optional hanger)
How to make it:
- Wipe the frame clean and remove the glass.
- Glue shells around the frame edge, mixing sizes and shapes.
- Fill small gaps with pebbles or a sprinkle of sand for texture.
- Let dry fully; add photo and tie ribbon if you want a hanger.
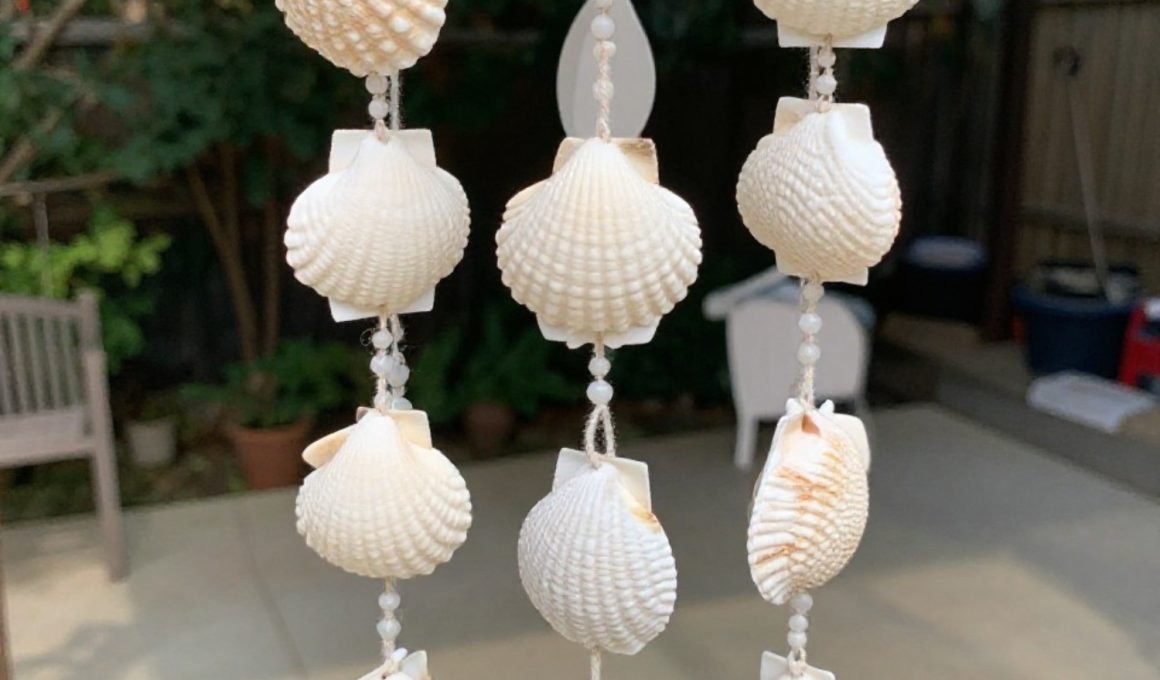
3. Beachy Shell Wind Chime
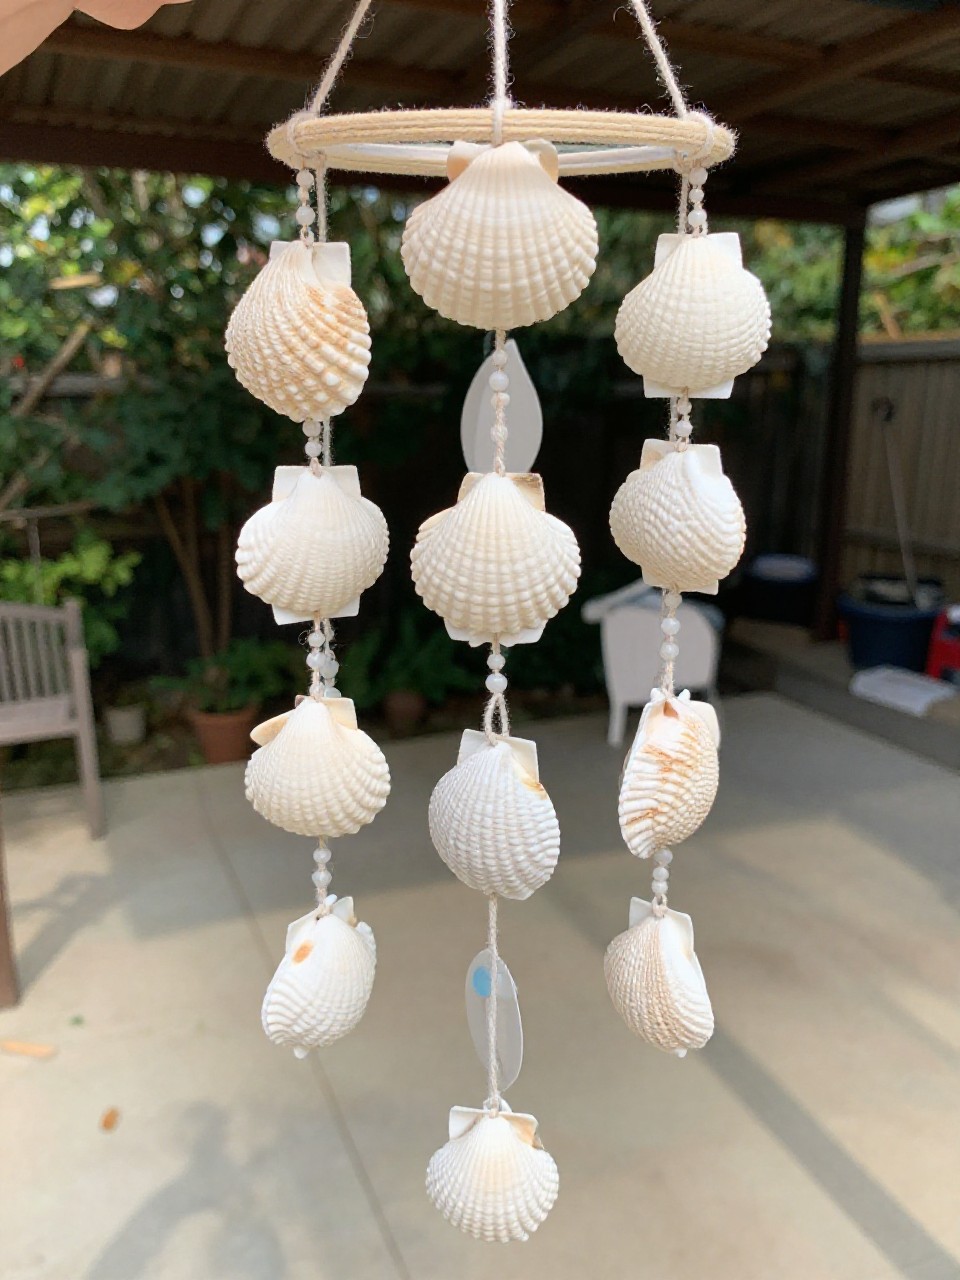
Dangling shells make a soft clink in the breeze from a simple driftwood hanger. Kids love choosing shell shapes and hearing their gentle sounds on the porch.
Materials Needed:
- Small driftwood stick or sturdy twig
- Seashells with small holes (or use a thumbtack to start holes)
- Twine or fishing line
- Beads (optional)
- Hot glue (optional for securing knots)
How to make it:
- Tie two long strings to each end of the driftwood for hanging.
- Cut several shorter strings; knot shells and beads along each strand.
- Tie strands to the driftwood, spacing them evenly.
- Add a dab of glue on knots; hang and enjoy the soft chime.
4. Mini Shell Terrarium Jar
A tiny glass jar becomes a beach-in-a-jar with sand, shells, and a small note. Kids enjoy building layers and creating a personal memory capsule.
Materials Needed:
- Small clear jar with lid
- Clean dry sand
- Mini seashells and sea glass
- Tiny paper for a rolled “message”
- Ribbon or sticker label (optional)
How to make it:
- Pour a layer of sand into the jar.
- Arrange shells and sea glass in small clusters.
- Roll a tiny note, tie with thread, and tuck it into the sand.
- Close the lid; add a ribbon or label with the beach date.
5. Shell Magnet Set
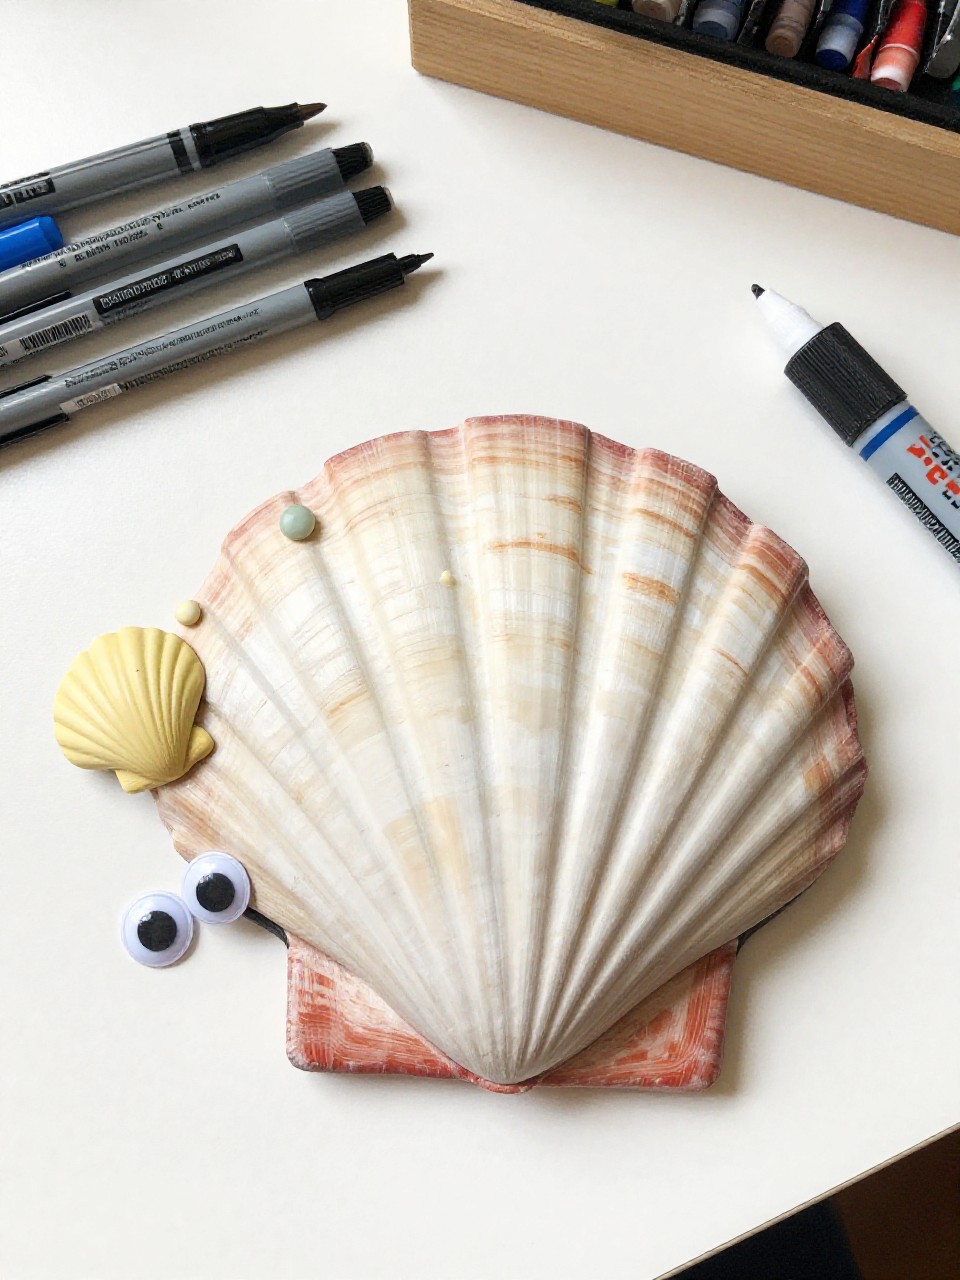
Flat shells turn into cheerful fridge magnets with paint and googly eyes. Kids love decorating tiny faces or patterns and then seeing them hold notes on the fridge.
Materials Needed:
- Flat seashells
- Small round magnets
- Strong craft glue
- Acrylic paint or paint pens
- Googly eyes (optional)
How to make it:
- Clean and dry shells; test how they sit flat.
- Paint shells with simple faces, fruit slices, or wave patterns.
- Glue a magnet to the back of each shell.
- Let cure fully; stick them on a fridge or locker.
6. Ocean Shell Shadow Box
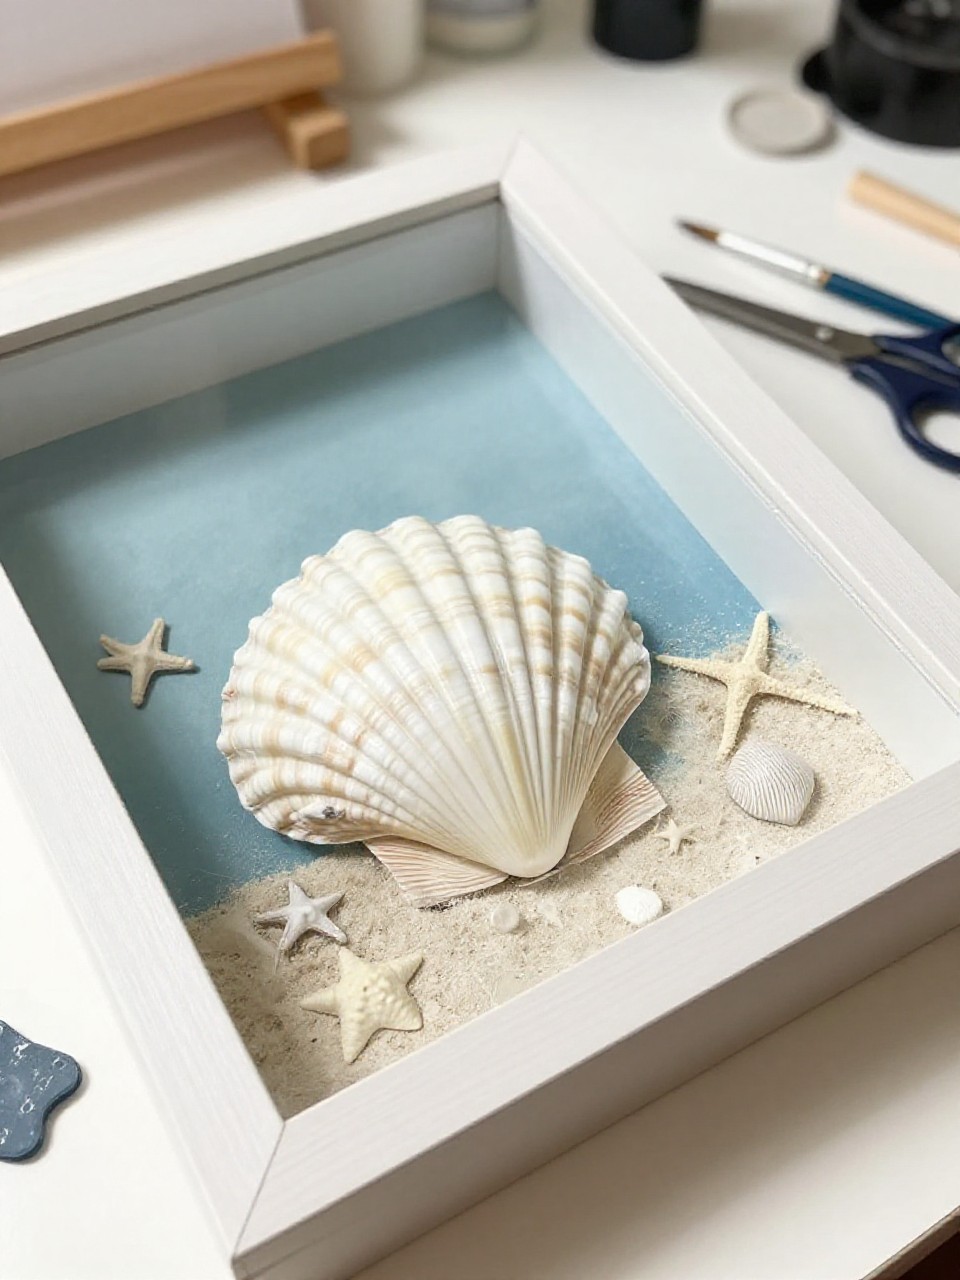
A shallow box becomes a tiny ocean scene with layered sand, shells, and a paper wave. Kids enjoy building a 3D picture that looks like a little beach window.
Materials Needed:
- Shadow box frame or small shallow box
- Sand and shells
- Blue cardstock for waves/sky
- Craft glue
- Mini starfish or sea glass (optional)
How to make it:
- Glue blue cardstock to the back of the box as the sky.
- Spread a glue line and press in a sand layer at the bottom.
- Arrange shells and sea glass; glue them in place.
- Close the box; display standing or hang on a wall.
7. Shell Sea Creature Rocks
Painted pebbles become fish, crabs, and turtles with glued-on shells for fins and shells. Kids love mixing rock painting with real shells to make chubby little sea friends.
Materials Needed:
- Smooth rocks
- Small seashells (clam, spiral, tiny pieces)
- Acrylic paint and markers
- Craft glue
- Googly eyes (optional)
How to make it:
- Paint rocks in bright colors and let dry.
- Glue shells as fins, crab claws, or turtle backs.
- Add eyes, smiles, and spots with markers or paint.
- Dry fully; line them up on a shelf or garden ledge.
8. Sandy Shell Name Plaque
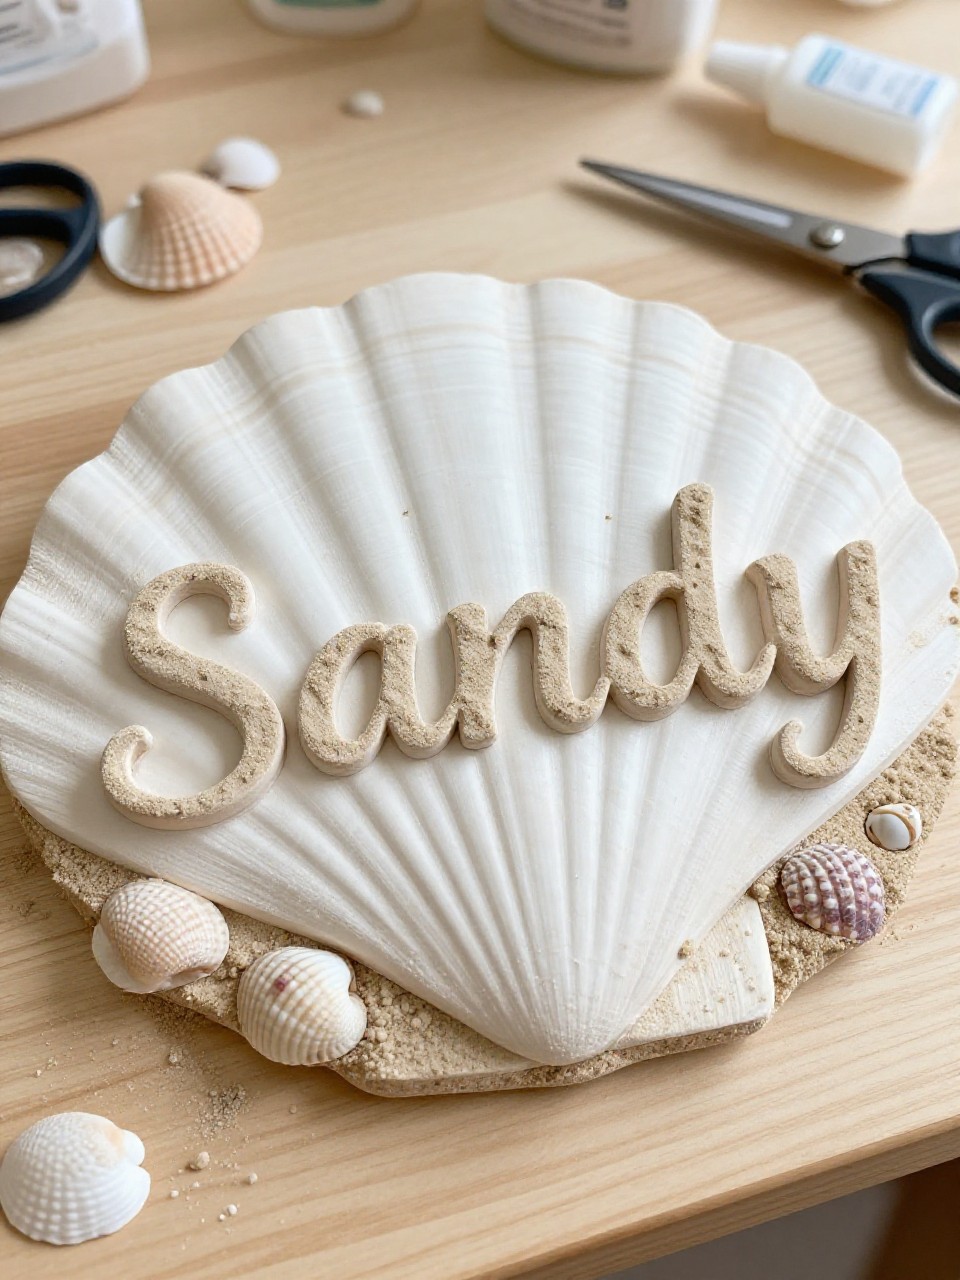
Spell a name with shells pressed into sandy glue on a wooden board. Kids enjoy seeing their name form and choosing special shells for each letter.
Materials Needed:
- Small wooden board or thick cardboard
- White glue or mod podge
- Clean dry sand
- Assorted seashells
- Ribbon or sawtooth hanger (optional)
How to make it:
- Brush glue over the board; sprinkle sand to cover and tap off extra.
- Sketch the name lightly with pencil once dry.
- Glue shells along the letter lines, fitting shapes like a puzzle.
- Let dry; add a hanger and display on a bedroom door.
9. Shell Candle Tea Light Holder
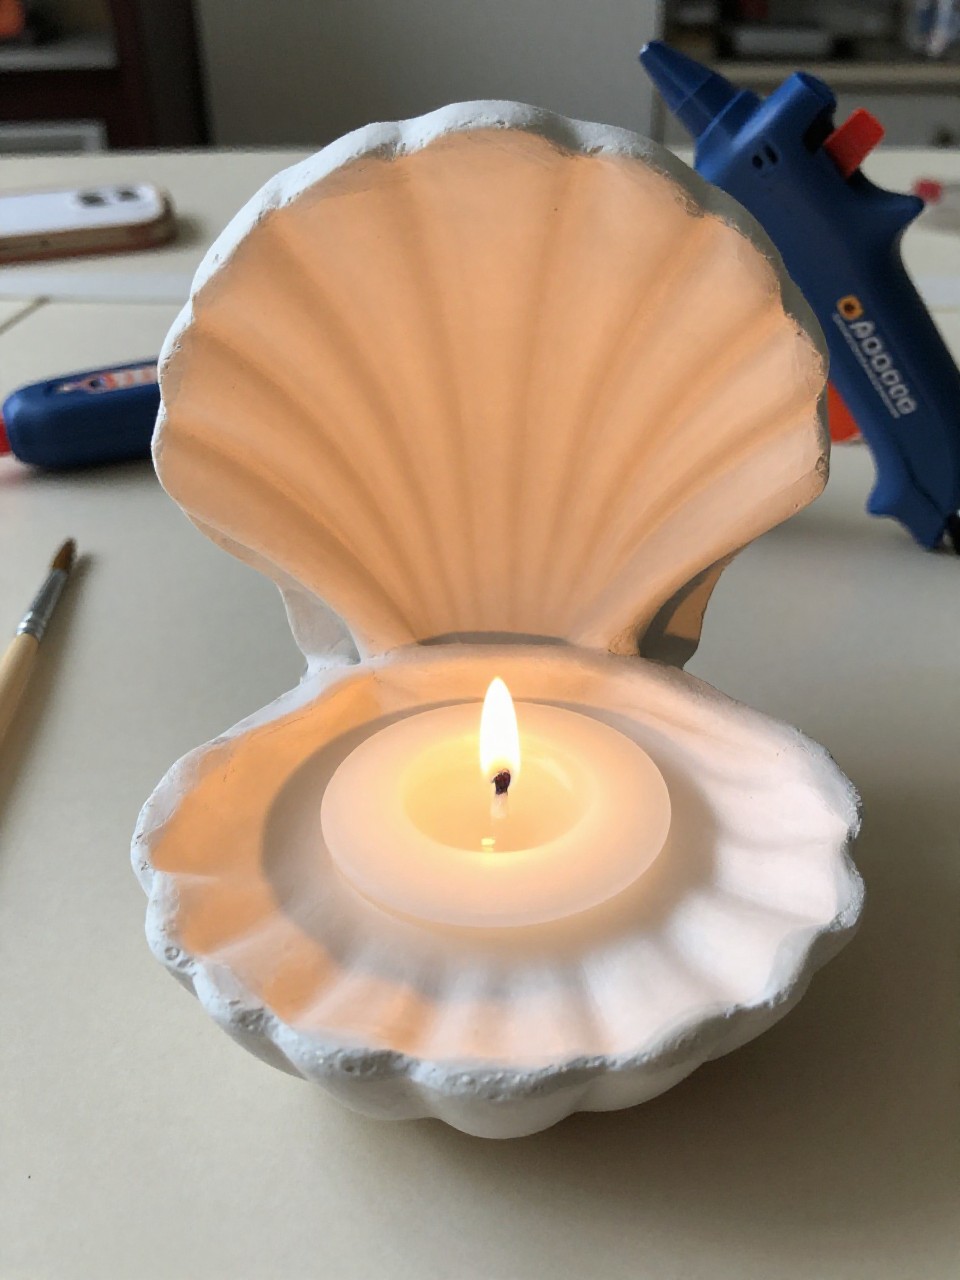
A cluster of shells forms a pretty nest for a tea light in a small dish. Kids enjoy arranging the shells like petals; adults can help with glue for safety.
Materials Needed:
- Small glass or ceramic dish
- Seashells (medium size)
- Strong craft glue or hot glue (adult help)
- Unscented tea light or LED tea light
- Optional pearl beads
How to make it:
- Place the dish on a flat surface.
- Glue shells around the rim, slightly overlapping like flower petals.
- Add pearl beads between gaps if you like.
- Let dry; set in a tea light and enjoy the glow.
10. Mermaid Tail Shell Bookmark
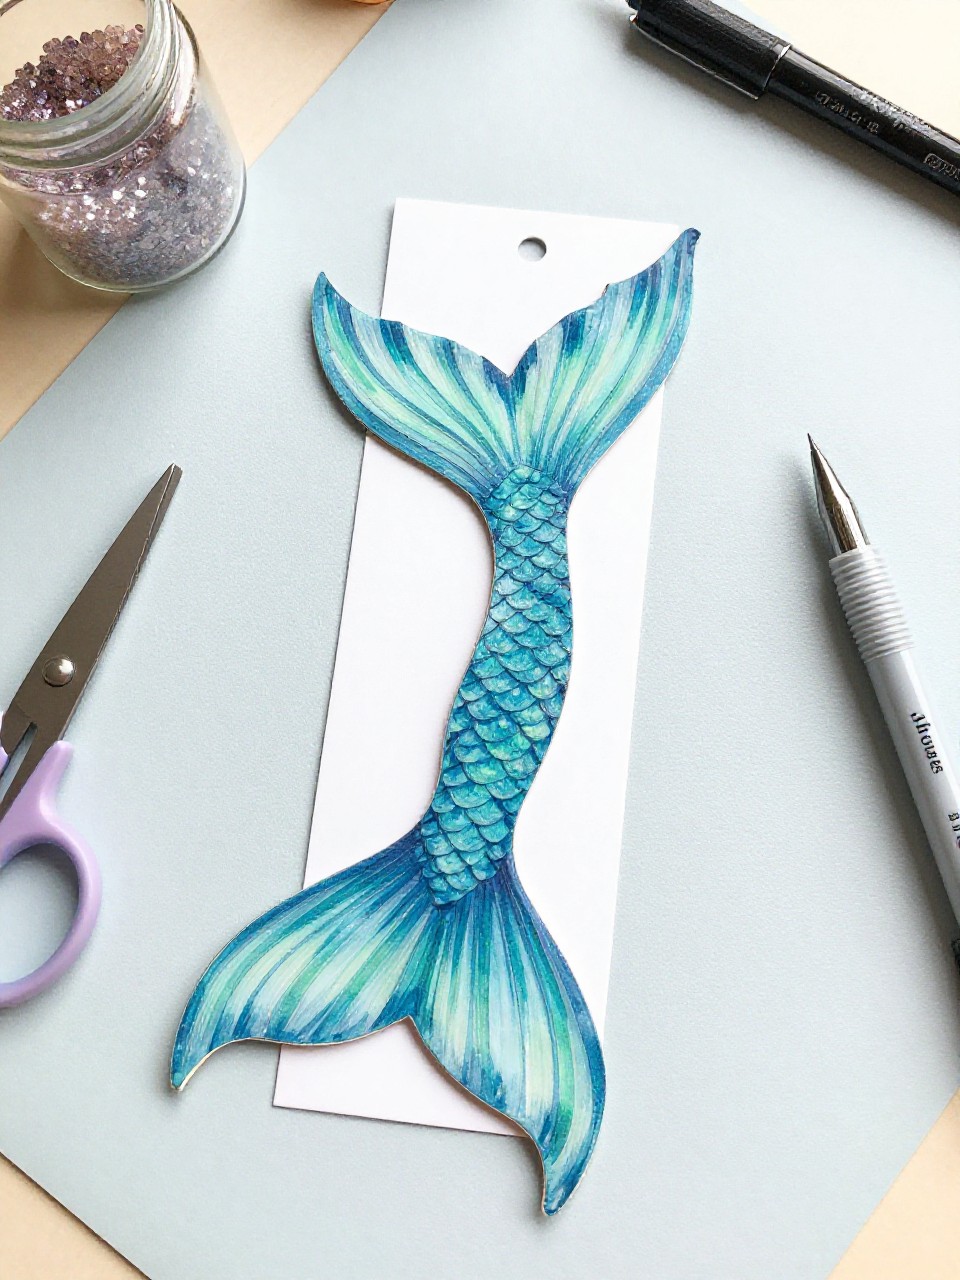
A ribbon bookmark gets a shimmery mermaid tail charm made from a single shell. Kids love the glittery, magical look and using it in their books.
Materials Needed:
- Flat shell shaped like a tail or fan
- Ribbon or thin cord
- Jump ring and small charm clip (optional)
- Acrylic paint in teal/purple and glitter
- Strong glue
How to make it:
- Paint the shell in mermaid colors; add a touch of glitter.
- Glue or attach a jump ring to the shell top.
- Tie the ring to a ribbon length sized for a book.
- Let dry; slip the ribbon into a favorite read.
11. Shell Mosaic Heart
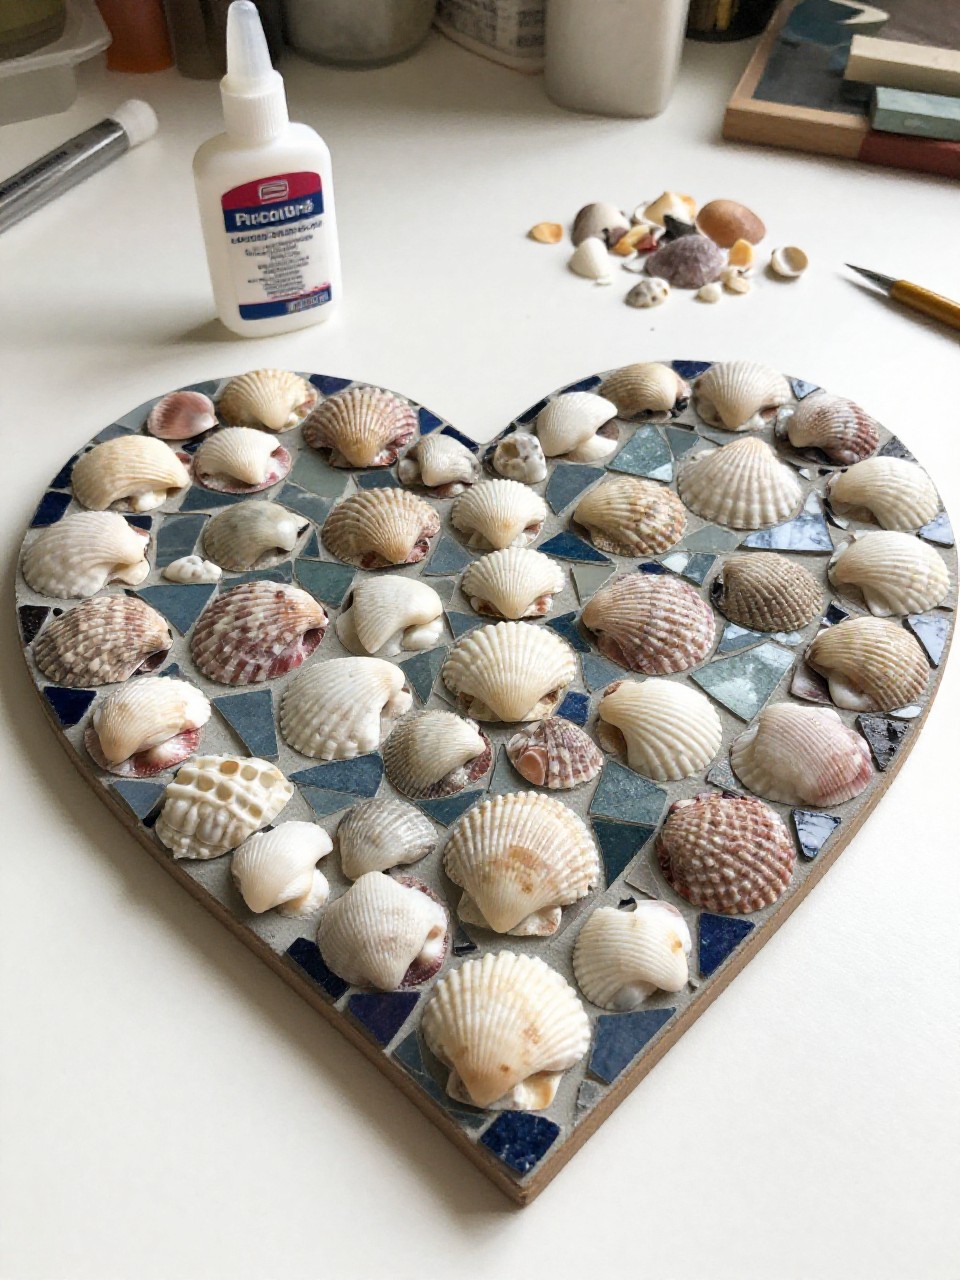
Small shells make a sweet heart mosaic on a sturdy cardboard base. Kids enjoy sorting sizes and building a shape that looks tidy and special.
Materials Needed:
- Cardboard heart cutout or wooden heart
- Small shells and crushed shell bits
- White glue
- Paint (optional background)
- Ribbon for hanging (optional)
How to make it:
- Paint the heart base if you want a colored background.
- Spread glue inside the heart; place shells edge to edge.
- Fill tiny gaps with crushed shell pieces.
- Dry flat; add ribbon and hang.
12. Sea Snail Pencil Toppers
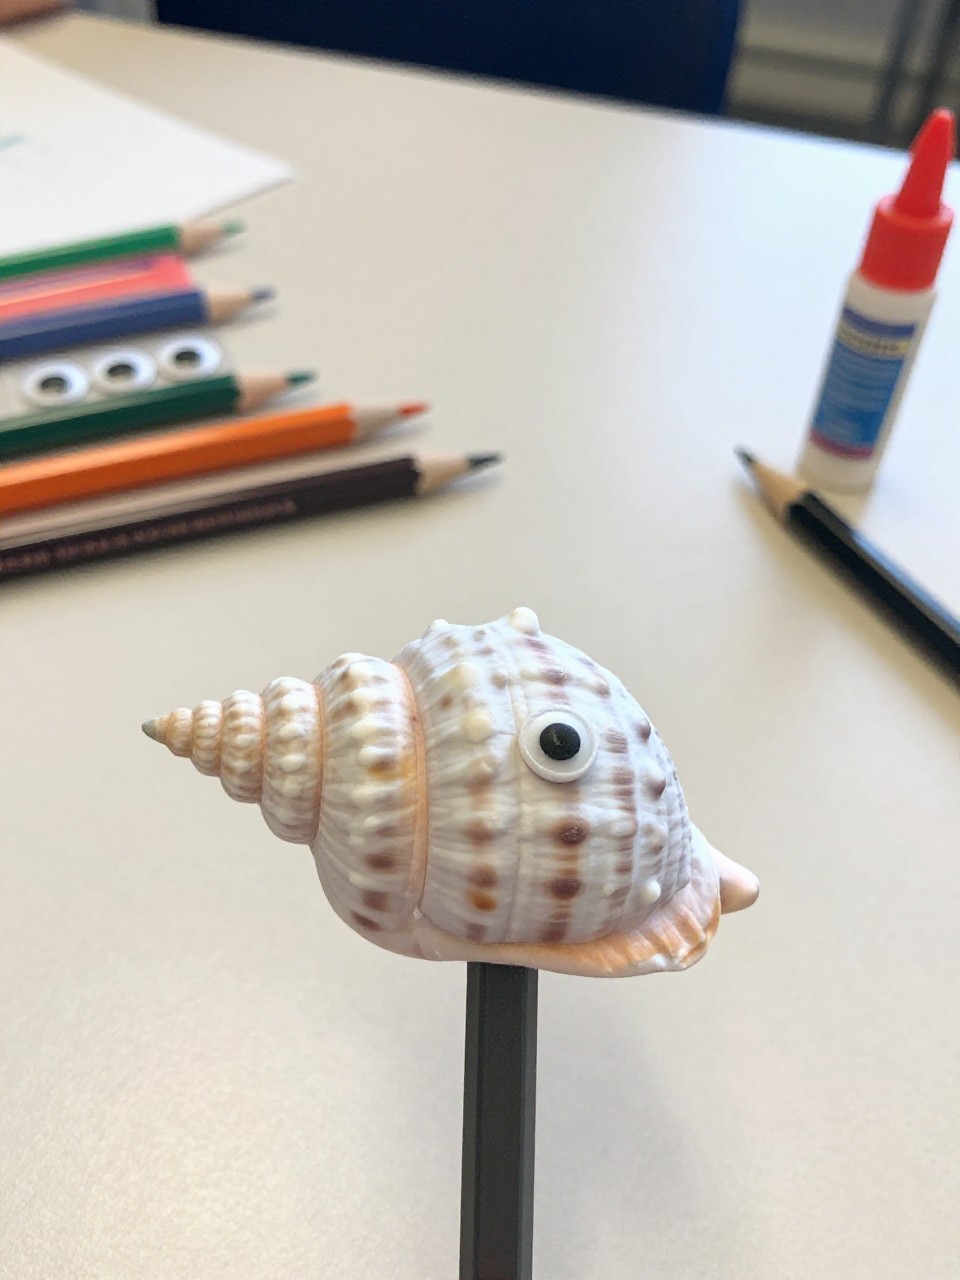
Spiral shells become funny snails that sit on pencil erasers with clay bodies. Kids love giving them silly eyes and turning school supplies into ocean pets.
Materials Needed:
- Spiral shells
- Air-dry clay or foam clay
- Googly eyes
- Craft glue
- Pencils
How to make it:
- Roll a small clay blob and press a pencil end gently to shape a sleeve.
- Attach the spiral shell as the snail’s shell; smooth clay around it.
- Add googly eyes and a smile with a toothpick.
- Let dry; slide onto a pencil for a cute topper.
13. Shell and Sea Glass Sun Catcher
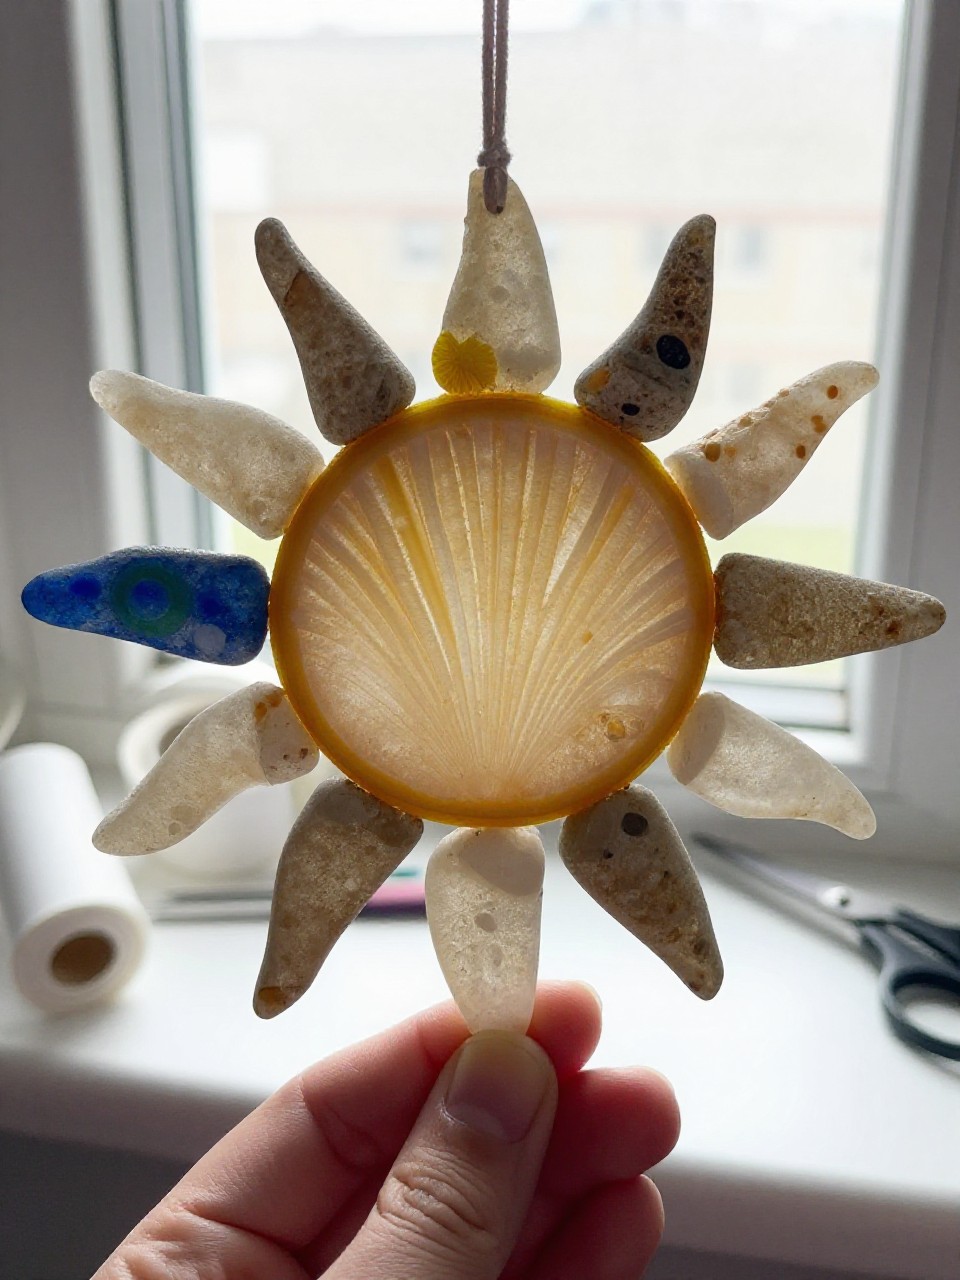
A clear plastic lid or hoop becomes a sunny window hanger with shells and sea glass. Kids love how the light shines through and makes ocean colors dance.
Materials Needed:
- Clear plastic lid or embroidery hoop with clear contact paper
- Sea glass and flat tiny shells
- Clear-drying glue (if using lid)
- Ribbon for hanging
- Glitter (optional)
How to make it:
- For a lid: arrange shells/glass inside and glue down. For a hoop: stick pieces onto sticky contact paper.
- Fill spaces with bits of sea glass and a light sprinkle of glitter.
- Seal the back with more contact paper if using a hoop.
- Tie ribbon and hang in a sunny window.
14. Shell Hoop Earrings (Kid-Assist)
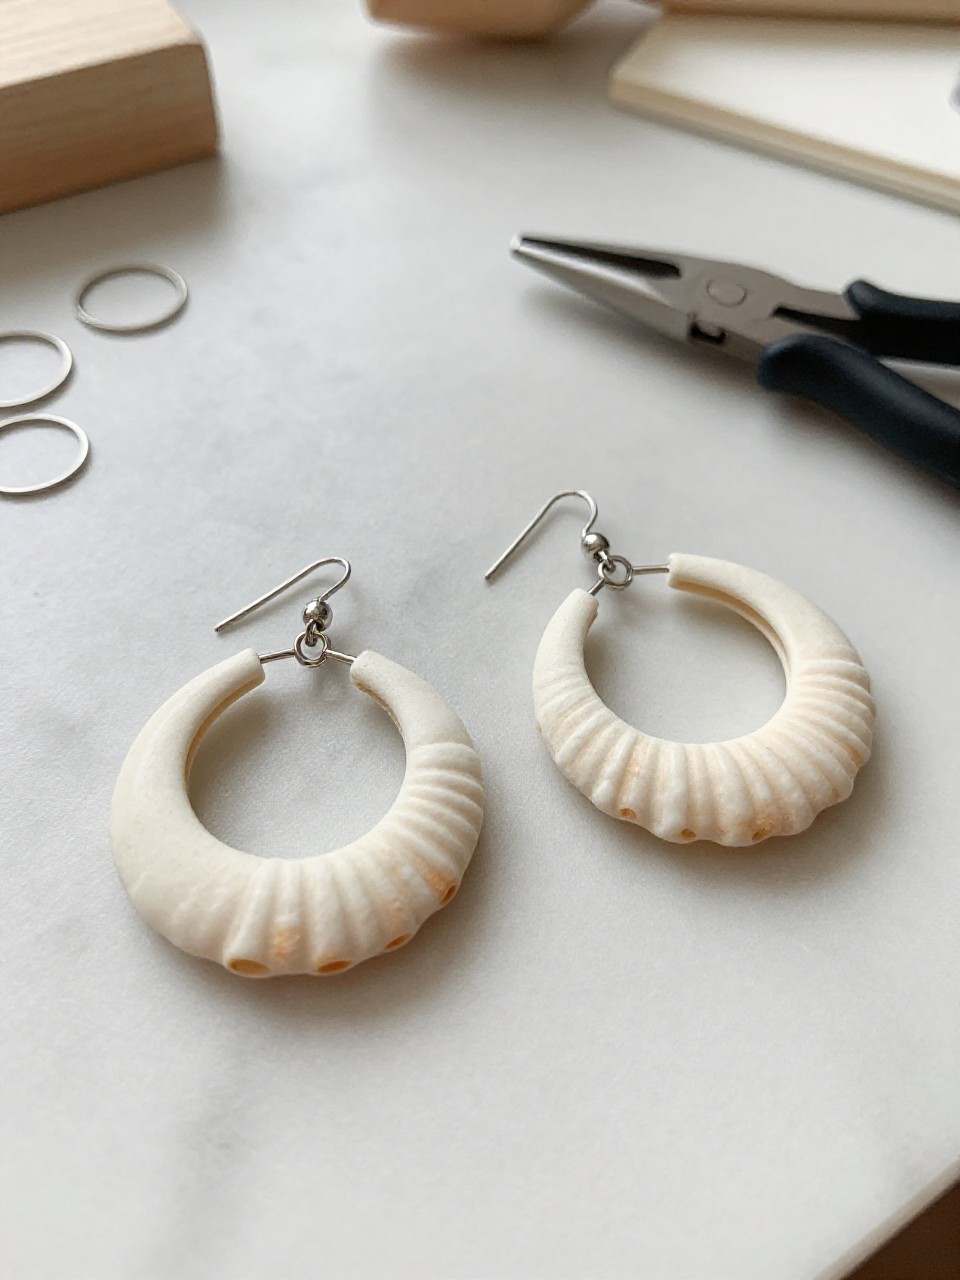
Lightweight tiny shells become simple hoops that feel beachy and cute. Older kids enjoy choosing matching shells and seeing a “real” accessory come together.
Materials Needed:
- Small lightweight shells
- Earring hoops or wire hoops
- Tiny jump rings
- Small pliers
- Acrylic sealer (optional)
How to make it:
- If needed, add a tiny jump ring to each shell.
- Slide shells onto the hoop and space them evenly.
- Close hoop with pliers; seal shells lightly if desired.
- Wear with care or gift in a small box.
15. Beach Memory Jar Lamp Shade Trim
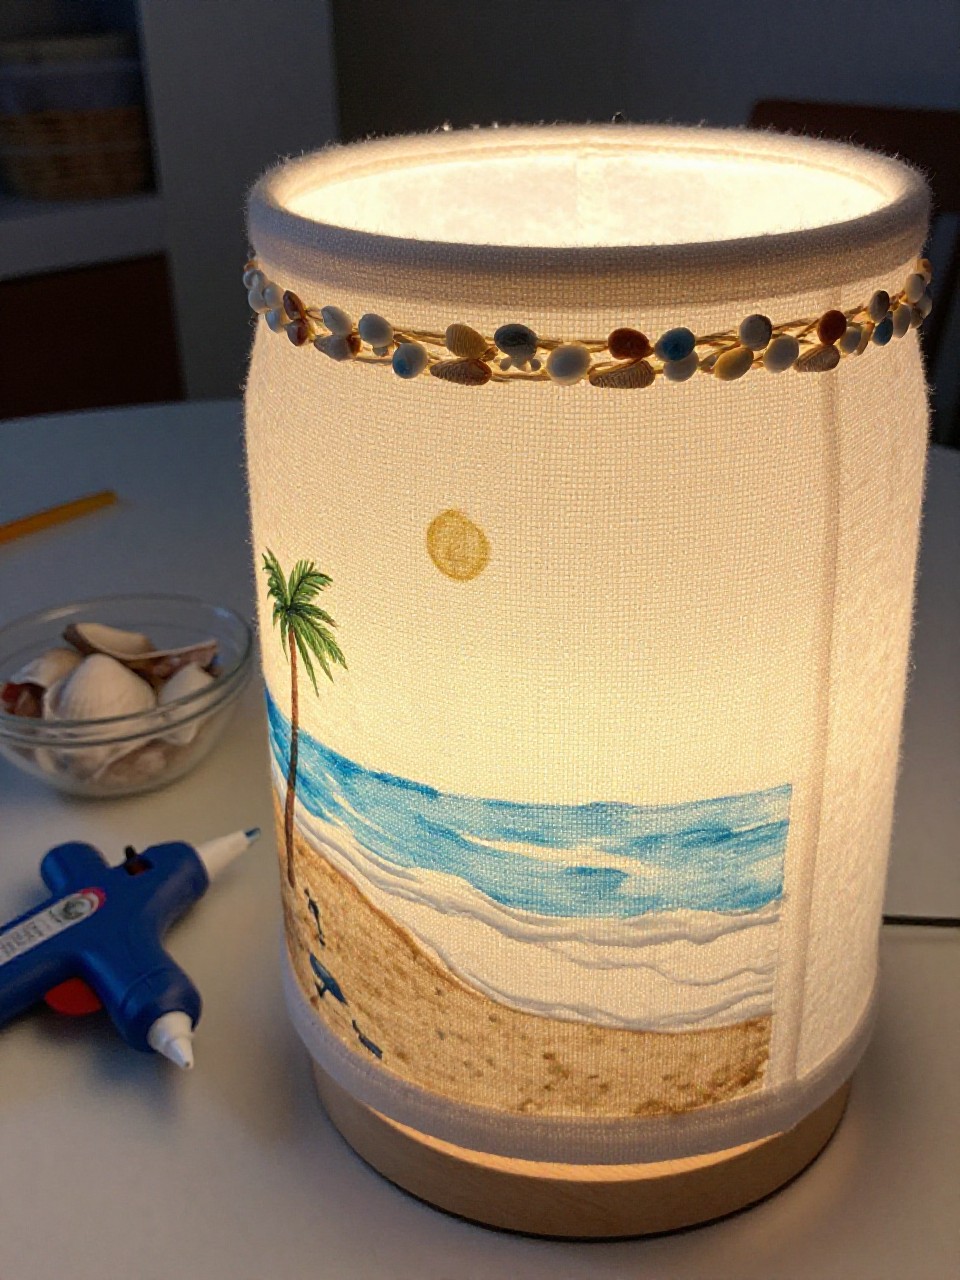
A plain lamp shade gets a beach trim with ribbon and small shells glued in a neat ring. Kids enjoy the quick makeover and the cozy beach glow at night.
Materials Needed:
- Plain fabric lamp shade
- Ribbon or jute twine
- Small shells
- Hot glue or strong craft glue
- Mini pearl beads (optional)
How to make it:
- Measure and glue ribbon or twine around the bottom edge of the shade.
- Evenly space small shells and glue them along the trim.
- Add tiny pearl beads between shells for sparkle.
- Let cure; place on the lamp and switch on the warm seaside look.