

In This Article Show
Spring makes many of us want a fresh start at home—but buying all new decor can get pricey fast. Good news: you can make beautiful pieces that feel boutique without stressing over tricky steps.
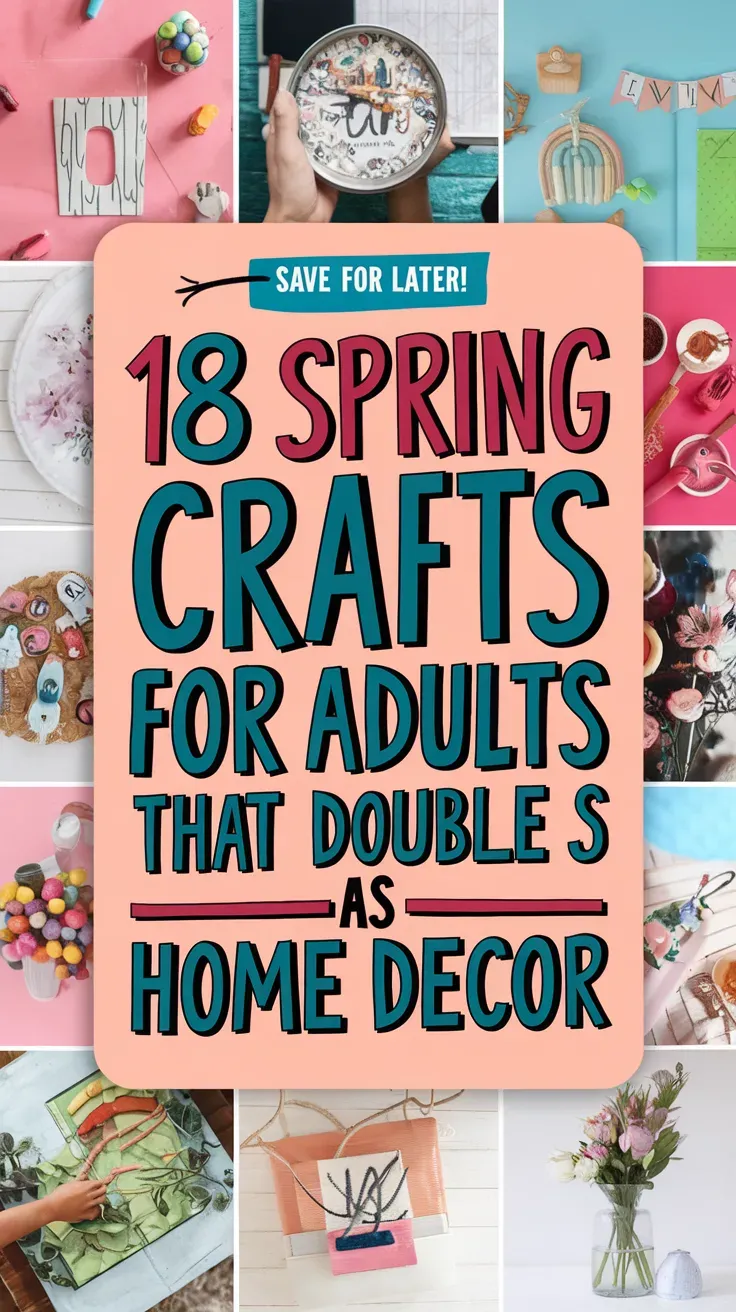
These projects look polished, but they’re beginner-friendly and low-mess.
Grab a calm afternoon, put on a playlist, and let’s turn simple materials into decor you’ll actually want to keep out all season long.
1. Pressed Wildflower Floating Frame
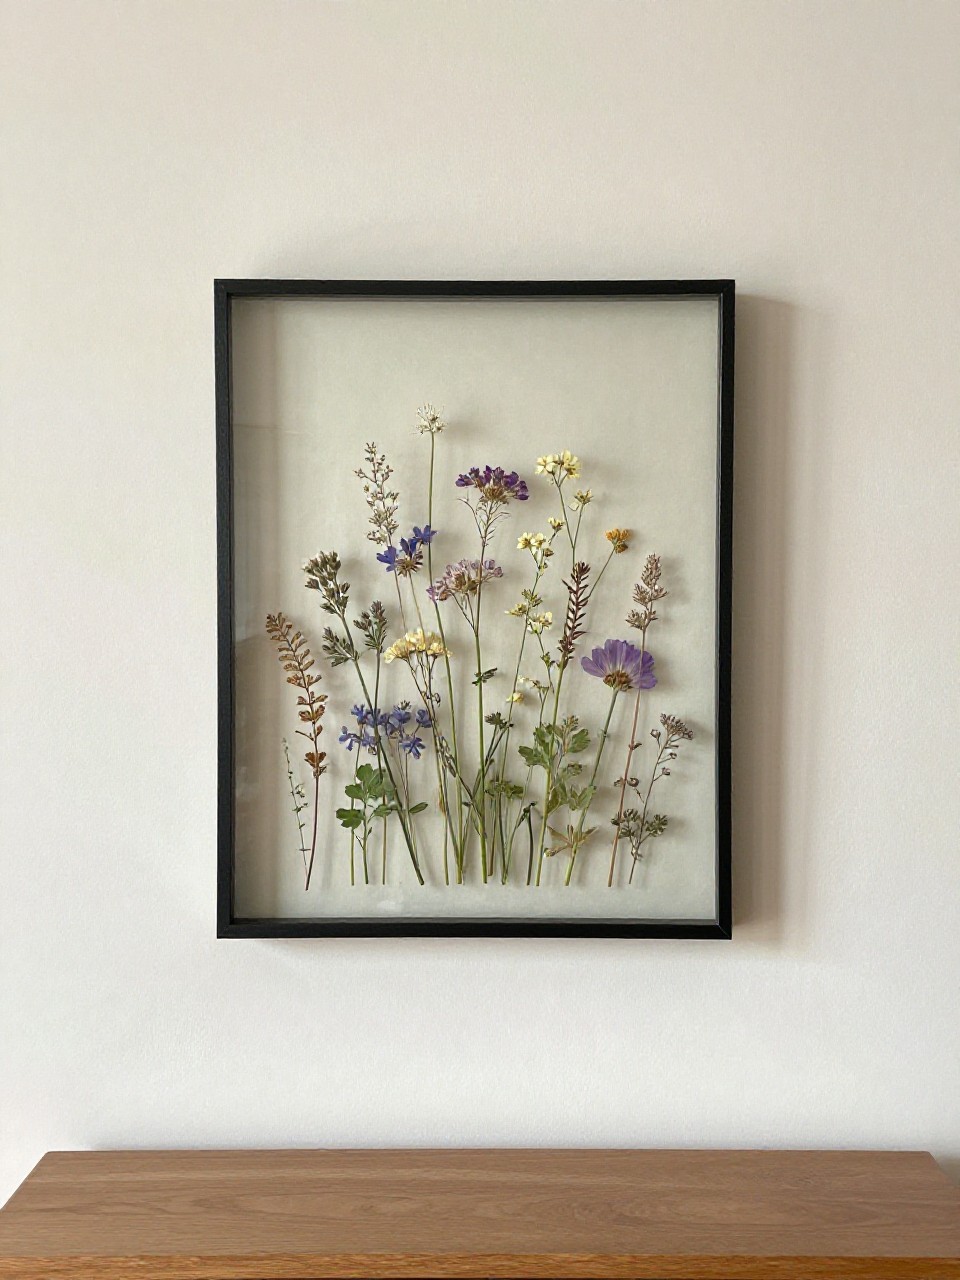
A delicate, airy frame that lets spring blooms look like they’re suspended in glass. It’s light, botanical, and feels like a keepsake without the fuss.
Materials Needed:
- Two glass frames or floating frame
- Pressed flowers/leaves
- Double-sided tape or clear-drying glue
How to make it:
- Arrange pressed flowers on the inner glass until the layout feels balanced.
- Use tiny dots of clear glue or tape to secure petals.
- Place the second pane and close the frame tightly.
- Hang near a window so light shines through.
2. Textured Limewash Canvas Art
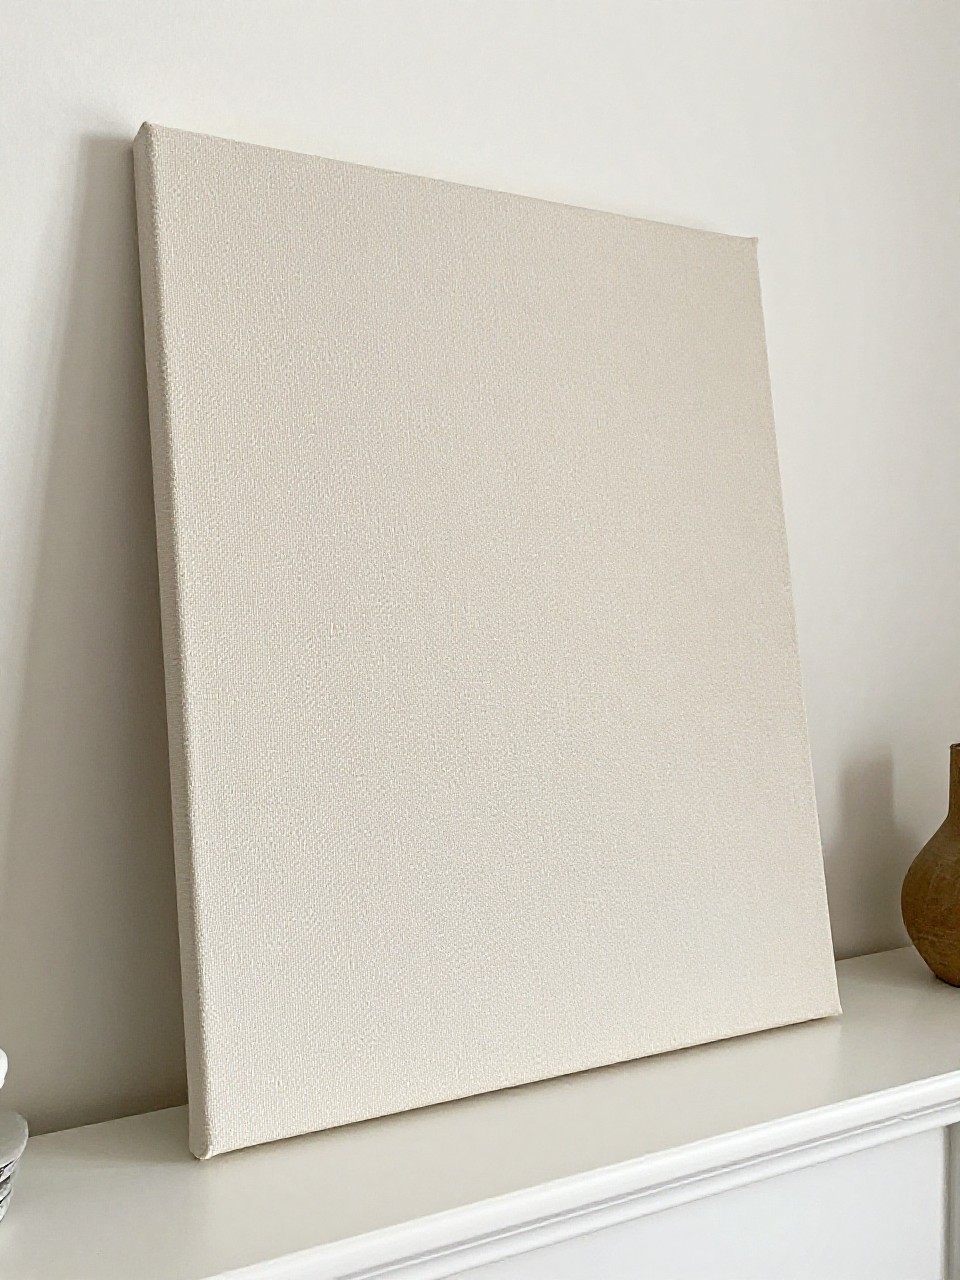
Create a soothing, high-end art piece with soft texture and cloud-like color shifts. It gives a modern, serene vibe without pricey paint.
Materials Needed:
- Pre-stretched canvas
- Joint compound or lightweight spackle
- Acrylic craft paint
How to make it:
- Spread a thin, uneven coat of joint compound over canvas using a putty knife.
- Let dry, then lightly sand peaks for a smooth-yet-textured surface.
- Mix white paint with a touch of beige/gray and dab in soft layers.
- Blend edges with a dry brush for a limewash look.
3. Terracotta Baking Soda Vases
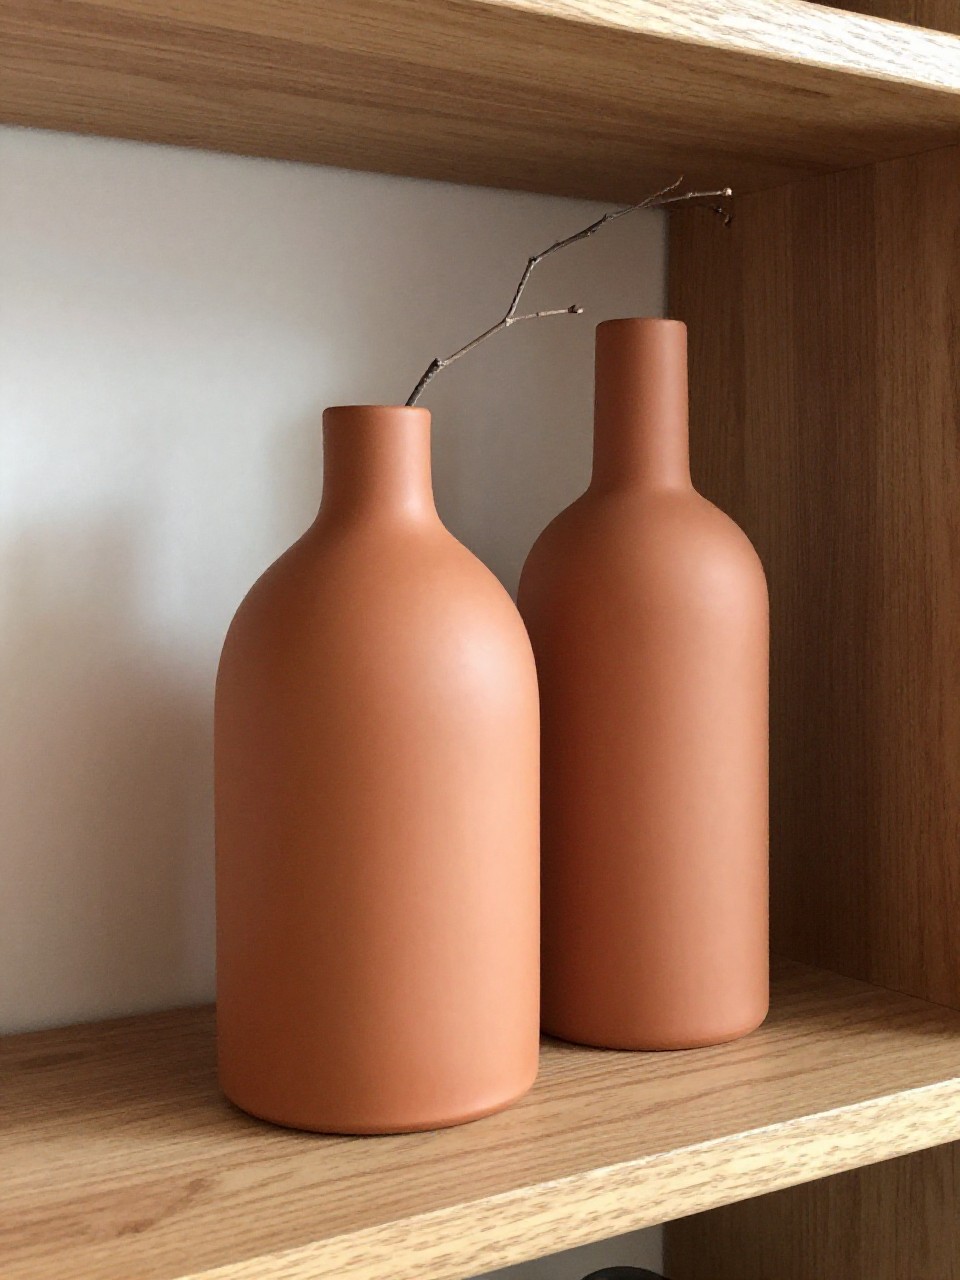
Turn plain glass jars into chalky, rustic “ceramic” vases that look store-bought. The finish is matte, earthy, and so satisfying.
Materials Needed:
- Clean glass bottles or jars
- Acrylic paint + baking soda
- Paintbrush
How to make it:
- Mix 1–2 tablespoons of baking soda into acrylic paint to thicken.
- Brush onto bottles in long strokes; let dry and add a second coat.
- Speckle with a tiny bit of watered-down, darker paint for texture.
- Cure overnight before styling with stems.
4. Botanical Cyanotype-Style Prints (Without Sun Chemicals)
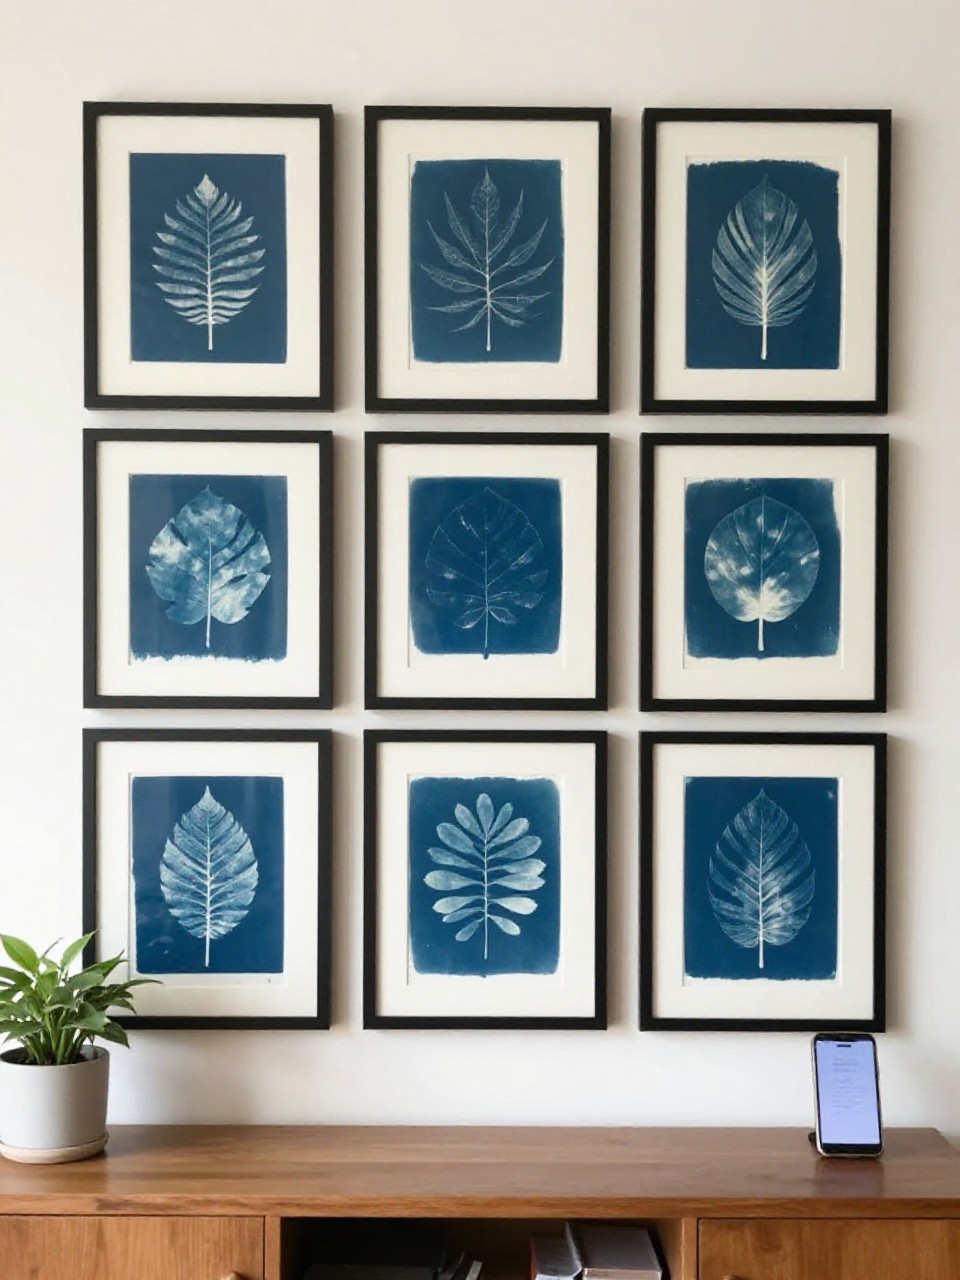
Mimic cyanotypes using deep blue paper and white ink for crisp, graphic botanicals. It looks like gallery art, but it’s simple tracing and stenciling.
Materials Needed:
- Navy or deep blue cardstock
- White paint pen or white ink + small brush
- Real leaves or leaf stencils
How to make it:
- Place leaves on blue paper and lightly trace around edges.
- Fill outlines with white ink, adding vein details.
- Create clusters for a balanced composition.
- Frame in a thin black or wood frame.
5. Minimal Clay Arch Candle Holders
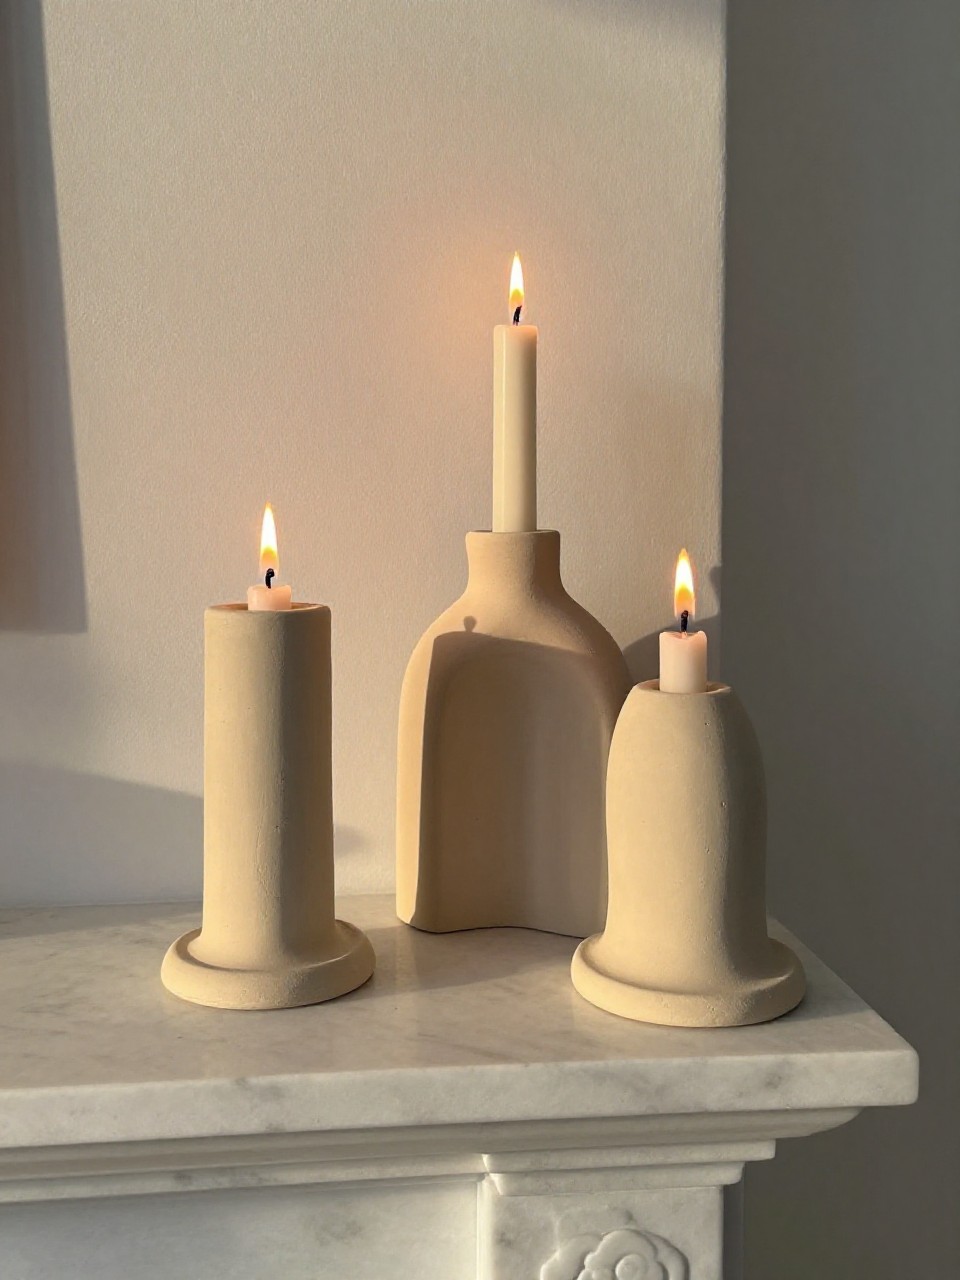
Soft arches feel sculptural and modern, perfect for mantel or table. The smooth clay finish looks designer, but bakes in a home oven.
Materials Needed:
- Oven-bake polymer clay
- Craft knife
- Tea light cups or taper candle adapters
How to make it:
- Roll clay into thick ropes and form arch shapes.
- Flatten the bottom slightly so it stands; press candle cup into top if needed.
- Bake per package directions and let cool.
- Sand lightly and display with candles.
6. Painted Burlap Spring Banner

A casual, farmhouse-style banner with hand-painted motifs like tulips or daisies. It brings gentle color to mantels, shelves, or doorways.
Materials Needed:
- Burlap ribbon or fabric
- Acrylic paint
- Twine
How to make it:
- Cut burlap into triangles and paint simple floral icons.
- Let dry, then fold top edge over the twine and hot glue.
- Space flags evenly along the twine.
- Hang and fluff for softness.
7. Faux Stained Glass Mason Jar Lanterns
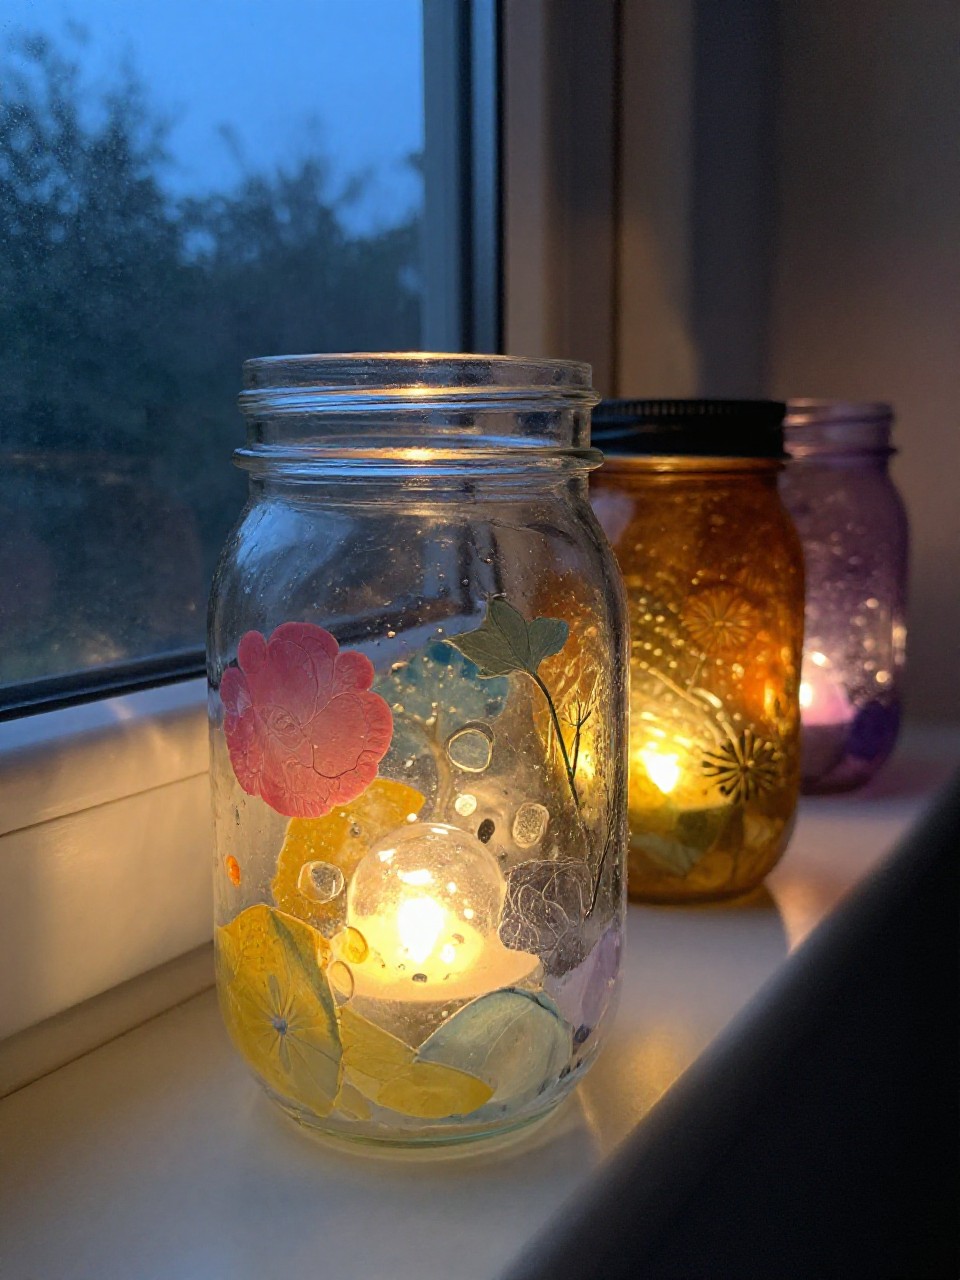
Vibrant, jewel-toned lanterns that glow at night. They add instant charm to patios and windowsills.
Materials Needed:
- Mason jars
- Glass paint or food coloring + Mod Podge
- Tea lights or LED string lights
How to make it:
- Mix Mod Podge with a few drops of food coloring (or use glass paint).
- Brush inside or outside of jars in color blocks or mosaic shapes.
- Let dry clear and add an extra coat if needed.
- Place tea lights or string lights inside.
8. Herb-Stamped Linen Tea Towels
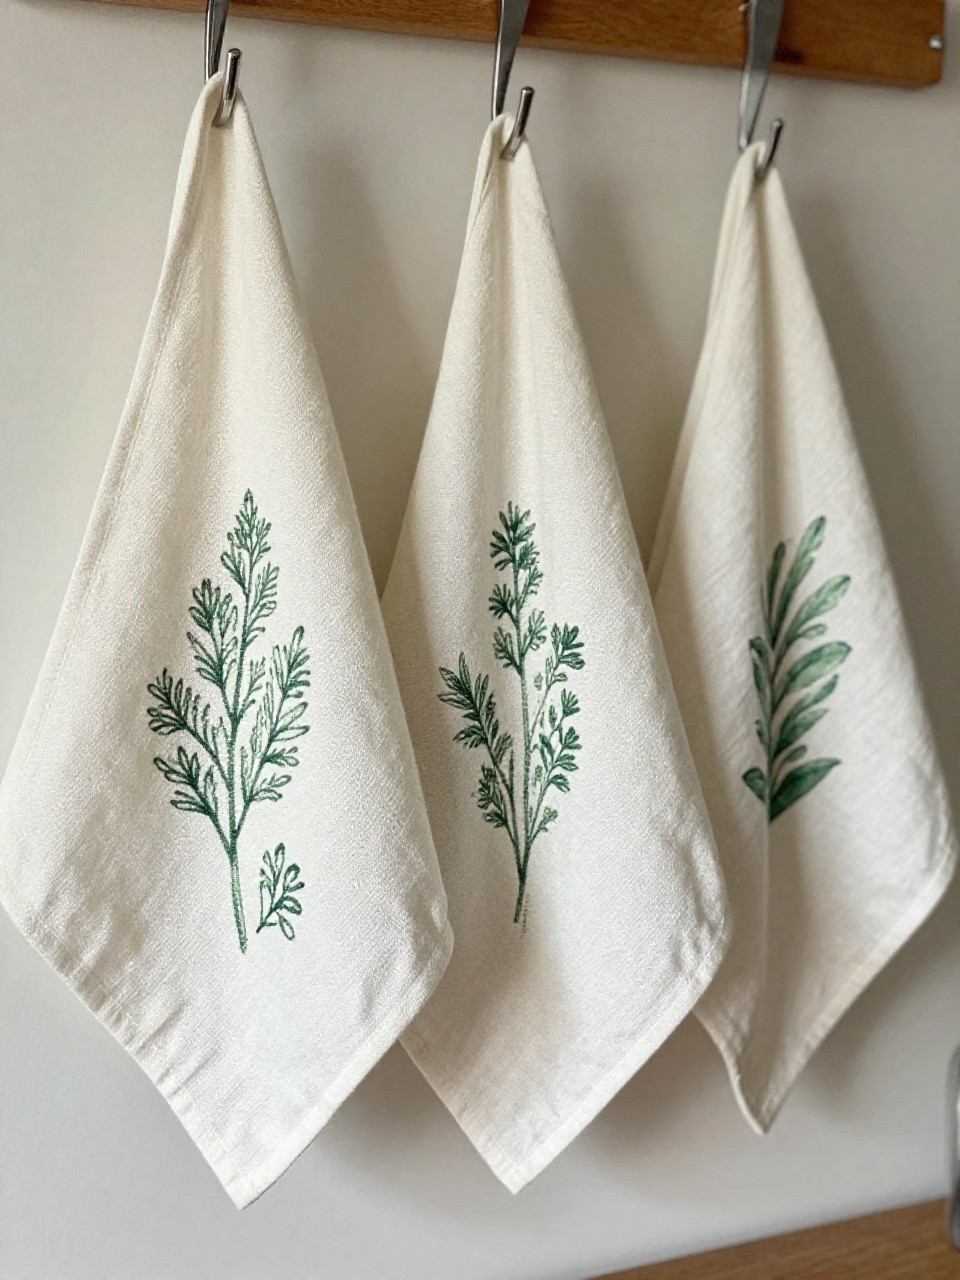
Simple, chic towels with leaf prints that look hand-drawn. Perfect for a kitchen refresh and lovely as gifts.
Materials Needed:
- Plain linen or cotton towels
- Fresh herbs (rosemary, sage, parsley)
- Fabric paint
How to make it:
- Brush fabric paint onto the textured side of a herb leaf.
- Press leaf onto towel firmly; lift straight up.
- Repeat in a scattered or border pattern.
- Heat set paint per instructions.
9. Gradient Dip-Dyed Pillow Covers
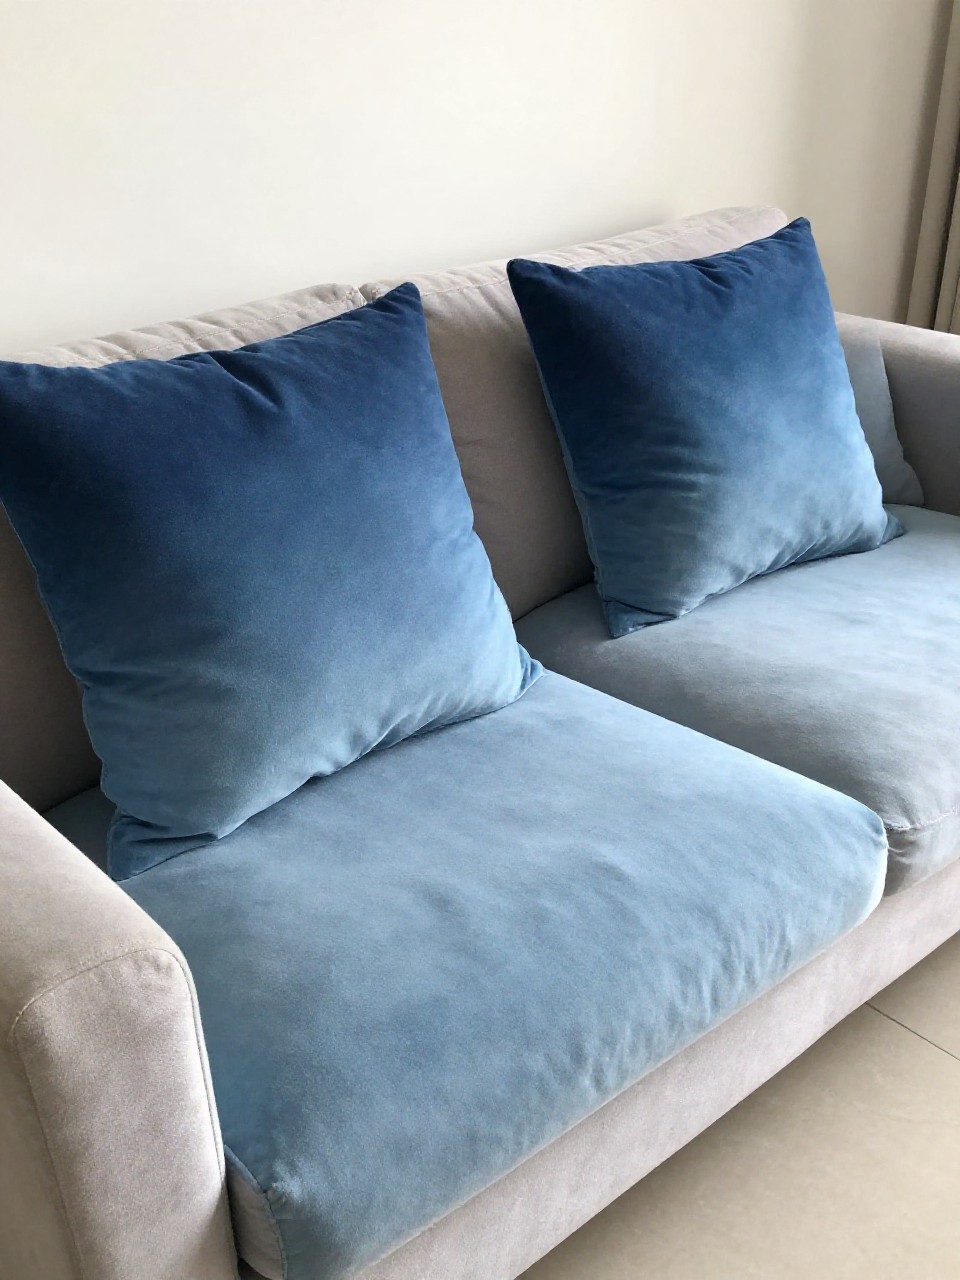
Soft ombré cushions that look boutique and breezy. They add instant calm to sofas or beds.
Materials Needed:
- White cotton pillow covers
- Fabric dye
- Bucket or large bowl
How to make it:
- Mix dye in warm water per instructions.
- Dip the bottom third of the cover, hold, then lift slowly for a gradient.
- Rinse gently and let dry flat.
- Insert pillow and fluff.
10. Pressed Flower Coasters with Resin-Look Finish
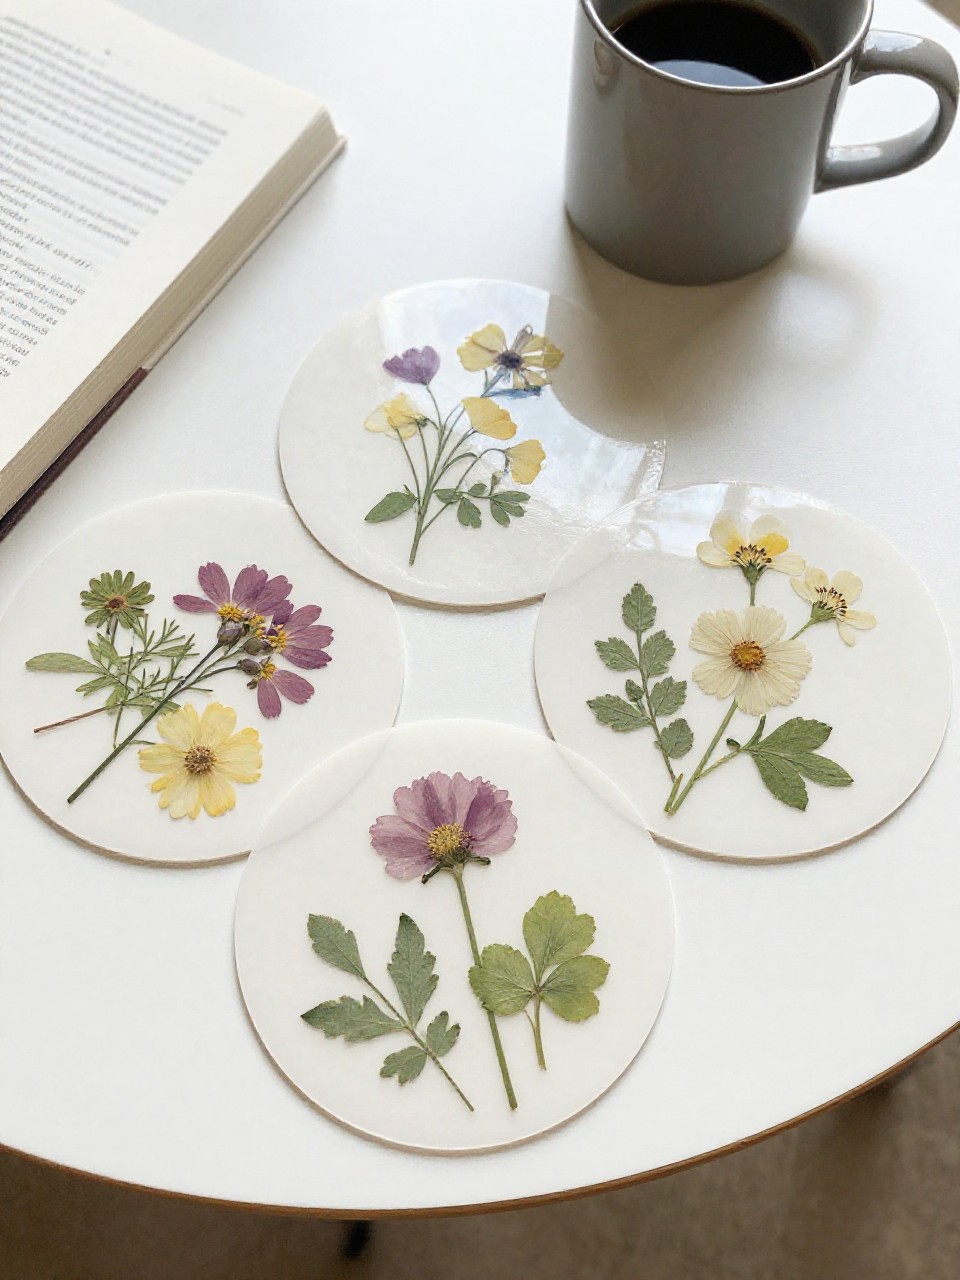
Clear, glossy coasters with tiny blooms inside—like little gardens on your table. Use an easy resin-alternative for low mess.
Materials Needed:
- Clear acrylic coaster blanks or tiles
- Pressed flowers
- UV resin or clear-drying epoxy alternative
How to make it:
- Arrange pressed flowers on the coaster blank.
- Pour a thin layer of resin/alternative to cover.
- Pop bubbles with a toothpick and cure per instructions.
- Add felt pads underneath.
11. Painted Cane-Weave Planter Wraps
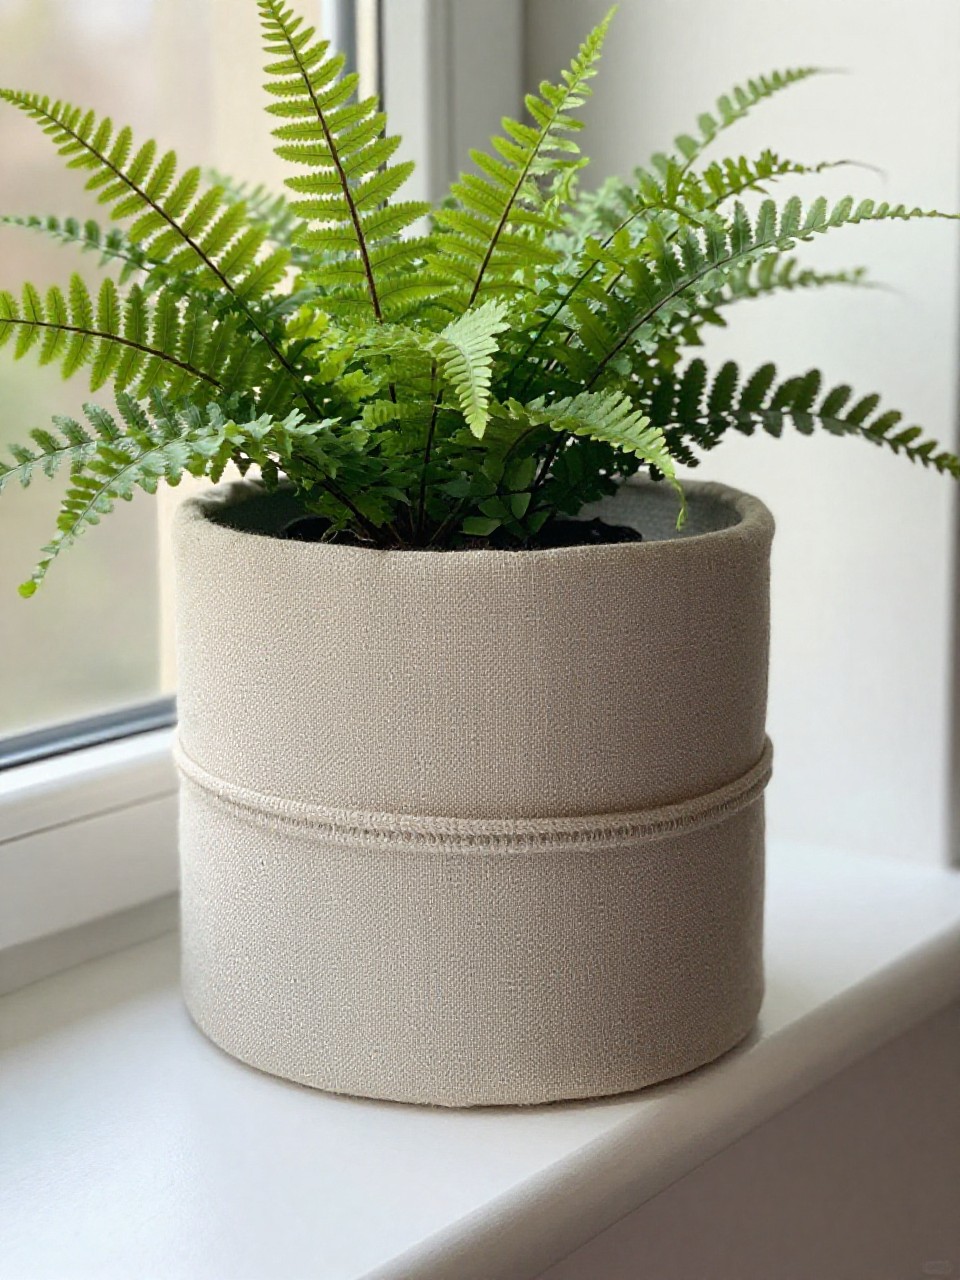
Give plain pots a fresh, airy look with faux-cane patterning on cardstock wraps. It’s lightweight, neutral, and so chic.
Materials Needed:
- Kraft cardstock
- Acrylic paint pens (cream, tan, white)
- Double-sided tape
How to make it:
- Measure the pot circumference and cut a cardstock strip to fit.
- Draw a simple cane pattern: small squares with diagonal dots.
- Wrap around the pot and secure with tape at the back.
- Slip onto the pot and adjust the pattern alignment.
12. Watercolor Tile Trivets
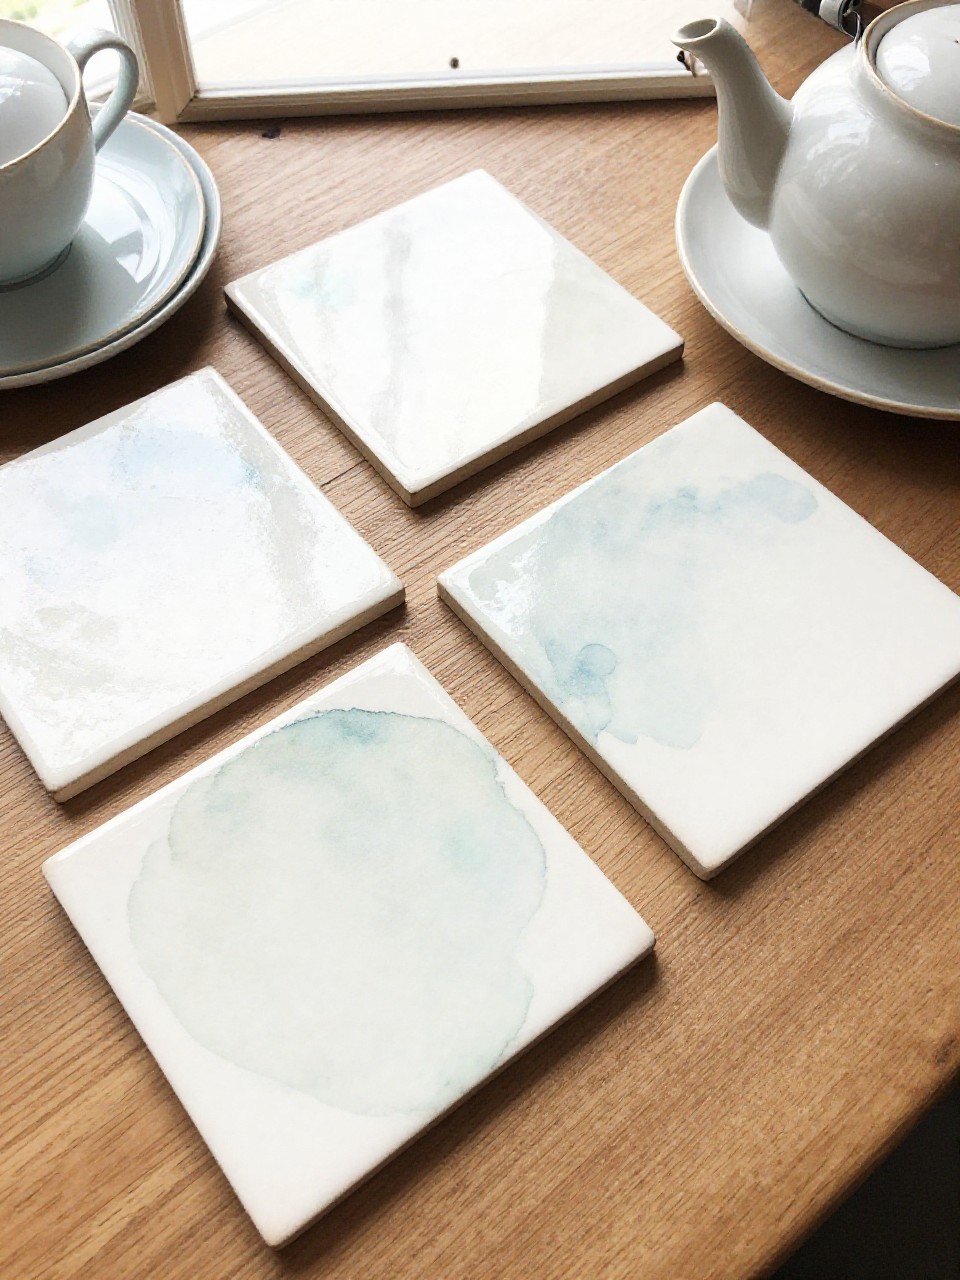
Soft, marbled tiles that look like watercolor art but handle heat. Pretty and practical on the dining table.
Materials Needed:
- Plain white ceramic tiles
- Alcohol inks or watered-down alcohol markers
- Felt pads
How to make it:
- Drop ink onto tile; mist with isopropyl alcohol to bloom colors.
- Tilt tile for organic flow; let dry.
- Seal with heat-resistant clear spray.
- Add felt pads to the back.
13. Plaster-Dipped Faux Peonies
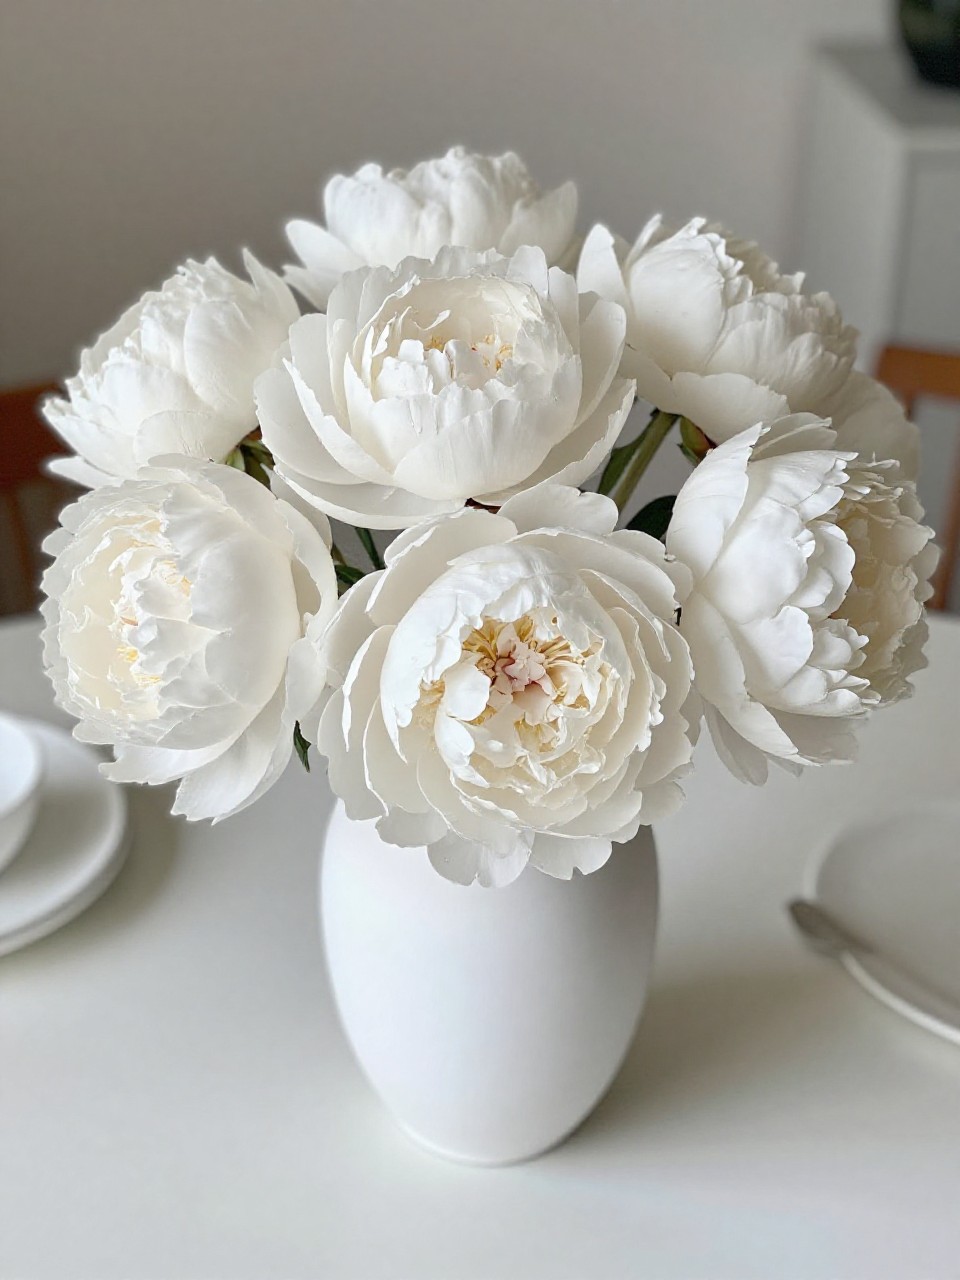
Soft, chalky blooms that look like sculptural art. Style them in a vase for a modern, romantic centerpiece.
Materials Needed:
- Silk peonies or faux flowers
- Plaster of Paris
- Skewers or floral wire
How to make it:
- Mix plaster to a yogurt-like consistency.
- Dip flower heads lightly, shaking off excess.
- Let dry upright by sticking stems into foam.
- Arrange in a vase once fully set.
14. Marbled Clay Trinket Dishes
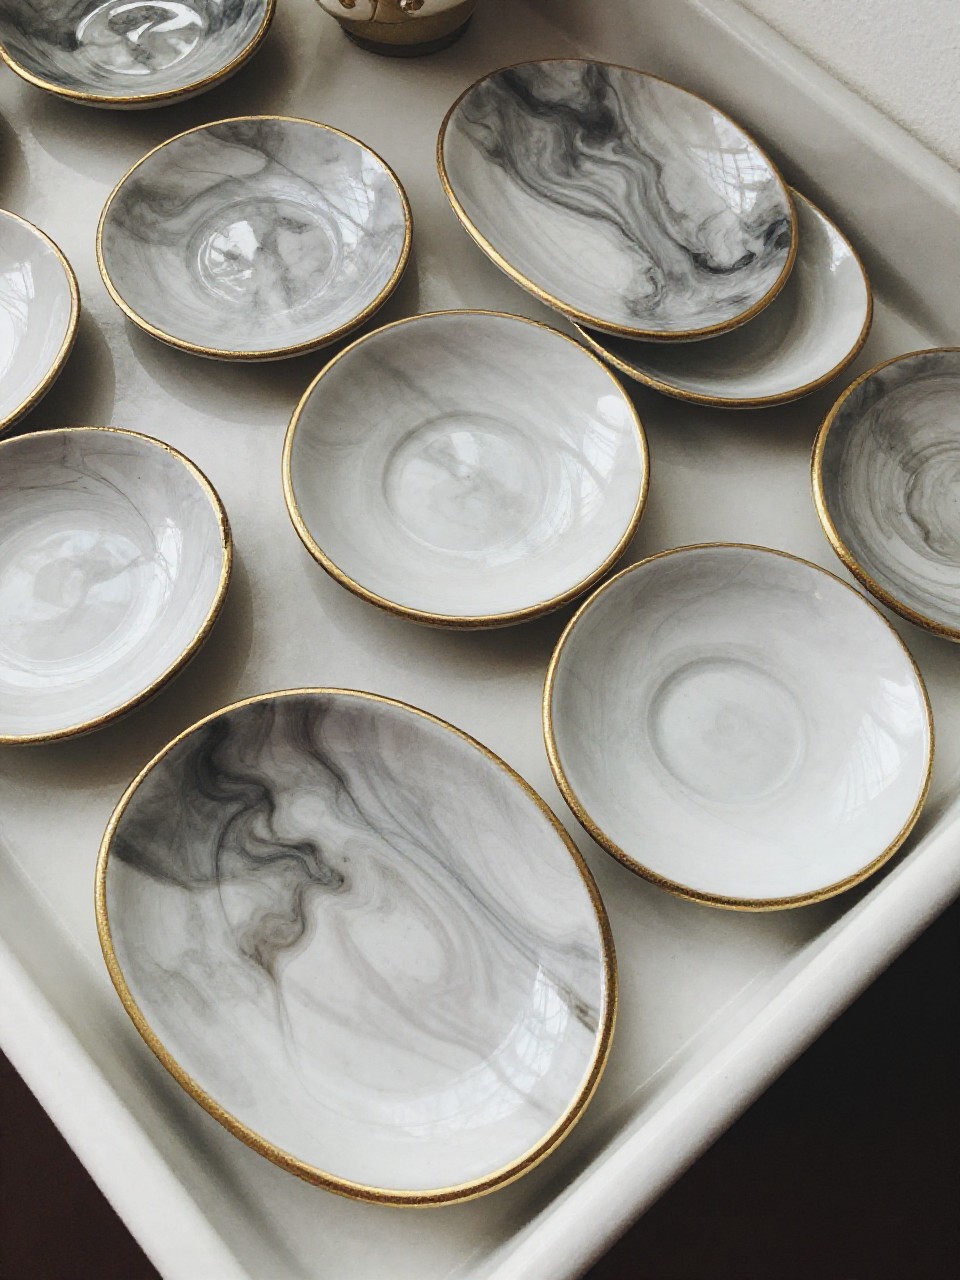
Swirly, candy-like dish that holds keys, rings, or loose change. Each one looks like boutique ceramics.
Materials Needed:
- Polymer clay (2–3 colors)
- Rolling pin or glass bottle
- Gold paint pen (optional)
How to make it:
- Roll clay colors into ropes and twist together; fold and twist again.
- Flatten with a rolling pin to reveal marbling.
- Cut a circle, mold edges upward into a shallow dish.
- Bake, cool, and highlight rim with a gold paint pen.
15. Dried Citrus Garland With Eucalyptus
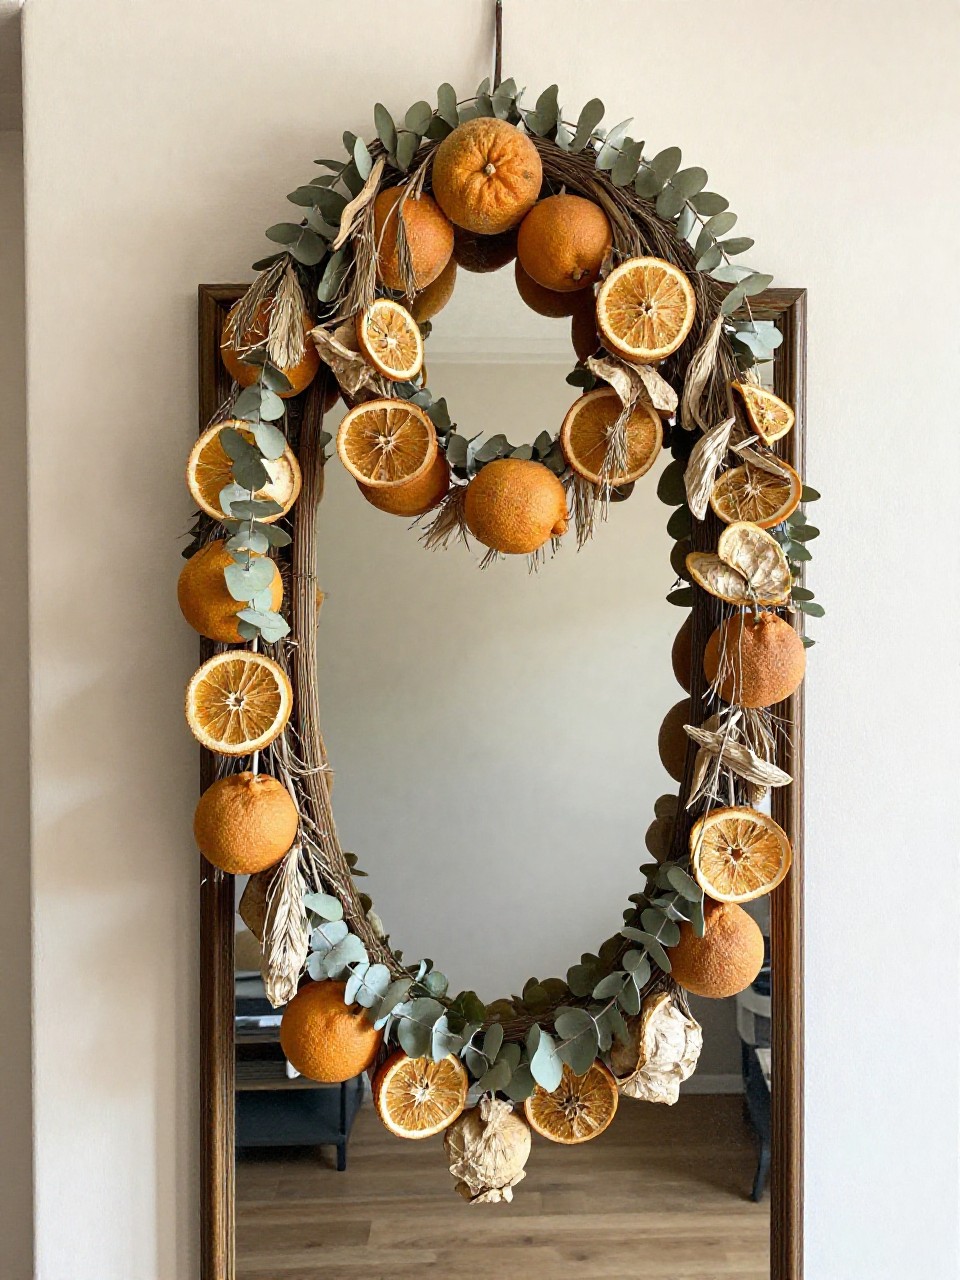
Sunny slices and greenery for a fresh, fragrant look. It brightens mantels, mirrors, or windows.
Materials Needed:
- Oranges/lemons
- Twine
- Dried eucalyptus sprigs
How to make it:
- Slice citrus thinly and dry in a low oven until crisp.
- Thread slices and eucalyptus onto twine with a needle.
- Space elements evenly and tie knots to hold.
- Hang and adjust clusters.
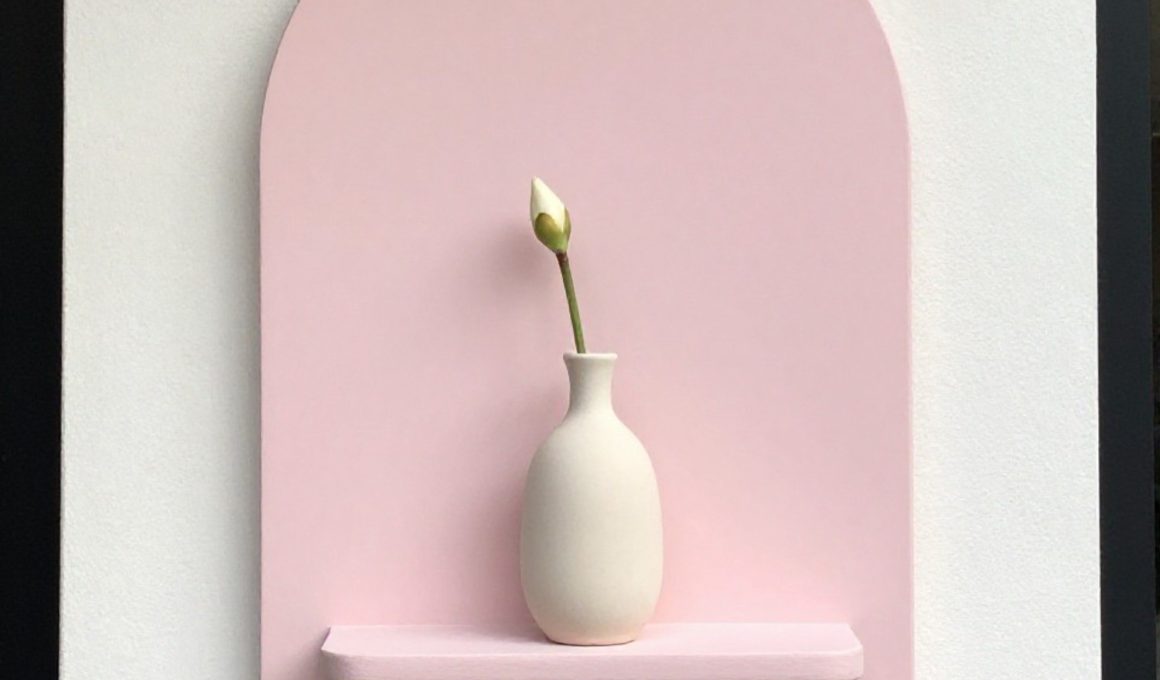
16. Painted Arch Wall Plaque Shelf
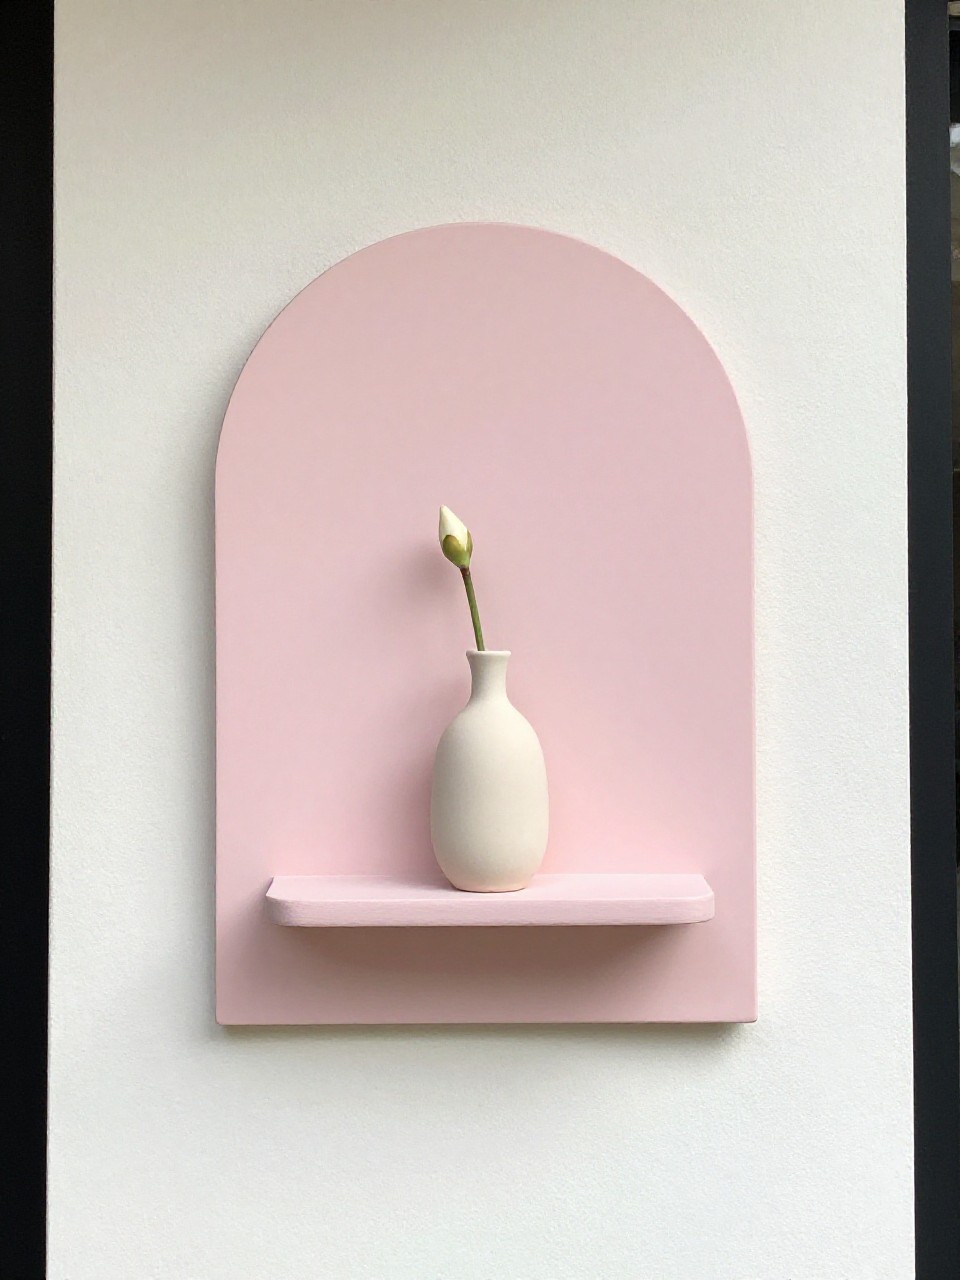
A mini wall accent that holds a tiny vase or candle. The arch shape feels modern and soft.
Materials Needed:
- Wood plaque (arch or rectangle you’ll round)
- Small wood ledge or scrap
- Paint
How to make it:
- Lightly sand and paint the plaque in a soft spring color.
- Attach the mini ledge with wood glue; clamp to dry.
- Add a second paint coat for a smooth finish.
- Hang and style with a bud vase.
17. Fabric-Covered Books for Color Blocking
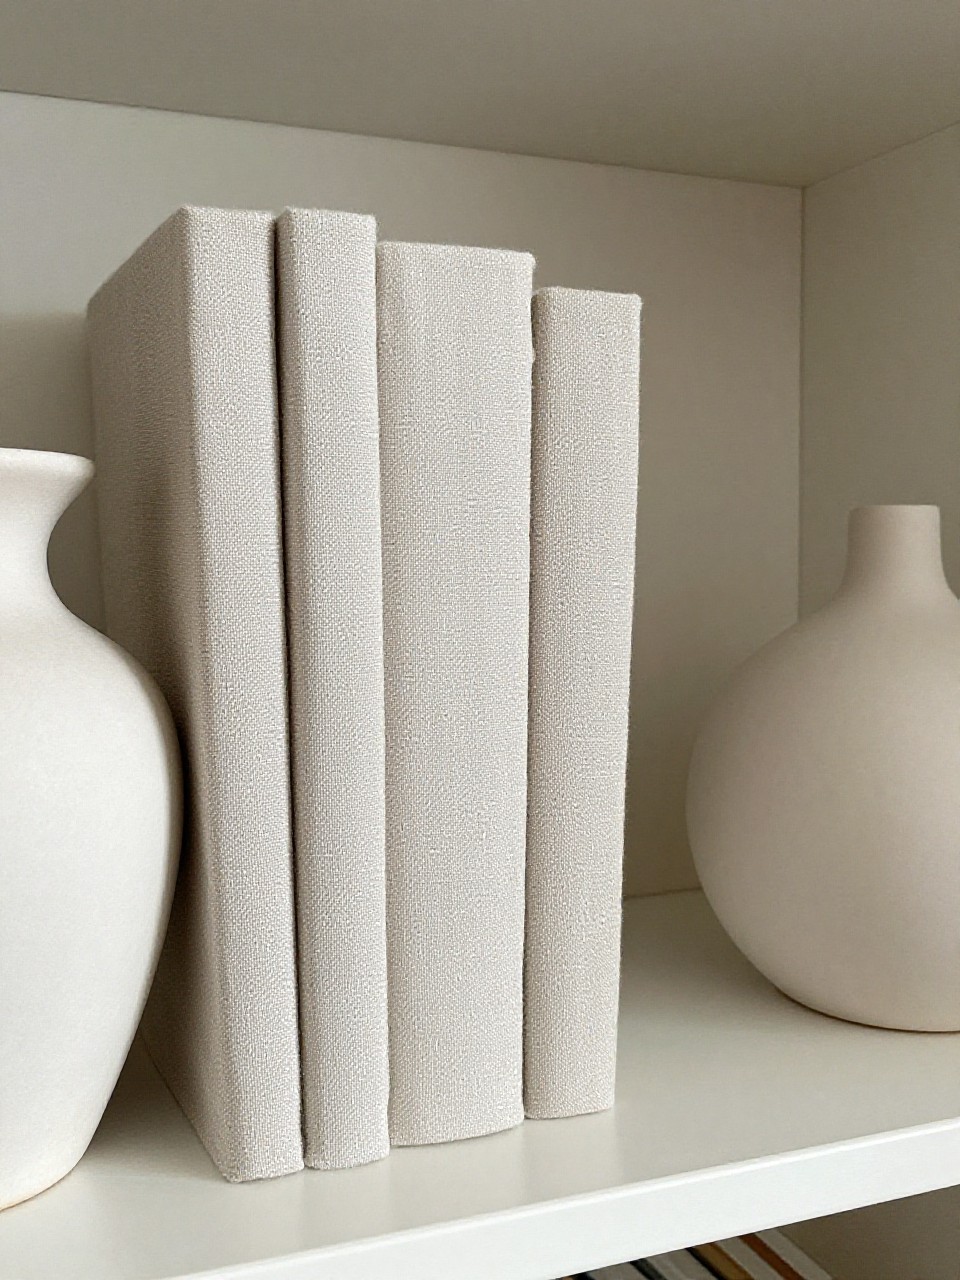
Give old books a calm, curated look with linen or cotton covers. They make shelves feel styled and intentional.
Materials Needed:
- Scrap fabric (linen/cotton)
- Double-sided tape or fabric glue
- Scissors
How to make it:
- Cut fabric with 1–2 inches extra around the book.
- Wrap and fold like a gift; secure flaps inside covers with tape/glue.
- Smooth wrinkles and crease edges neatly.
- Stack by color for a block effect.
18. Mossy Spring Letter Monogram
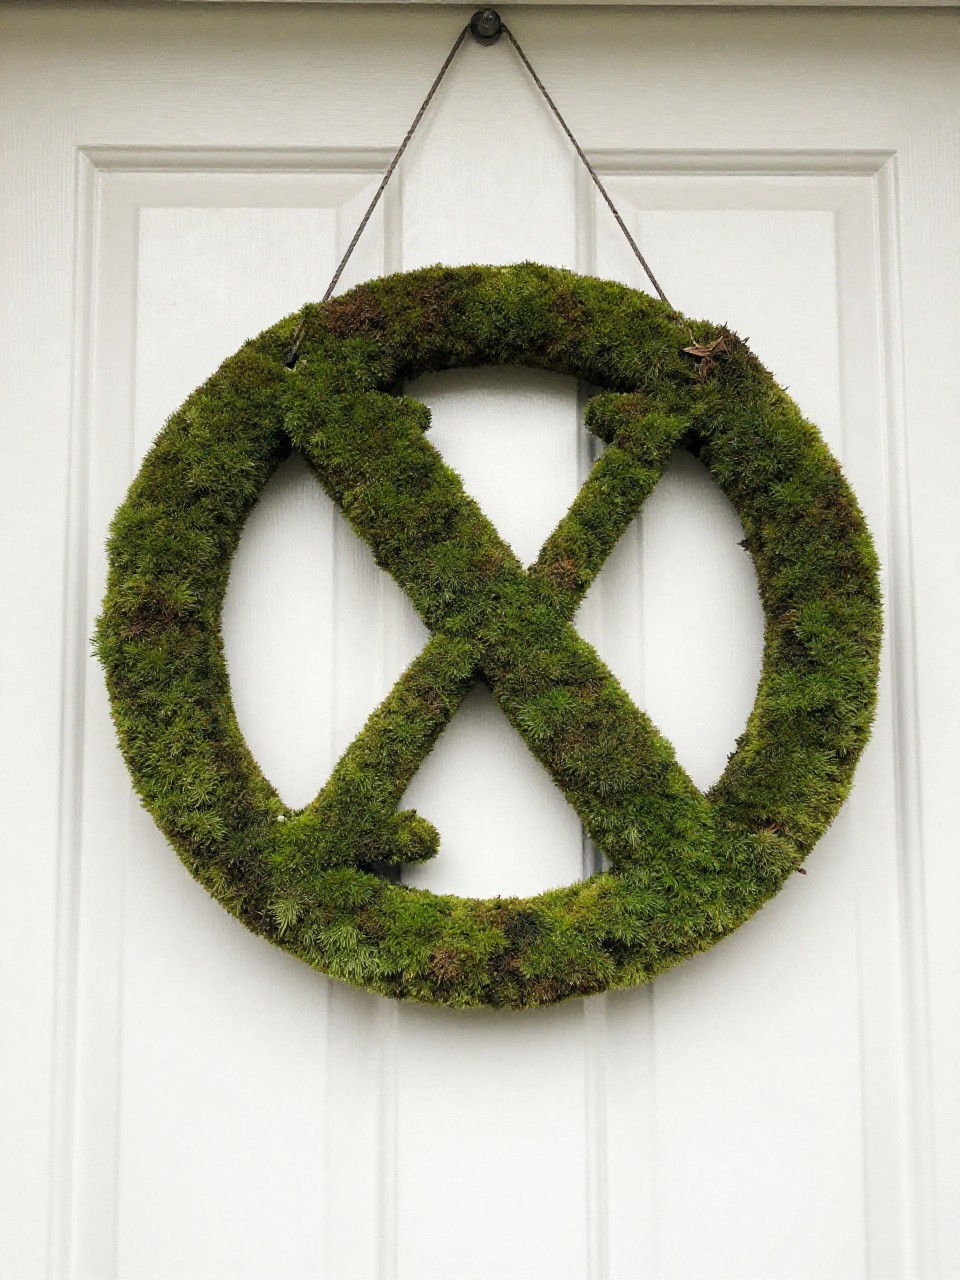
A lush, nature-inspired letter that feels like a mini garden. Hang it on a door or prop it on a shelf.
Materials Needed:
- Cardboard or wood letter
- Sheet moss or preserved moss
- Hot glue
How to make it:
- Cut moss to fit the letter’s front face.
- Hot glue pieces tightly, filling gaps for a plush look.
- Trim edges clean with scissors. Add a ribbon loop for hanging or stand it upright.