In This Article Show
Summer break can feel long when you’re trying to keep kids busy without spending much. If you’re looking for simple, sunny-day projects or rainy-day fun, these Dollar Tree summer crafts will help.
Each idea uses easy supplies you can find for a dollar or less and turns them into bright, seasonal makes. Let’s jump into fun, budget-friendly crafts that spark creativity and keep hands happily making all summer long.
1. Seashell Shadow Box Frame

This craft looks like a mini beach scene inside a simple picture frame, filled with shells and a sandy bottom. Kids love arranging shells like a treasure display, and it feels extra special to make a “souvenir” from summer days. Beginner friendly.
Materials Needed:
- Dollar Tree picture frame (with backing)
- Small bag of craft sand or play sand
- Assorted faux or real seashells
- White glue or hot glue (adult help)
- Small scrap of blue paper (optional sky)
How to make it:
- Remove the glass and place a blue paper “sky” behind the frame backing if you like.
- Spread a layer of glue along the bottom and sprinkle sand to make a beach.
- Arrange and glue seashells in layers for a 3D effect.
- Let dry fully, reassemble frame, and stand it up for display.
2. Pool Noodle Boat Racers
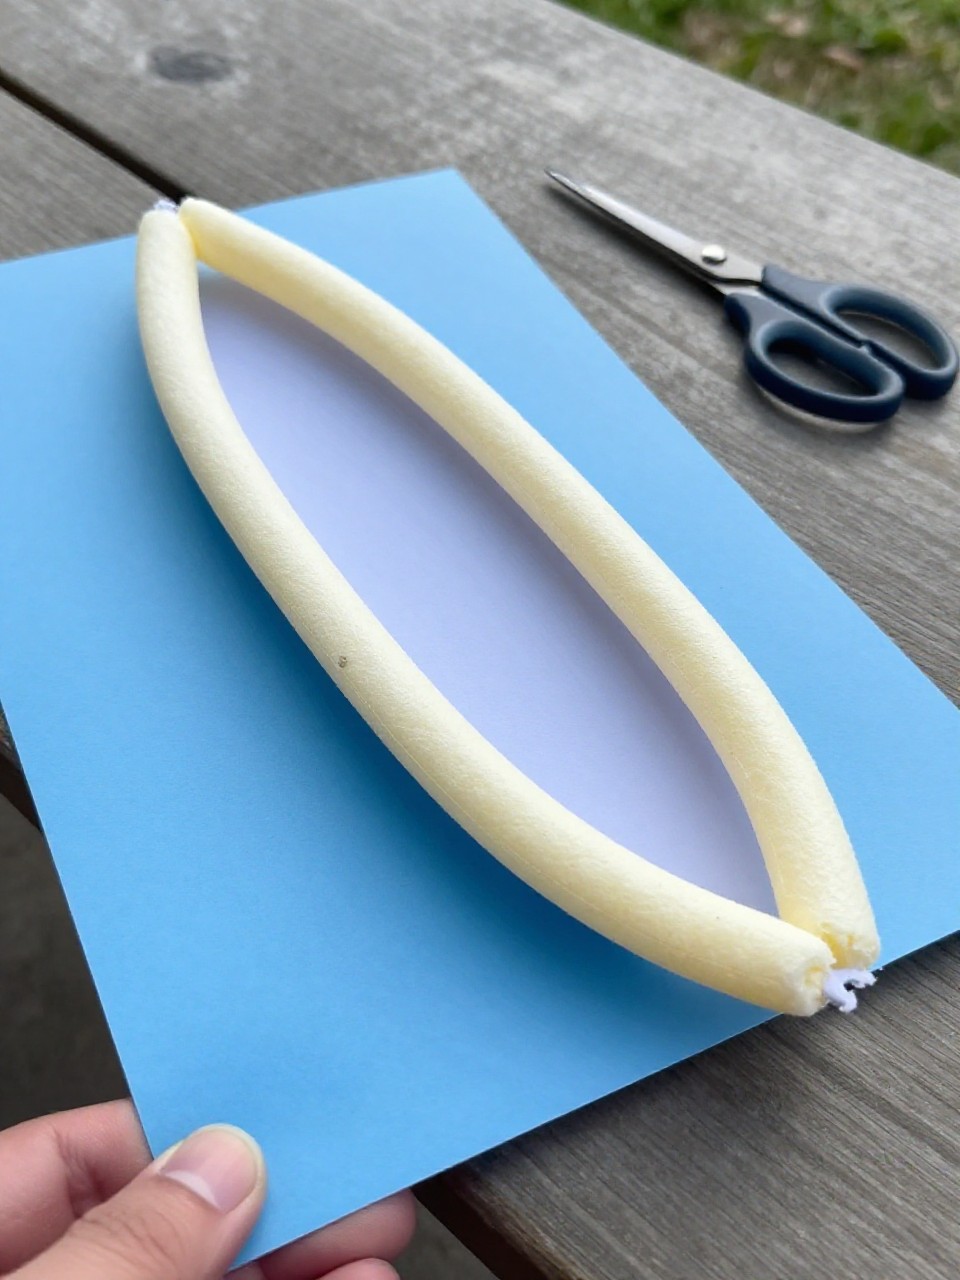
These tiny boats are made from sliced pool noodles with a bright paper sail and a straw mast. Kids enjoy racing them in a kiddie pool or sink and decorating each boat with their own colors and flags.
Materials Needed:
- Pool noodle (cut into 1–2 inch slices)
- Drinking straws
- Foam sheets or cardstock (for sails)
- Waterproof tape or glue dots
- Stickers or markers (optional)
How to make it:
- Slice the pool noodle into “boat” rounds.
- Cut a triangle sail from foam or cardstock and poke it onto a straw.
- Insert the straw into the noodle center and secure with tape if needed; decorate.
- Test float and race in water; let dry between uses.
3. Sunburst Clothespin Wreath

The finished piece is a cheerful sun shape made from painted clothespins clipped around a wire wreath form. Kids love snapping on the pins and choosing sunny yellows and oranges for a bright, happy door decoration.
Materials Needed:
- Wire wreath ring (small)
- Wooden clothespins (about 40–50)
- Acrylic paint (yellow/orange)
- Paintbrush
- Ribbon for hanging (optional)
How to make it:
- Paint clothespins in shades of yellow and orange; let dry.
- Clip pins evenly around the wreath ring to form a sunburst.
- Add layered colors or simple dots for texture.
- Tie a ribbon loop and hang on a door or wall.
4. Mason Jar Beach Lantern

This lantern looks like a sandy shoreline inside a jar with a tea light glowing over shells and tiny pebbles. Kids enjoy layering sand and shells and watching it sparkle on summer nights.
Materials Needed:
- Glass mason jar
- Battery tea light
- Craft sand and small pebbles
- Mini seashells
- Twine or ribbon (optional)
How to make it:
- Pour a thin layer of sand, then pebbles, into the jar bottom.
- Nestle shells around the sides for a beach look.
- Place the tea light on top and test the glow.
- Tie twine around the jar rim for a coastal touch.
5. Popsicle Stick Watermelon Coasters

These coasters look like round watermelon slices made from painted craft sticks glued into a disc. Kids love the easy painting and the cute summer fruit pattern they can use at snack time.
Materials Needed:
- Jumbo craft sticks
- Cardboard circle (as backing)
- Acrylic paint (red, green, white, black)
- White glue
- Scissors
How to make it:
- Cut a cardboard circle and glue craft sticks across it, trimming edges to a round.
- Paint the center red, a thin white ring, and a green rind outside.
- Dot on black “seeds.”
- Let dry and use under cups.
6. Summer Kite Suncatcher

This looks like a bright kite-shaped window hanging with translucent colors that glow in sunlight. Kids enjoy choosing color bits and seeing the light shine through their design.
Materials Needed:
- Clear contact paper
- Tissue paper squares
- Black construction paper (frame strips)
- Ribbon or yarn (kite tail)
- Hole punch
How to make it:
- Cut two kite-shaped pieces of contact paper.
- Stick tissue squares onto the sticky side, then frame edges with black strips.
- Seal with the second contact paper piece; punch a hole and tie a ribbon tail.
- Hang in a sunny window.
7. Ocean Animal Paper Plate Puppets

These are cute paper plate puppets shaped like fish, turtles, and octopuses with googly eyes and bold colors. Kids enjoy simple cutting and playing pretend ocean stories afterward.
Materials Needed:
- Paper plates
- Colored paper or foam sheets
- Googly eyes
- Craft sticks
- Markers, glue, scissors
How to make it:
- Cut paper plates into animal shapes (fish fins, turtle shell, octopus arms).
- Glue on colored paper details and googly eyes.
- Attach a craft stick handle to the back.
- Let dry and put on a puppet show.
8. Flip-Flop Door Hanger

This project becomes a cheerful door sign using foam flip-flops decorated with flowers and a welcome message. Kids love arranging the flip-flops in a row and adding bright stickers and ribbon.
Materials Needed:
- Foam flip-flops (Dollar Tree decor or kid-size)
- Hot glue or strong glue (adult help)
- Faux flowers or foam stickers
- Acrylic paint or paint marker
- Ribbon for hanging
How to make it:
- Arrange flip-flops side by side or in a fan shape.
- Glue them together, then add flowers or stickers.
- Write “Hello Summer” or a name with a paint marker.
- Glue on ribbon at the back and hang.
9. Beach Ball Garland
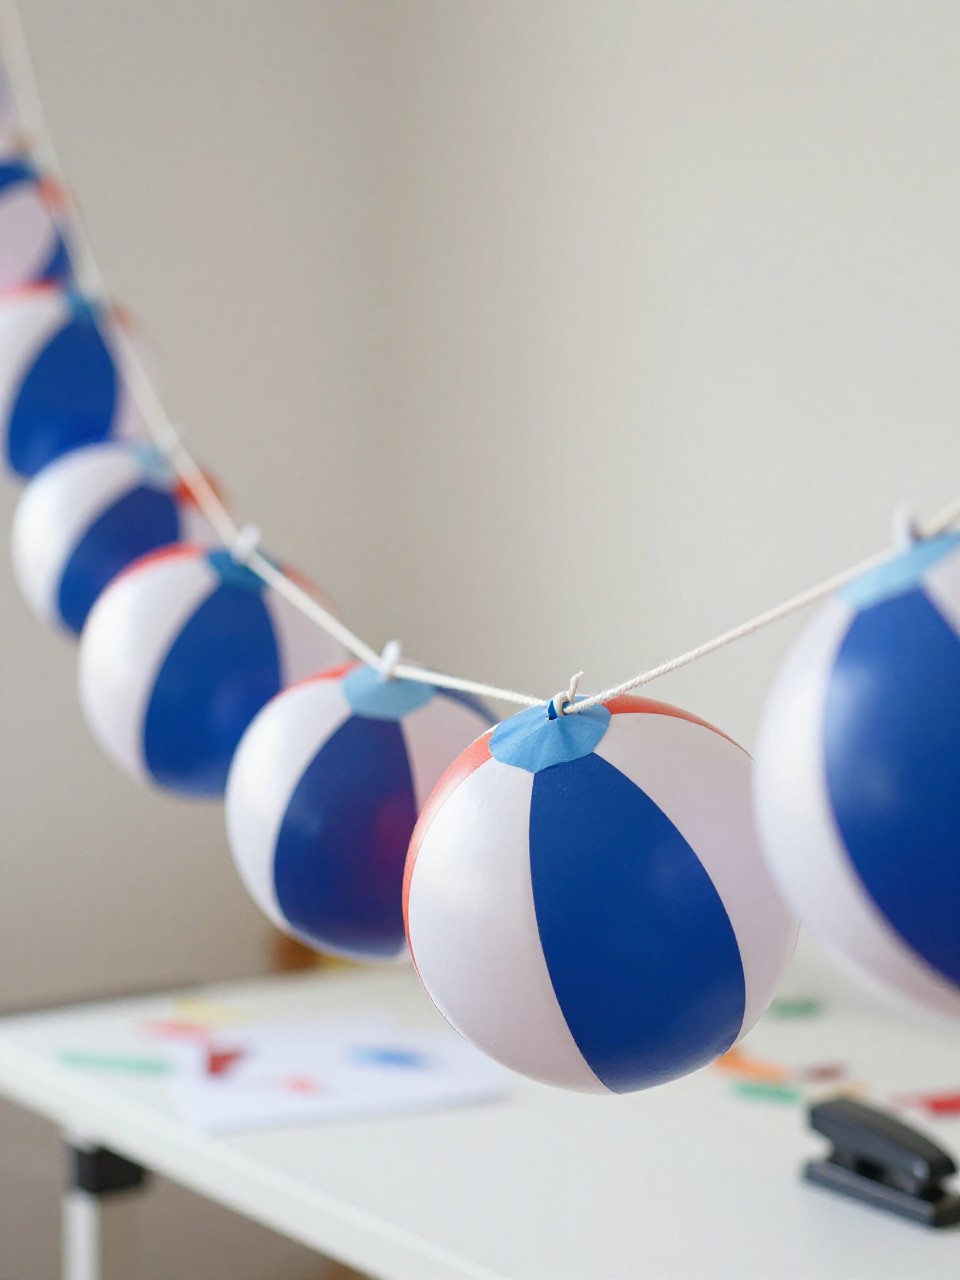
This garland looks like a string of mini beach balls made from colorful paper circles. Kids enjoy the repeating pattern and seeing it brighten a playroom or party table.
Materials Needed:
- Colored cardstock
- White cardstock
- Glue stick
- Hole punch
- Twine or string
How to make it:
- Cut equal-sized circles from colored and white cardstock.
- Glue colored wedge shapes onto white circles to mimic beach ball panels.
- Punch holes at the top and thread onto twine.
- Hang across a wall or mantel.
10. Nature Paintbrush Art Set

This make-and-create set uses clothespins and leaves or flowers to build “paintbrushes” for outdoor painting. Kids love experimenting with textures and making abstract summer art.
Materials Needed:
- Wooden clothespins
- Small leaves, herbs, or flowers
- Paper
- Washable paint
- Tray or paper plate palette
How to make it:
- Clip leaves or small flower bunches into clothespins to form brush heads.
- Pour paint onto a tray.
- Dab and sweep different “brushes” across paper to see textures.
- Dry art and display.
11. Tie-Dye Sharpie Beach Tote

The finished tote has soft tie-dye swirls made with Sharpies and rubbing alcohol on a plain canvas bag. Kids enjoy making their own summer bag for library trips or snacks.
Materials Needed:
- Plain canvas tote (Dollar Tree if available)
- Permanent markers in bright colors
- Rubbing alcohol (70%+)
- Dropper or spray bottle
- Cardboard insert (to protect inside)
How to make it:
- Place cardboard inside the tote to prevent bleed-through.
- Draw dots and simple shapes with markers.
- Drip or mist rubbing alcohol to blur and blend colors.
- Let dry completely before use.
12. Sandcastle Cardboard Village
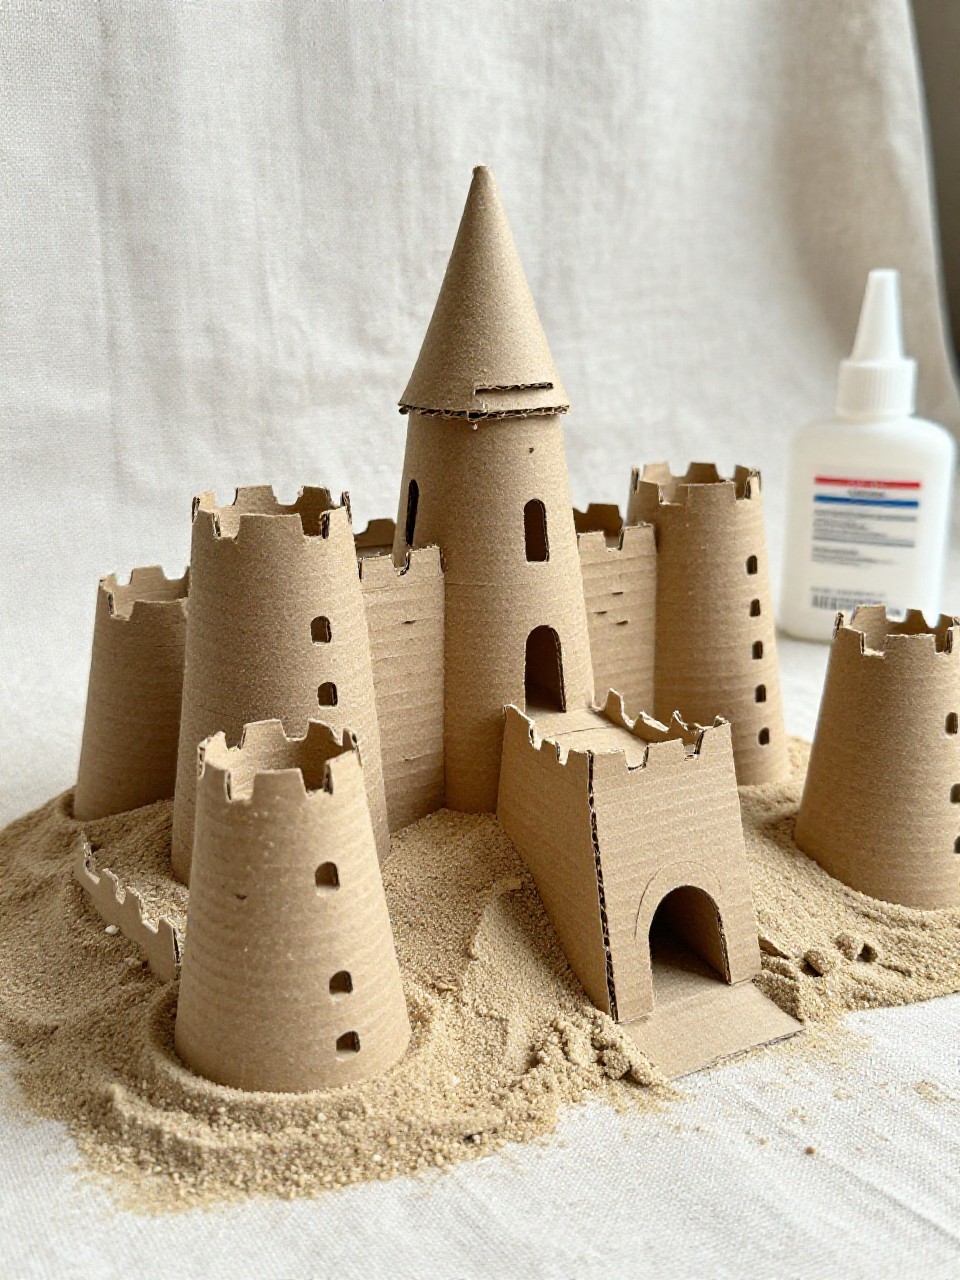
This looks like a set of small “sandcastle” buildings made from cardboard tubes rolled in sand with flag toppers. Kids love building a whole beach town and moving pieces around.
Materials Needed:
- Cardboard tubes and small boxes
- White glue
- Craft sand
- Toothpicks
- Colored paper (flags)
How to make it:
- Brush glue over tubes and boxes; roll in sand and let dry.
- Cut door and window shapes or draw them on.
- Make tiny flags from paper and toothpicks; stick into the tops.
- Arrange your village on a tray or shelf.
13. Citrus Slice Painted Flower Pots
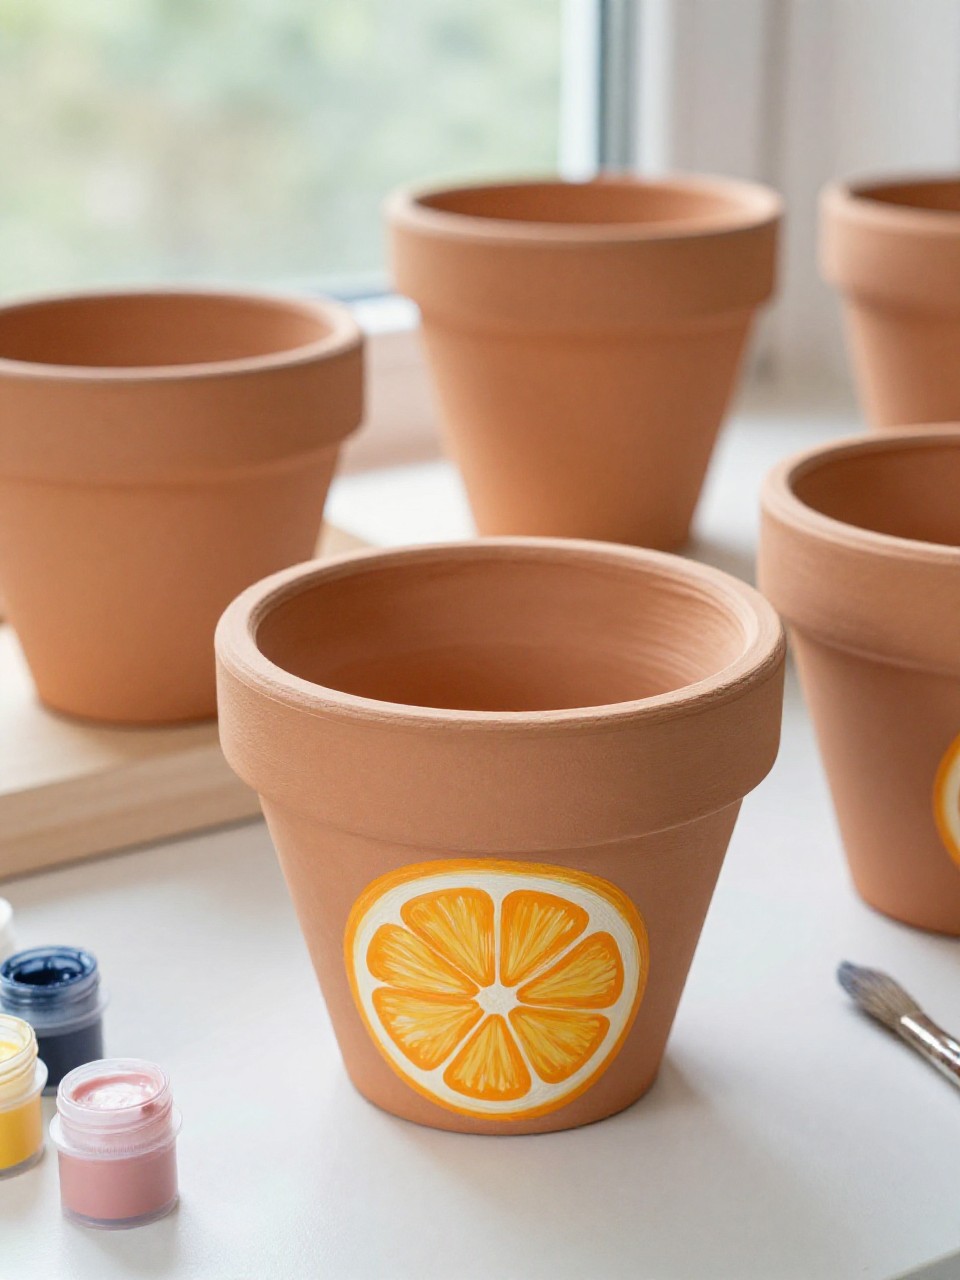
These are small terracotta-style pots painted like lemon, lime, and orange slices. Kids enjoy the bold, fresh colors and can plant herbs or faux succulents after.
Materials Needed:
- Small plastic or clay pots
- Acrylic paint (yellow, green, orange, white)
- Paintbrushes
- Pencil (for guide lines)
- Potting soil and small plant (optional)
How to make it:
- Paint pots in solid citrus colors; let dry.
- Lightly pencil wedge lines and paint white pith and segments.
- Add a second coat for crisp edges.
- Plant herbs or display empty as decor.
14. DIY Bug Catcher Jar

This is a simple observation jar with a mesh lid, leaf, and paper label for short-term bug watching in the yard. Kids enjoy gently observing summer insects, then releasing them.
Materials Needed:
- Plastic jar or lidded container
- Mesh or tulle fabric
- Rubber band or twine
- Leaf or small twig (habitat)
- Paper and marker (label)
How to make it:
- Cut out the jar lid center and replace with mesh, securing with a rubber band or twine.
- Add a clean leaf or twig inside.
- Make and stick on a simple “Bug Spot” label.
- Observe bugs briefly and release outdoors.
15. Rainbow Sprinkler Bottle Wand

This craft becomes a playful water wand using a recycled plastic bottle with poke holes and colorful ribbon. Kids love running through the gentle spray on hot days.
Materials Needed:
- Empty plastic water bottle with cap
- Nail or push pin (to poke holes; adult help)
- Duct tape
- Colorful ribbon
- Garden hose (optional adapter using tape)
How to make it:
- Carefully poke small holes around the bottle sides and cap.
- Tape ribbon near the bottle neck for a rainbow tail.
- Fit the hose to the bottle opening and tape tightly, or fill and squeeze by hand.
- Play outdoors and enjoy the cool spray.