


In This Article Show
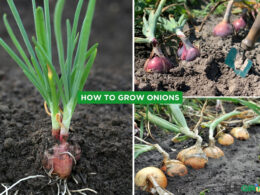
Onions are a staple in kitchens worldwide, known for their versatility in a variety of dishes, from savory soups to fresh salads. Not only are they relatively simple to grow, but cultivating your onions can also be a rewarding experience, providing you with a fresh supply of this essential ingredient right from your backyard or balcony. In this guide, we’ll walk through five simple steps to help beginners successfully grow onions at home.
Choosing the Right Onion Variety

Selecting the appropriate onion variety for your garden is a crucial first step in the growing process. Onions come in several varieties, each with unique flavors, textures, and colors suitable for different culinary uses and climates. Let’s explore the most common types and understand how to choose the best one for your needs.
Yellow Onions
Yellow onions are the all-purpose stars of the onion family. Known for their robust flavor that becomes sweet and caramelized when cooked, they are perfect for stews, sautéed dishes, and soups. Yellow onions are quite hardy and can be grown in most climates, but they thrive in moderate to cool weather. If you’re looking for a reliable performer in the garden that pairs well with almost any dish, yellow onions are a solid choice.
Red Onions
With their vibrant color and mild to sweet flavor, red onions are ideal for fresh uses such as salads, sandwiches, and garnishes. They prefer slightly warmer climates than yellow onions but are still versatile enough to grow in a variety of conditions. Red onions can also be pickled, which preserves their color and adds a zesty flavor to meals.
White Onions
White onions, with their sharp and crisp flavor, are often used in Mexican and Southwestern cuisines. They are excellent for salsas, and chutneys, and as a raw ingredient in recipes where a strong onion presence is desired. These onions tend to grow best in warmer climates and can be a bit more sensitive to cold temperatures compared to their yellow and red counterparts.
Tips for Selecting the Best Variety
- Consider Your Climate: Check the typical growing conditions in your area. Some onions, like the yellow variety, are more tolerant of cooler temperatures, while others, like white onions, prefer warmth.
- Think About Your Cooking Needs: Reflect on what dishes you enjoy cooking and eating. If you love making hearty roasts or caramelized onions, go for yellow onions. If fresh salads or salsas are more your style, red or white onions might be better suited.
- Check Local Advice: Local nurseries or gardening groups can offer advice tailored to your area, which can be invaluable in choosing the best onion variety for your garden.
Step-by-Step Guide to Planting

Planting onions successfully starts with understanding the best timing, the right location, and how to prepare the soil. Here’s a clear and straightforward guide to help you get your onion plants off to a great start.
When and Where to Plant Onions
- Timing: Onions are typically planted in early spring, as soon as the soil can be worked. In regions with milder winters, you can also plant onions in late fall; they will overwinter and resume growing early in the spring.
- Location: Choose a spot in your garden that receives at least 6 hours of sunlight daily. Onions grow best in areas where they can receive plenty of direct sunlight, which is crucial for their development.
Soil Preparation
- Soil Type: Onions prefer well-drained, loamy soil. Poor drainage can lead to rotting, so if your soil is heavy or clayey, consider amending it with compost or peat moss to improve drainage.
- pH Level: The ideal soil pH for onions is between 6.0 and 6.8. If you’re unsure about your soil pH, a simple soil test can provide you with this information.
- Nutrients: Before planting, enrich your soil with a balanced fertilizer or aged compost. Onions are heavy feeders and require adequate nutrients to grow large and healthy.
Spacing Requirements
- Rows: Plant onions in rows that are about 12 to 18 inches apart. This spacing allows adequate airflow between the plants, reducing the risk of disease.
- Plants: Space onion sets or plants about 4 to 6 inches apart. Giving them enough room to grow helps ensure they develop into full-sized bulbs.
Planting Onion Sets or Seeds
Using Onion Sets
- Dig a small hole and place the onion set in it with the root end down and the tip just slightly above the surface of the soil.
- Gently cover the set with soil and pat down lightly.
- Water thoroughly after planting.
Using Onion Seeds
- Sow seeds directly into the soil about 1 inch apart in rows.
- Cover lightly with soil. When seedlings grow to a few inches tall, thin them out so that they are 4 to 6 inches apart.
- Keep the area weed-free and water regularly to maintain even soil moisture.
Harvesting and Storing Onions

Harvesting onions at the right time and storing them properly is key to enjoying your crop long after the growing season ends. Here’s how to identify the right time to harvest, the correct way to harvest, and best practices for storing onions.
Signs That Your Onions Are Ready for Harvest
- Toppling Tops: One of the clearest signs that onions are ready to be harvested is when the tops (green shoots) begin to fall over and yellow. This typically occurs late in the summer.
- Bulb Size: Check the size of the onion bulbs. They should be well-formed and feel firm. The outer layers will also start to feel papery.
- Development: Onions are ready when the area around the neck (where the bulb meets the shoots) starts to constrict and the outer layers begin drying.
How to Harvest Onions Without Damaging Them
- Use the Right Tools: Employ a garden fork or a spade to loosen the soil around the onions. Be careful not to pierce or bruise the bulbs as this can make them susceptible to decay during storage.
- Lift Gently: Carefully lift the onions out of the soil with your hands. Avoid pulling on the tops as they might break off.
- Shake Off Soil: Gently shake off any excess soil from the bulbs, but do not wash them, as moisture can promote rot during storage.
Best Practices for Curing and Storing Onions
Curing Onions
- Lay the harvested onions out in a single layer in a dry, well-ventilated area, such as a shed or a garage. If the weather is dry, you can also cure them outside under a cover.
- Allow the onions to cure for several weeks until the outer layers are crispy and the roots have dried up. This process helps seal the outer layers, protecting the inner bulb.
Storing Onions
- Once cured, trim the roots and cut the dried tops off about 1 inch above the bulb.
- Store onions in a cool, dry place with good air circulation. Mesh bags or netted baskets are ideal as they allow air to circulate to each onion.
- Keep onions in a dark place to prevent them from sprouting. Ideal storage temperatures are between 40 to 50 degrees Fahrenheit (4 to 10 degrees Celsius).
- Regular Checks: Periodically check your stored onions for any signs of soft spots or sprouts. Remove any compromised onions to prevent them from affecting others.
By following these steps for harvesting and storing, you can maximize the shelf life of your onions, ensuring a steady supply of this versatile vegetable throughout the colder months.